Parivrtta Ashta Chandrasana - Revolved Crescent Moon

PROPPED OR UNPROPPED TWIST
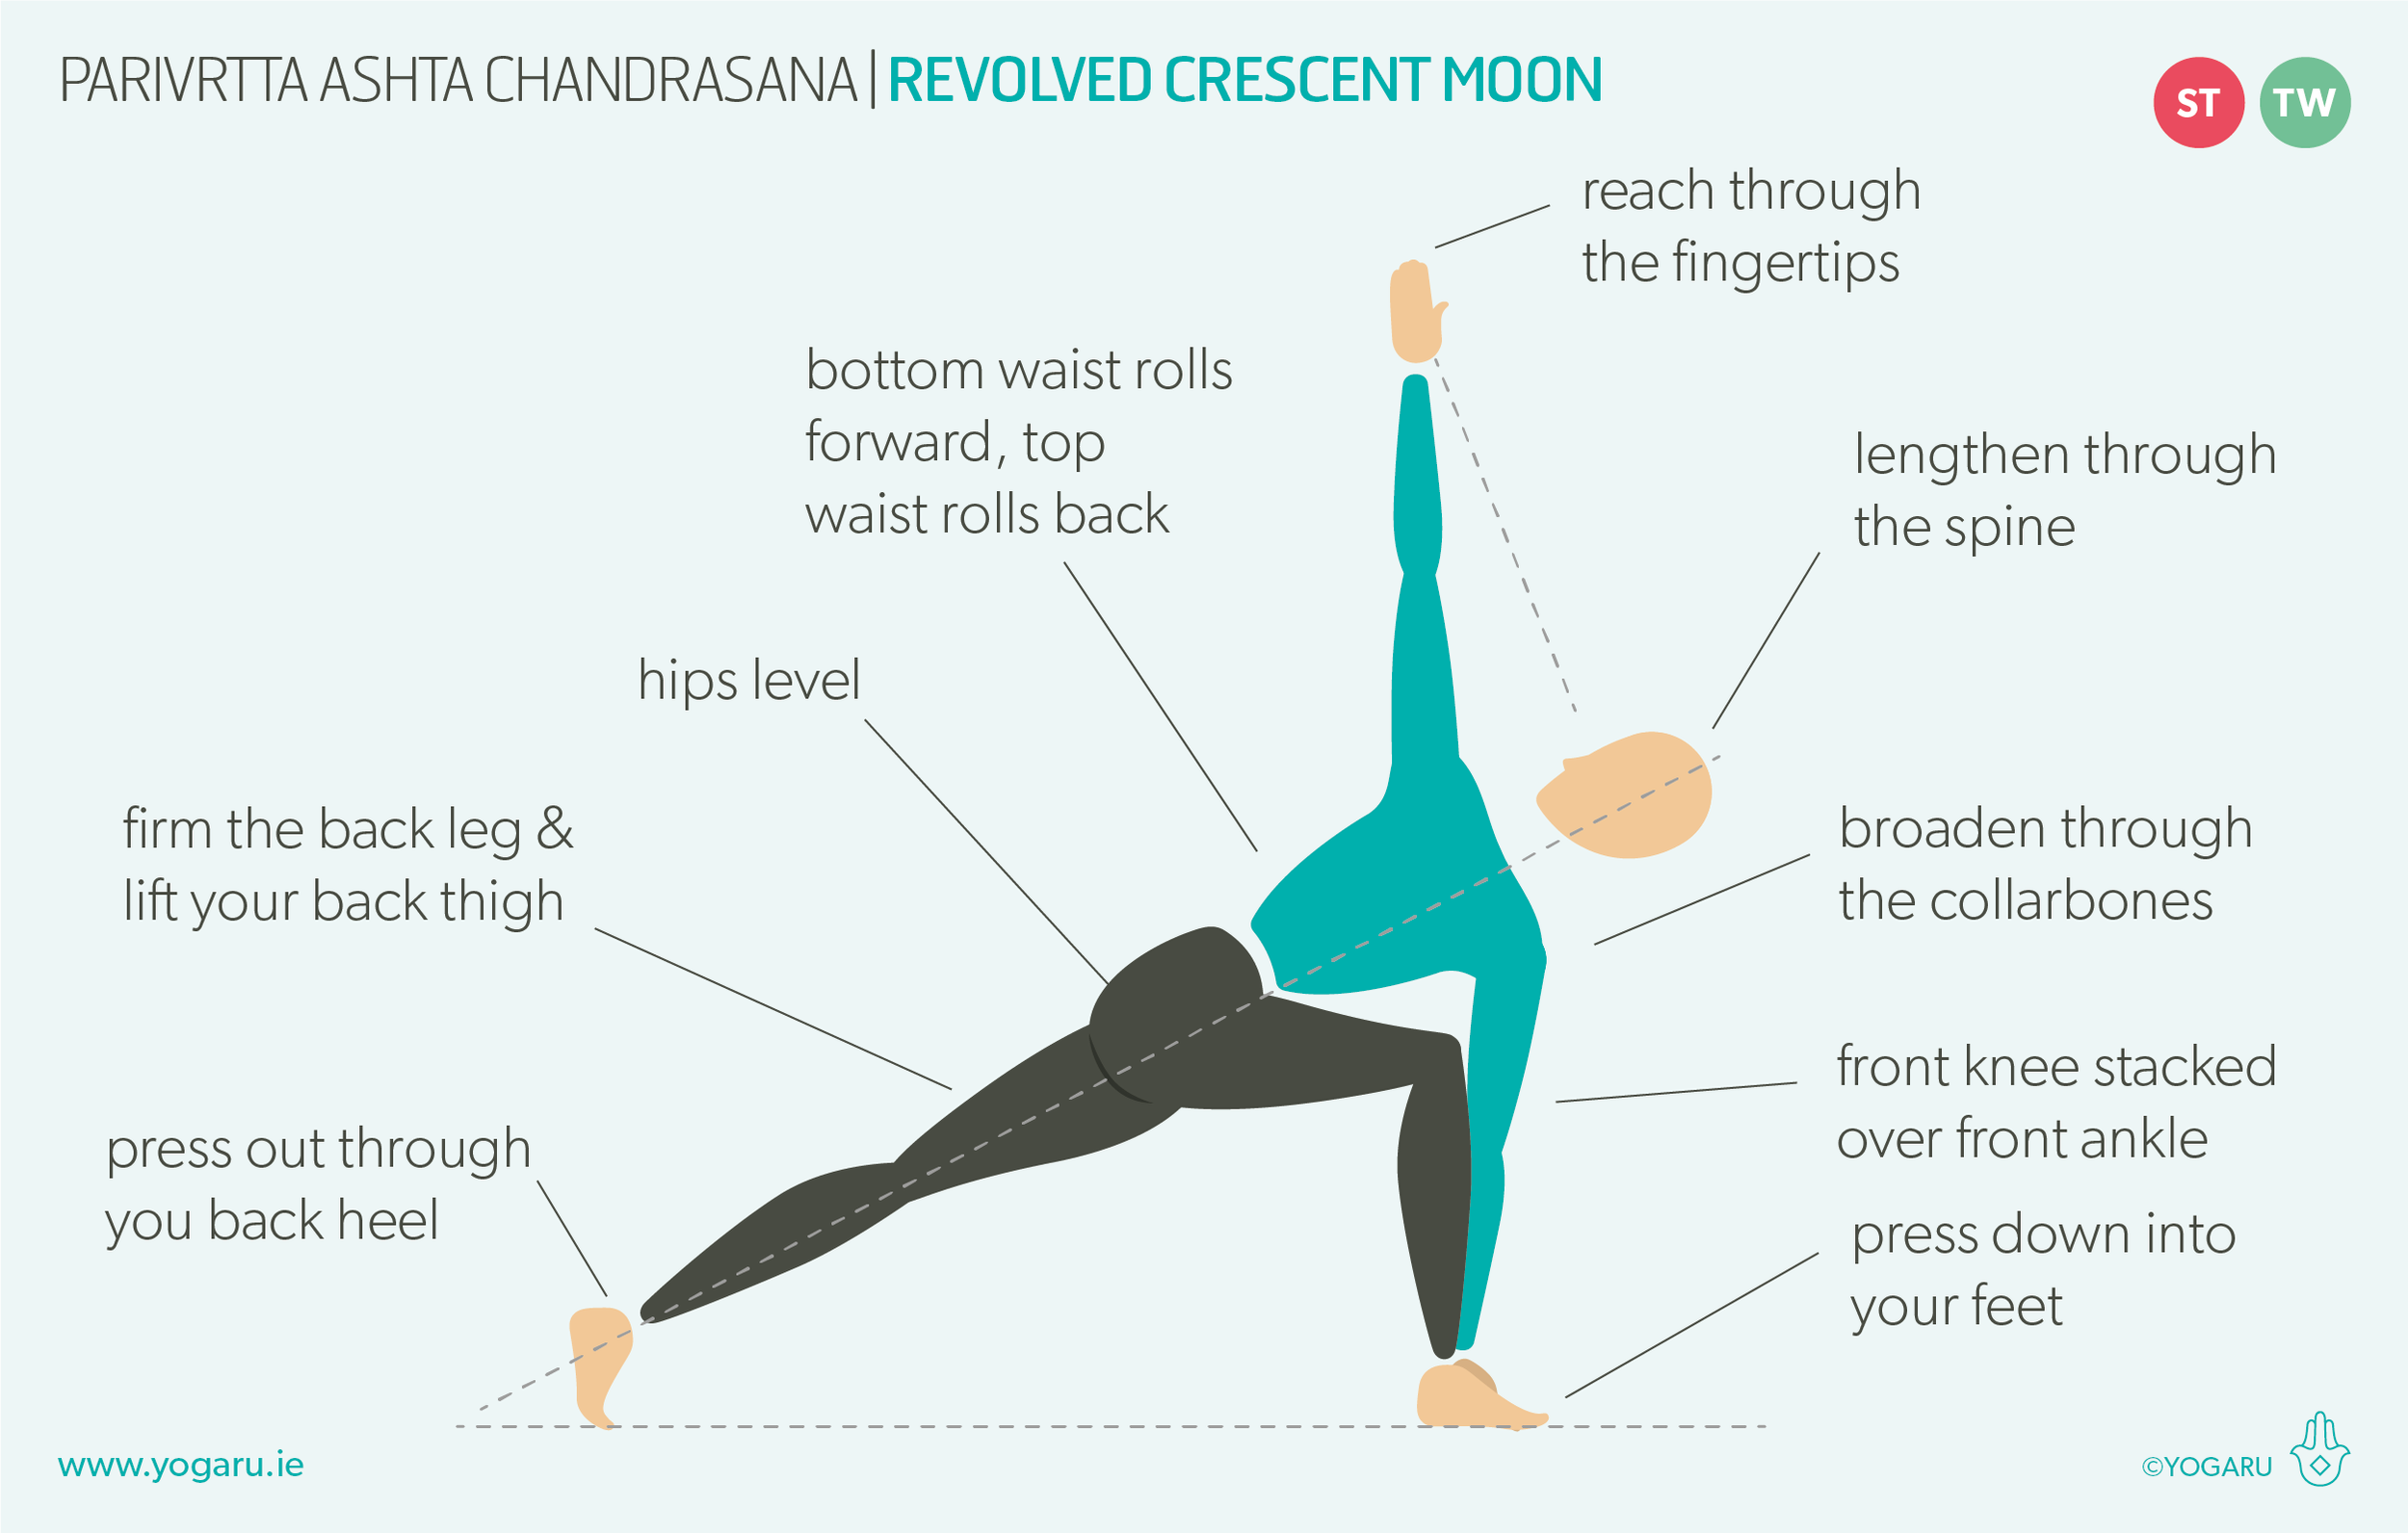
There are lots of great twisted versions of Parivrtta Ashta Chandrasana/Revolved Crescent Moon. In this version you get an extra bit of compression and massage of the organs of the abdominal region with the torso tilted forward. With the lower hand firmly planted on the ground, or a brick, it gives you a surface to press into to facilitate the twist, add the expansion of the top arm. Aided twists, which use the help of the prop of a hand pressing into the ground or an elbow pressing against a knee, help you get a deeper twist that stretches the muscles around the spine and core. Unaided twists, which are twists that work without a prop to facilitate your twist, are more strengthening to the muscles around the spine and core. Parivrtta Ashta Chandrasana/Revolved Crescent Moon is an aided twist. We will look at unaided twists too to give you the opportunity to both stretch and strengthen the area.

When we twist we reach the end of our twist by either the muscles ability to stretch and facilitate the twists or when vertebrae bone hits vertebrae bone. When you are coming into a twist, in this sequence or any time you practise a twist, give your spine its best chance to take the twist by deeply inhaling and lengthen the spine, before you exhale into your twist. This way you are opening the space between the vertebrae to twist with.

THE BENEFITS OF PARIVRTTA ASHTA CHANDRASANA/REVOLVED CRESCENT MOON
Parivrtta Ashta Chandrasana/Revolved Crescent Moon strengthens the spine, arms, shoulders, hip flexors and quads of the front leg, and the glutes of the back leg. It also stretches the hip flexors and quads of the back leg and the glutes of the front leg. As a standing pose it builds focus, heat, stamina and strength; increases energy, circulation and metabolism, and improves posture and coordination. As a twist pose it aids detoxification, digestion, boosts the immune system, and eases constipation, stress tension and anxiety.

Twists massage all the organs of the abdominal region – aiding maximum nutrition absorption in the digestive system and toxin elimination through the bowel and kidneys. When we twist we constrict the blood flow, and in releasing the twist a surge of blood rushes back – bringing with it a fresh supply of oxygen and flushes out toxins. Other than the obvious benefit of the squeeze to the bowels in elimination, it is more the increase in circulation that twists offer that help to clean the system of the body.

EXPLORING PARIVRTTA ASHTA CHANDRASANA/REVOLVED CRESCENT MOON IN YOUR PRACTICE
This sequence gives you plenty of versions of Parivrtta Ashta Chandrasana/Revolved Crescent Moon. You will start preparing for your peak pose in the first line with Parivrtta Utkatasana/Revolved Chair and will continue to capitalise on the work you have put into your twists by exploring some seated twists at the end of your practice.

As with Ashta Chandrasana/Crescent Moon the temptation is to let the hips sink down with gravity in Parivrtta Ashta Chandrasana/Revolved Crescent Moon. This increases your risk of overstretching the muscles around the hip joint. Activating the supporting muscles of the hips, hugging to the midline and keeping the hips level, will give you a more strengthening version of the pose. When we twist in this position there is a natural inclination to allow the hip we are twisting away from to drop down and the hip we are twisting towards to lift up. When you are in your version of the pose, glance at your pointy hip bones and make sure they are still level. You may need to back out of your twist a little to get your hips level again if your twist is pulling your right hip up.

ALIGNMENT CUES
Move slowly through this sequence and give your spine a chance to rejuvenate through the twists and the organs of the body to enjoy the rush of fresh blood as you come out of the twist.

Have a read of the tips below and either print out the sequence or save it onto your device:

  • From Adho Mukha Svanasana, inhale, step your right foot just inside your right hand, exhale here.

  • Ground your left hand to the left of your right foot, place your right hand on your right knee.

  • Inhale, lengthen through the spine, exhale, twist to the right from the waist, reach your right arm up high, palm facing right.

  • Broaden through the collarbones, stack your shoulders, bottom waist rolls forward, top waist rolls back, gaze to your right or to your right fingertips.

To save the images for personal use click and hold down the image until the ‘save image’ option appears; on Mac hold down ‘control’ and click the image to get the option box; on PC right click on the image to get the option box. Scroll down in the ‘option box’ and click ‘save image’.

Ruth Delahunty Yogaru

Everyday balance

BALANCE FOR LIFE
Balancing is a life skill that is important to nurture all the way through life. Similar to the life skill of your ability to safely get up and down from the ground, it works on a principle of use it or lose it. Building balancing practices into your yoga routine will keep this life skill active and help prevent risk of fall at any age, particularly later in life when it becomes more serious. Adding standing balancing poses trains pathways in the brain for balance and builds confidence, good stability and quick reactivity into your everyday life. It is not just the muscles that will become stronger but also the vestibular system of the inner ears which is the sensory system that coordinates spatial awareness with balance and movement. Adding a few drills of balance training into every yoga session, regardless of whether it's in the sequence or not, will ensure you are continuing to nourish this important skill. When you have trained this skill you will build muscle memory and the brain pathways for balance and coordination that you can tap into subconsciously when you need it. Giving you quick reactive reflexes to prevent risk of fall.

BUILD FROM THE GROUND UP
Building standing balance = feet + legs + core + posture. Balance starts from a sturdy foundation from the ground up. When you press into your feet you activate the primary balancing muscles of the legs and hips. The more you press the more active this connection is. The core braces against gravity and is often where your centre of gravity is found when in an upright standing position. Good posture helps to keep the spine stacked against the pressure of gravity. The curves of the spine absorb impact and give us the ability to react and recentre as we sway from side to side when we move. Gravity is constantly pushing us down, good balance built from all these elements will help to keep you upright, steady on your feet and moving confidently in your everyday life.

EXPLORING EVERYDAY BALANCE IN YOUR PRACTICE
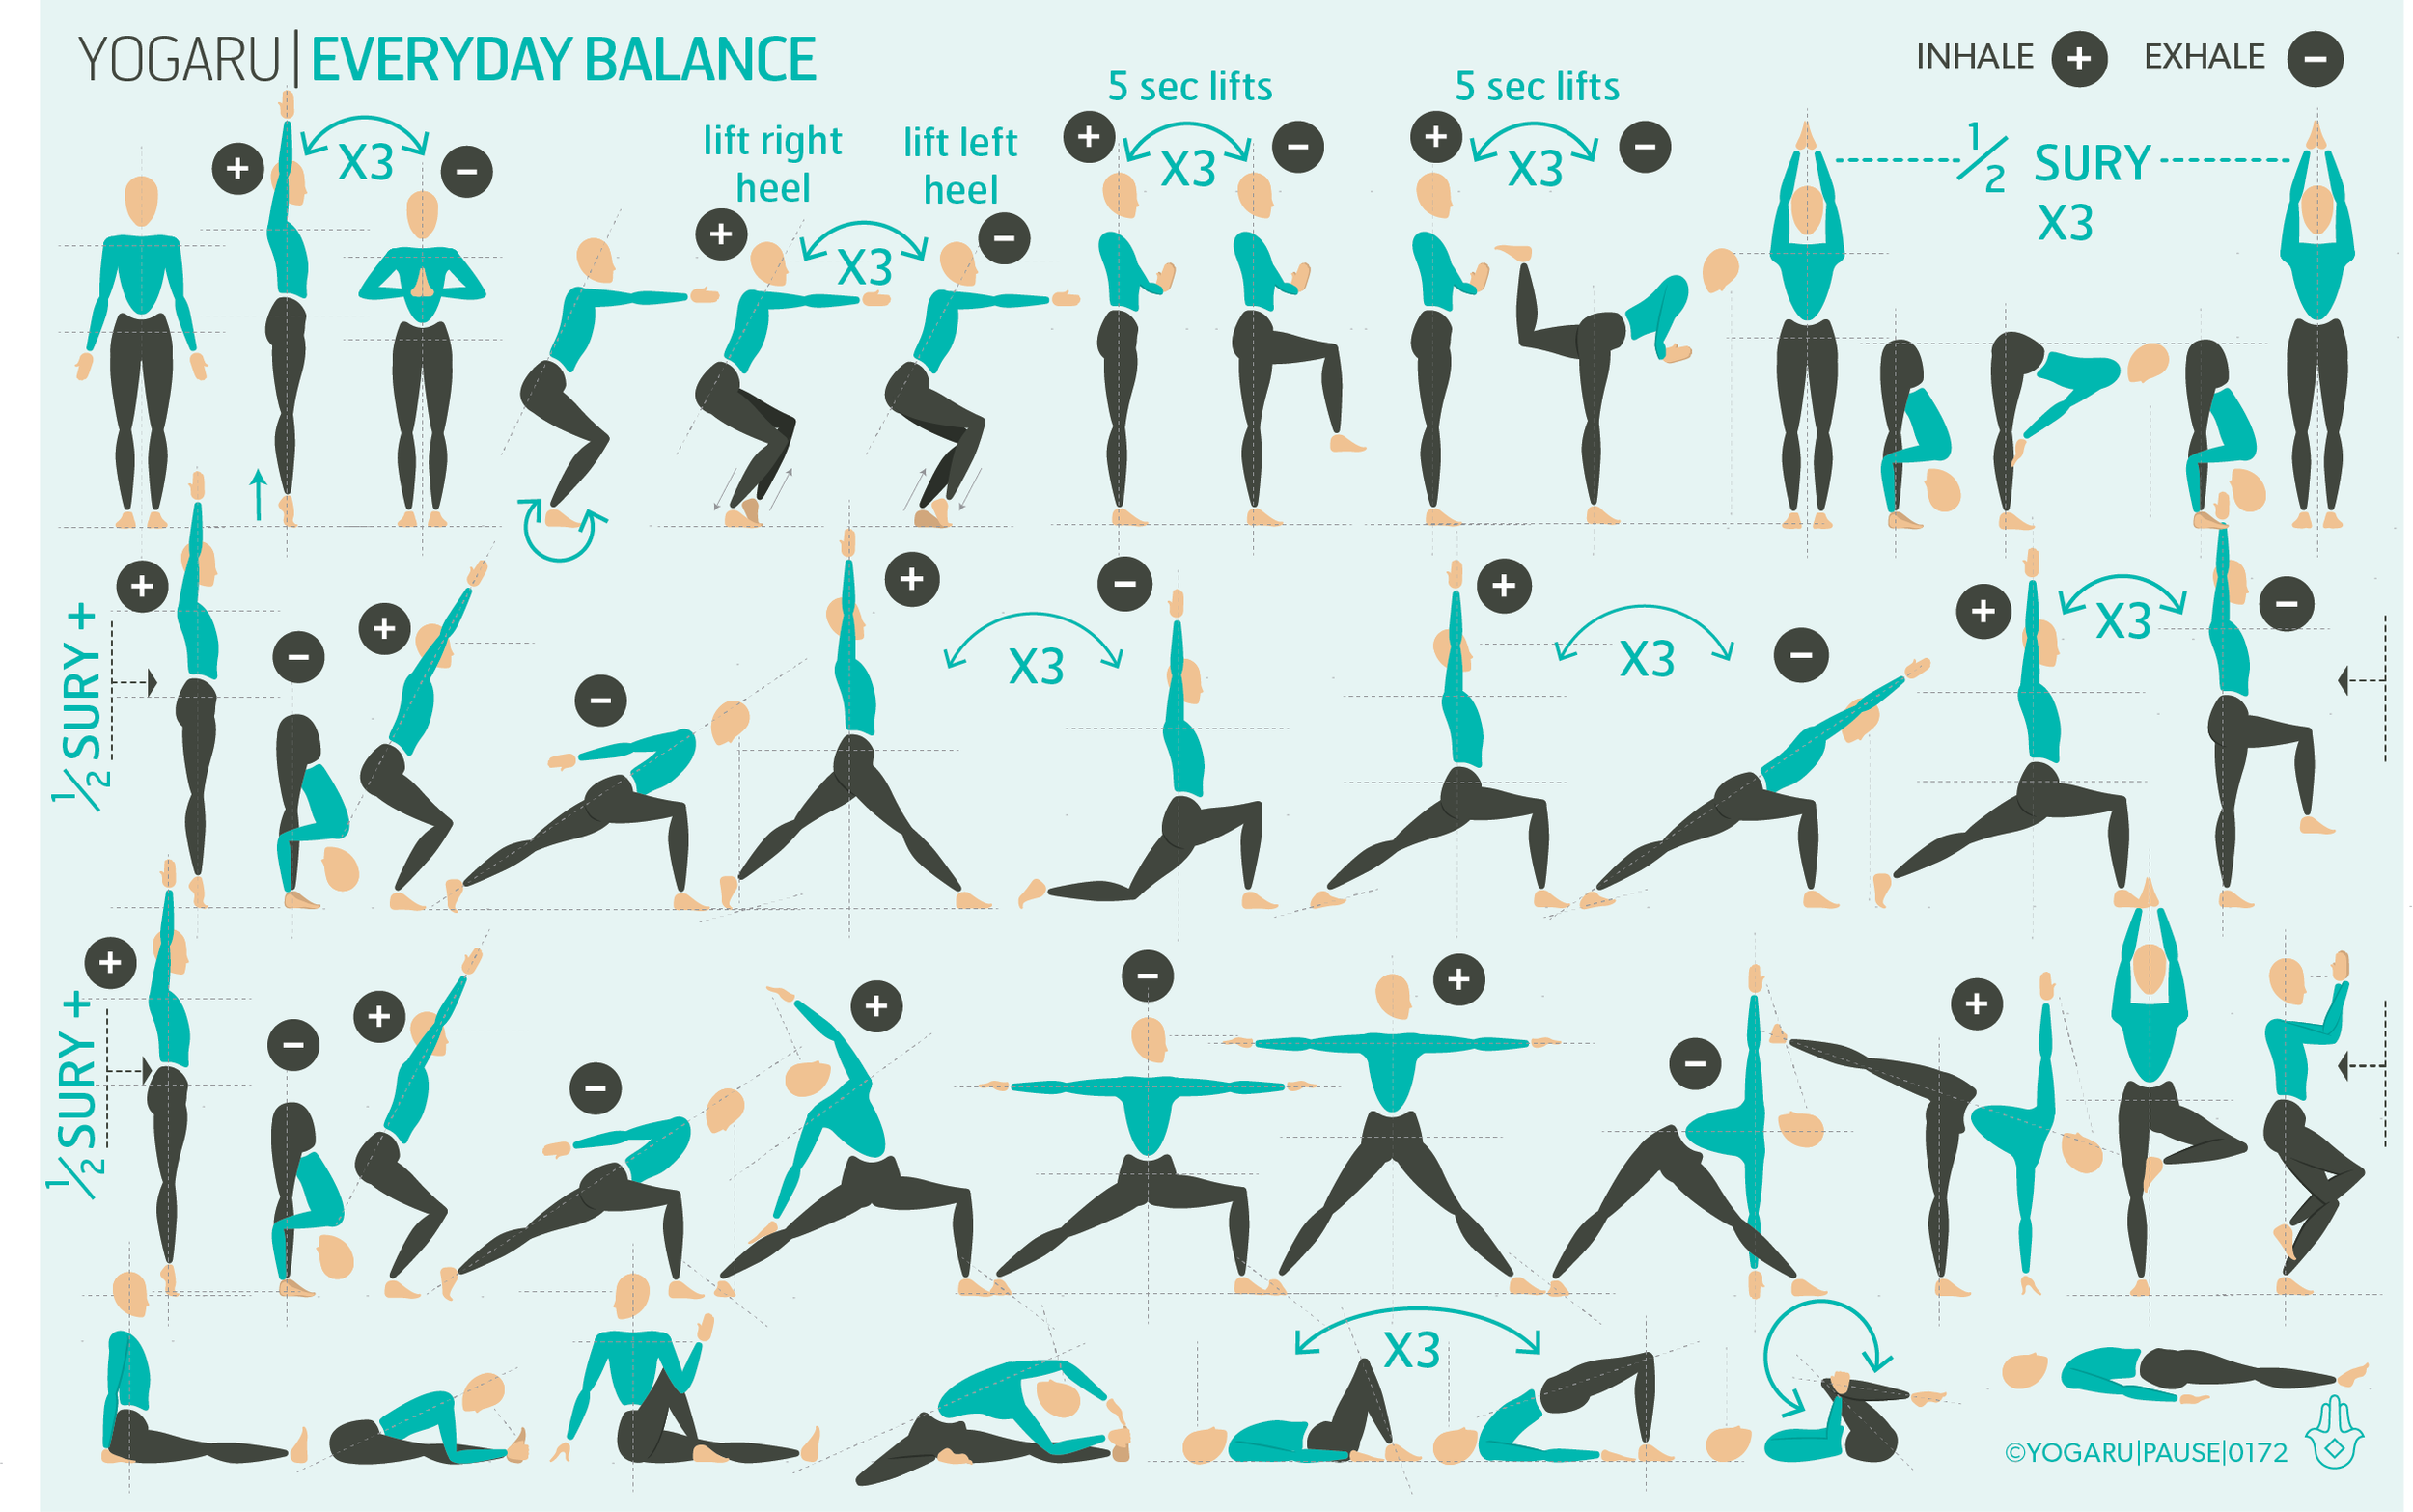
This sequence builds balance, starting from your foundation, focusing on the feet first. For the standing warm ups in row one press into the ground and root down into your foundation, this will help you create a strong foundation for you to feel confident in. This first row is the perfect balance mini routine to add throughout your week to train and improve your balance. If you would like to challenge your balance more, place a folded blanket under the standing foot and grow roots into the surface you are standing on. Balancing practices trains your body to respond to wobbles. If you find you wobble lots consider this good muscles and brian training for everyday balance. To help you find your balance bend your knees to bring your centre of gravity lower. Most wobbles happen during transitions in our practice. Use this practice to transition slowly and consciously with muscular control. Be ok with your wobble and observe the body busy keeping you upright.

ALIGNMENT CUES
There is no specific peak pose in this everyday balance sequence. Use the cues below to help you flow through the sequence with ease and fluidity.

Have a read of the tips below and either print out the sequence or save it onto your device:

  • Use the breath guide in the sequence to help you link breath with movement in the flow. Inhale is indicated with a ‘+’, exhale is a ‘-”.

  • Move slowly from pose to pose. Use the transitions as an opportunity to find strength and balance in motion.

  • For a longer practice, repeat the standing flows three times.

To save the images for personal use click and hold down the image until the ‘save image’ option appears; on Mac hold down ‘control’ and click the image to get the option box; on PC right click on the image to get the option box. Scroll down in the ‘option box’ and click ‘save image’.

Ruth Delahunty Yogaru


Setu Bandha Sarvangasana - Bridge

THE POSE TO SUIT YOUR NEEDS
Setu Bandha Sarvangasana/Bridge is one of the most well known and accessible backbend poses with lots of versions to suit your needs. It can be an energising and strengthening pose or a restorative and restful pose. Props are a great addition to the pose to either strengthen or soften the intensity. To add challenge you can place a brick between the knees to switch the adductor muscles on, or hold a brick between the arms to work the shoulders. To create more ease you can place a brick or bolsters under the hips for support or place a brick between your knees and strap it with a belt too .

THE BENEFITS OF SETU BANDHA SARVANGASANA/BRIDGE
Setu Bandha Sarvangasana/Bridge strengthens the spine, hamstrings, glutes and shoulders. It stretches the chest, core, quads and shoulders. This versatile backbend aids digestion, eases stress, tension, anxiety, expands lung capacity, realign the spine, improves posture and regulates metabolism. The energising, active versions of the pose strengthen the whole back body as you press the hips up against gravity, which, when done slowly and consciously, also help with hip stability and strength. The restorative, restful version of the pose work on balancing the nervous system and is the perfect pose after a long day sitting at a desk or after a workout session.

EXPLORING SETU BANDHA SARVANGASANA/BRIDGE IN YOUR PRACTICE
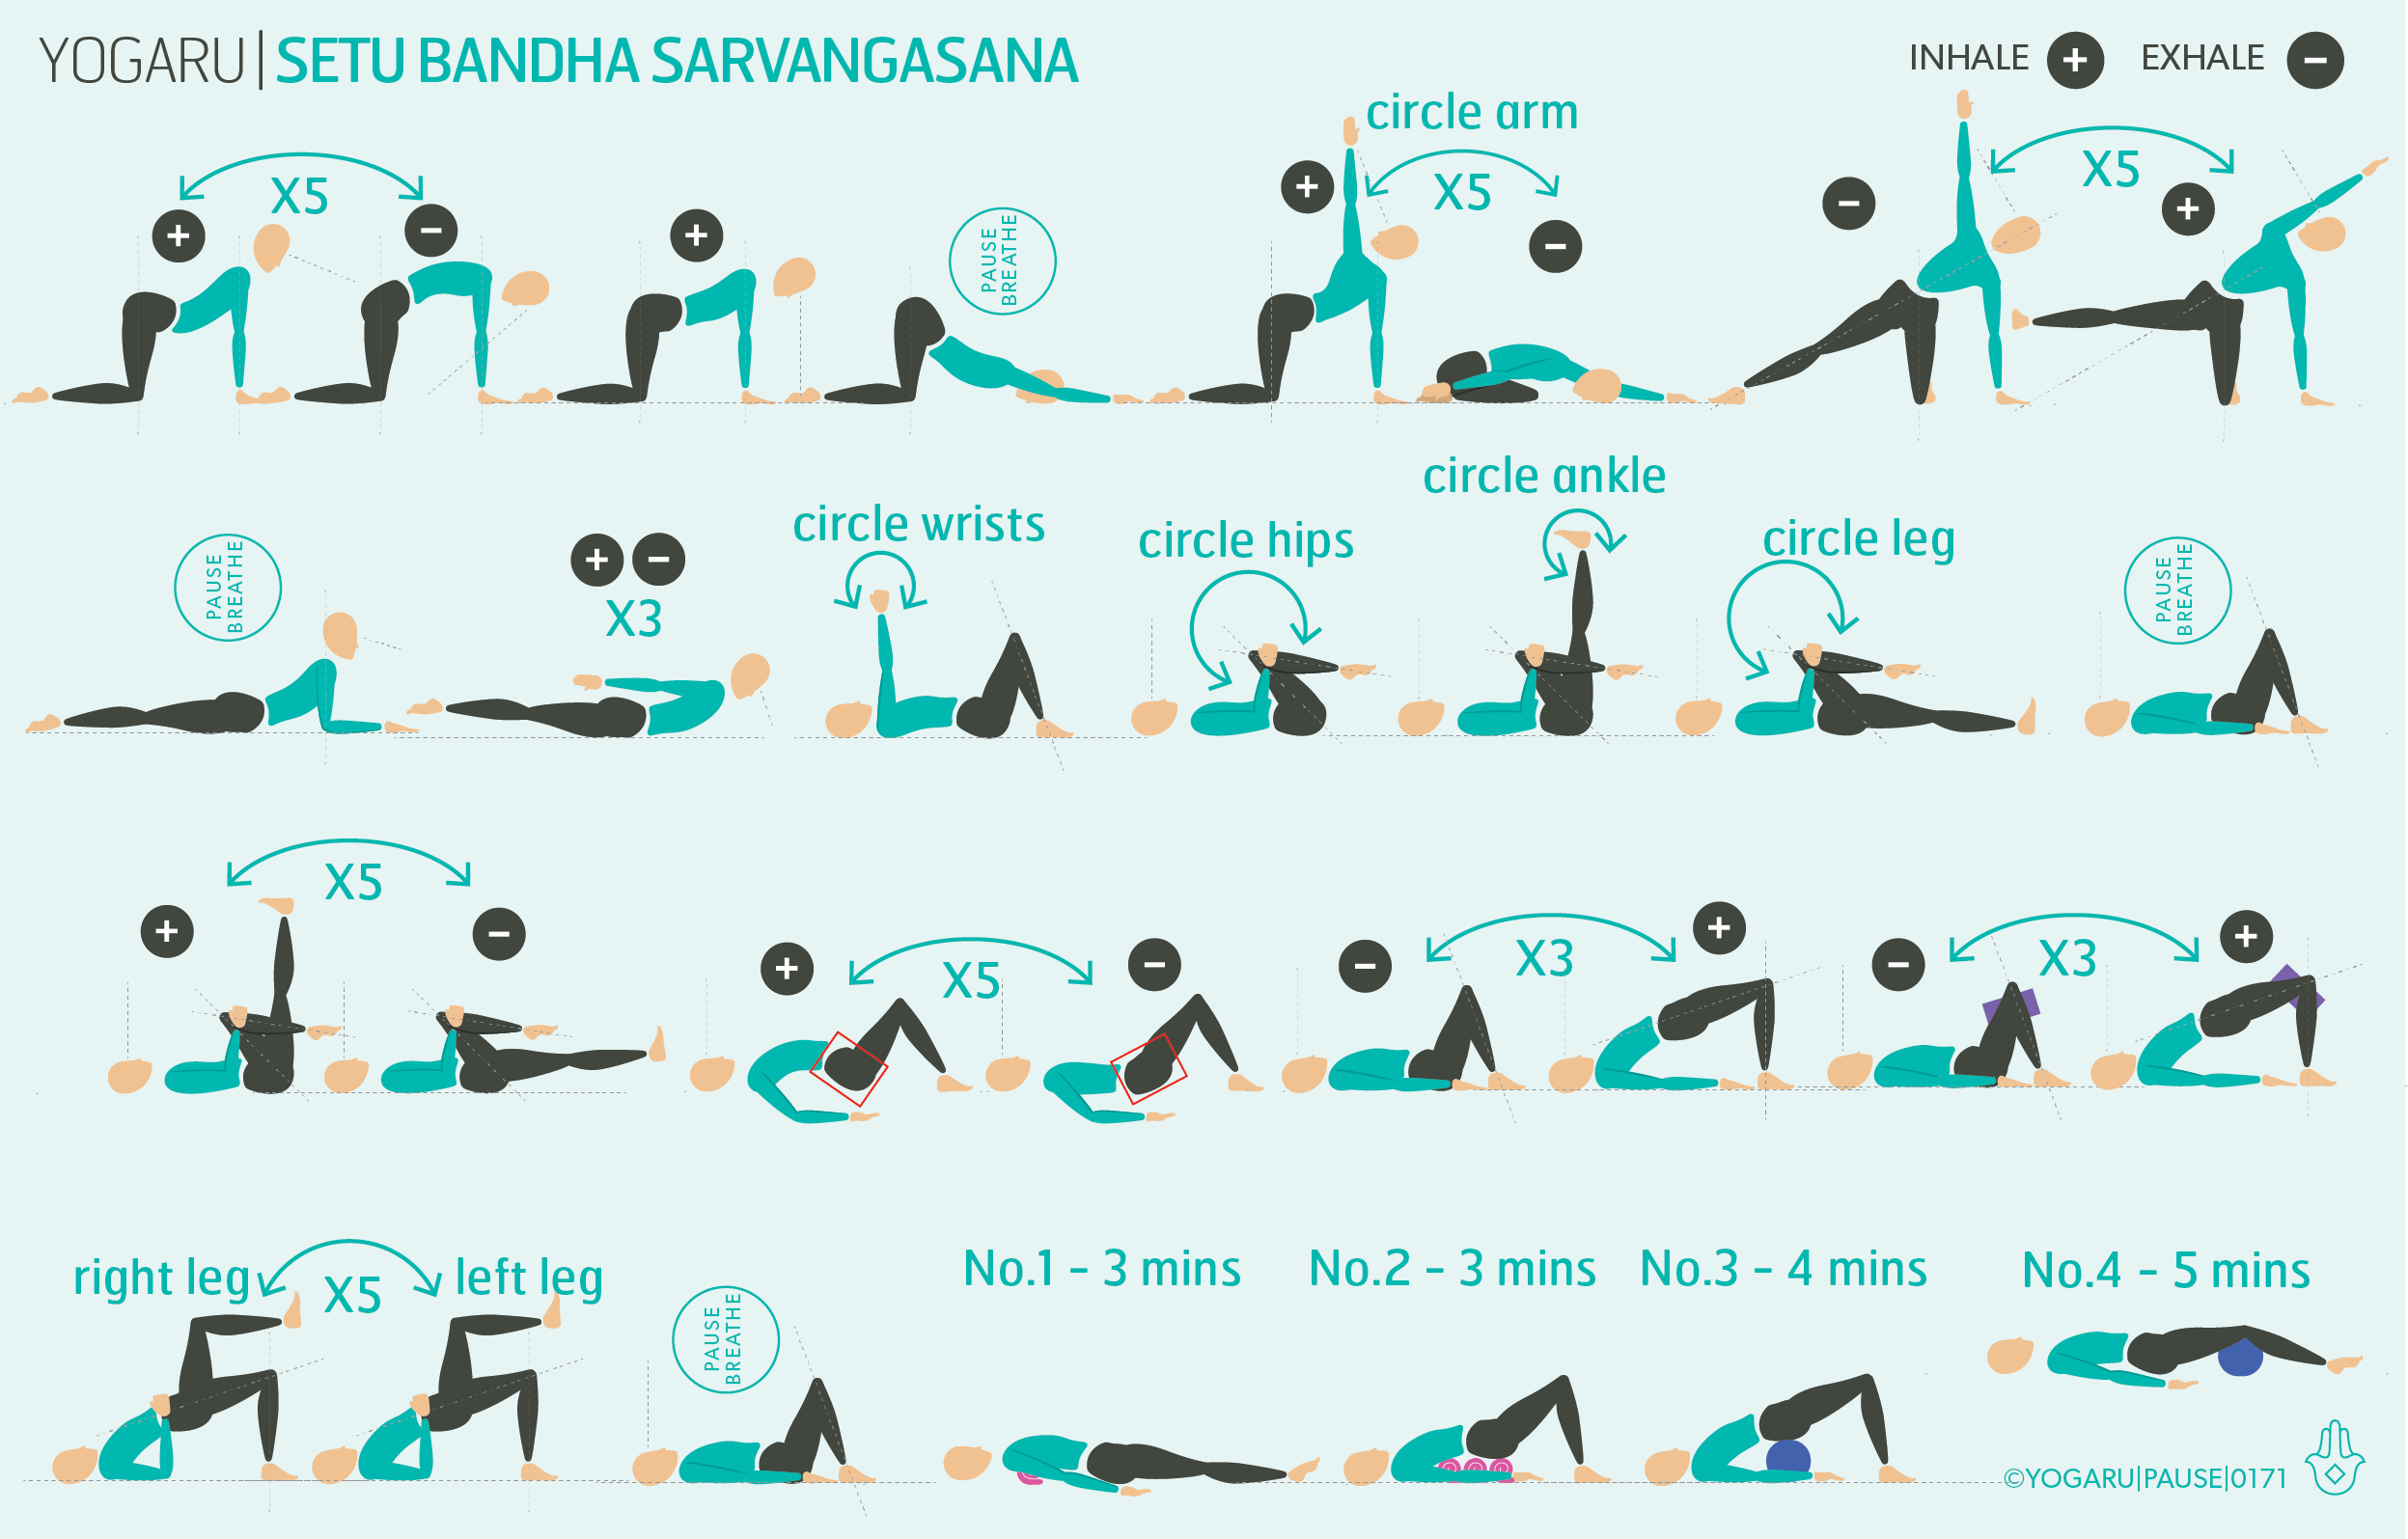
This sequence is perfect for days where you want to get a practice in and are feeling a bit low on energy. We stay low to the ground but still get plenty of mobility to the hips, spine and shoulders. There are both energising and restorative versions of Setu Bandha Sarvangasana/Bridge and it finishes with four restorative poses. Pose No.1 has a rolled blanket just under the shoulderblades to gently open the chest, No.2 has three rolled blankets under the back and hips to incrementally bring you up into No.3 supported SSetu Bandha Sarvangasana/Bridge with a bolster. The amount of time you spend in each of these restorative poses is up to you, I have given a suggested time per pose. Remember to do both sides on the mini flows where there is one leg lifting or circling.

ALIGNMENT CUES
Luxuriate in the simplicity of this gentle sequence. Move in a way that feels best for you and try not to get too caught up on what comes next or poses that you are not familiar with. This sequence is purely about moving with ease and kindness.

Have a read of the tips below and either print out the sequence or save it onto your device:

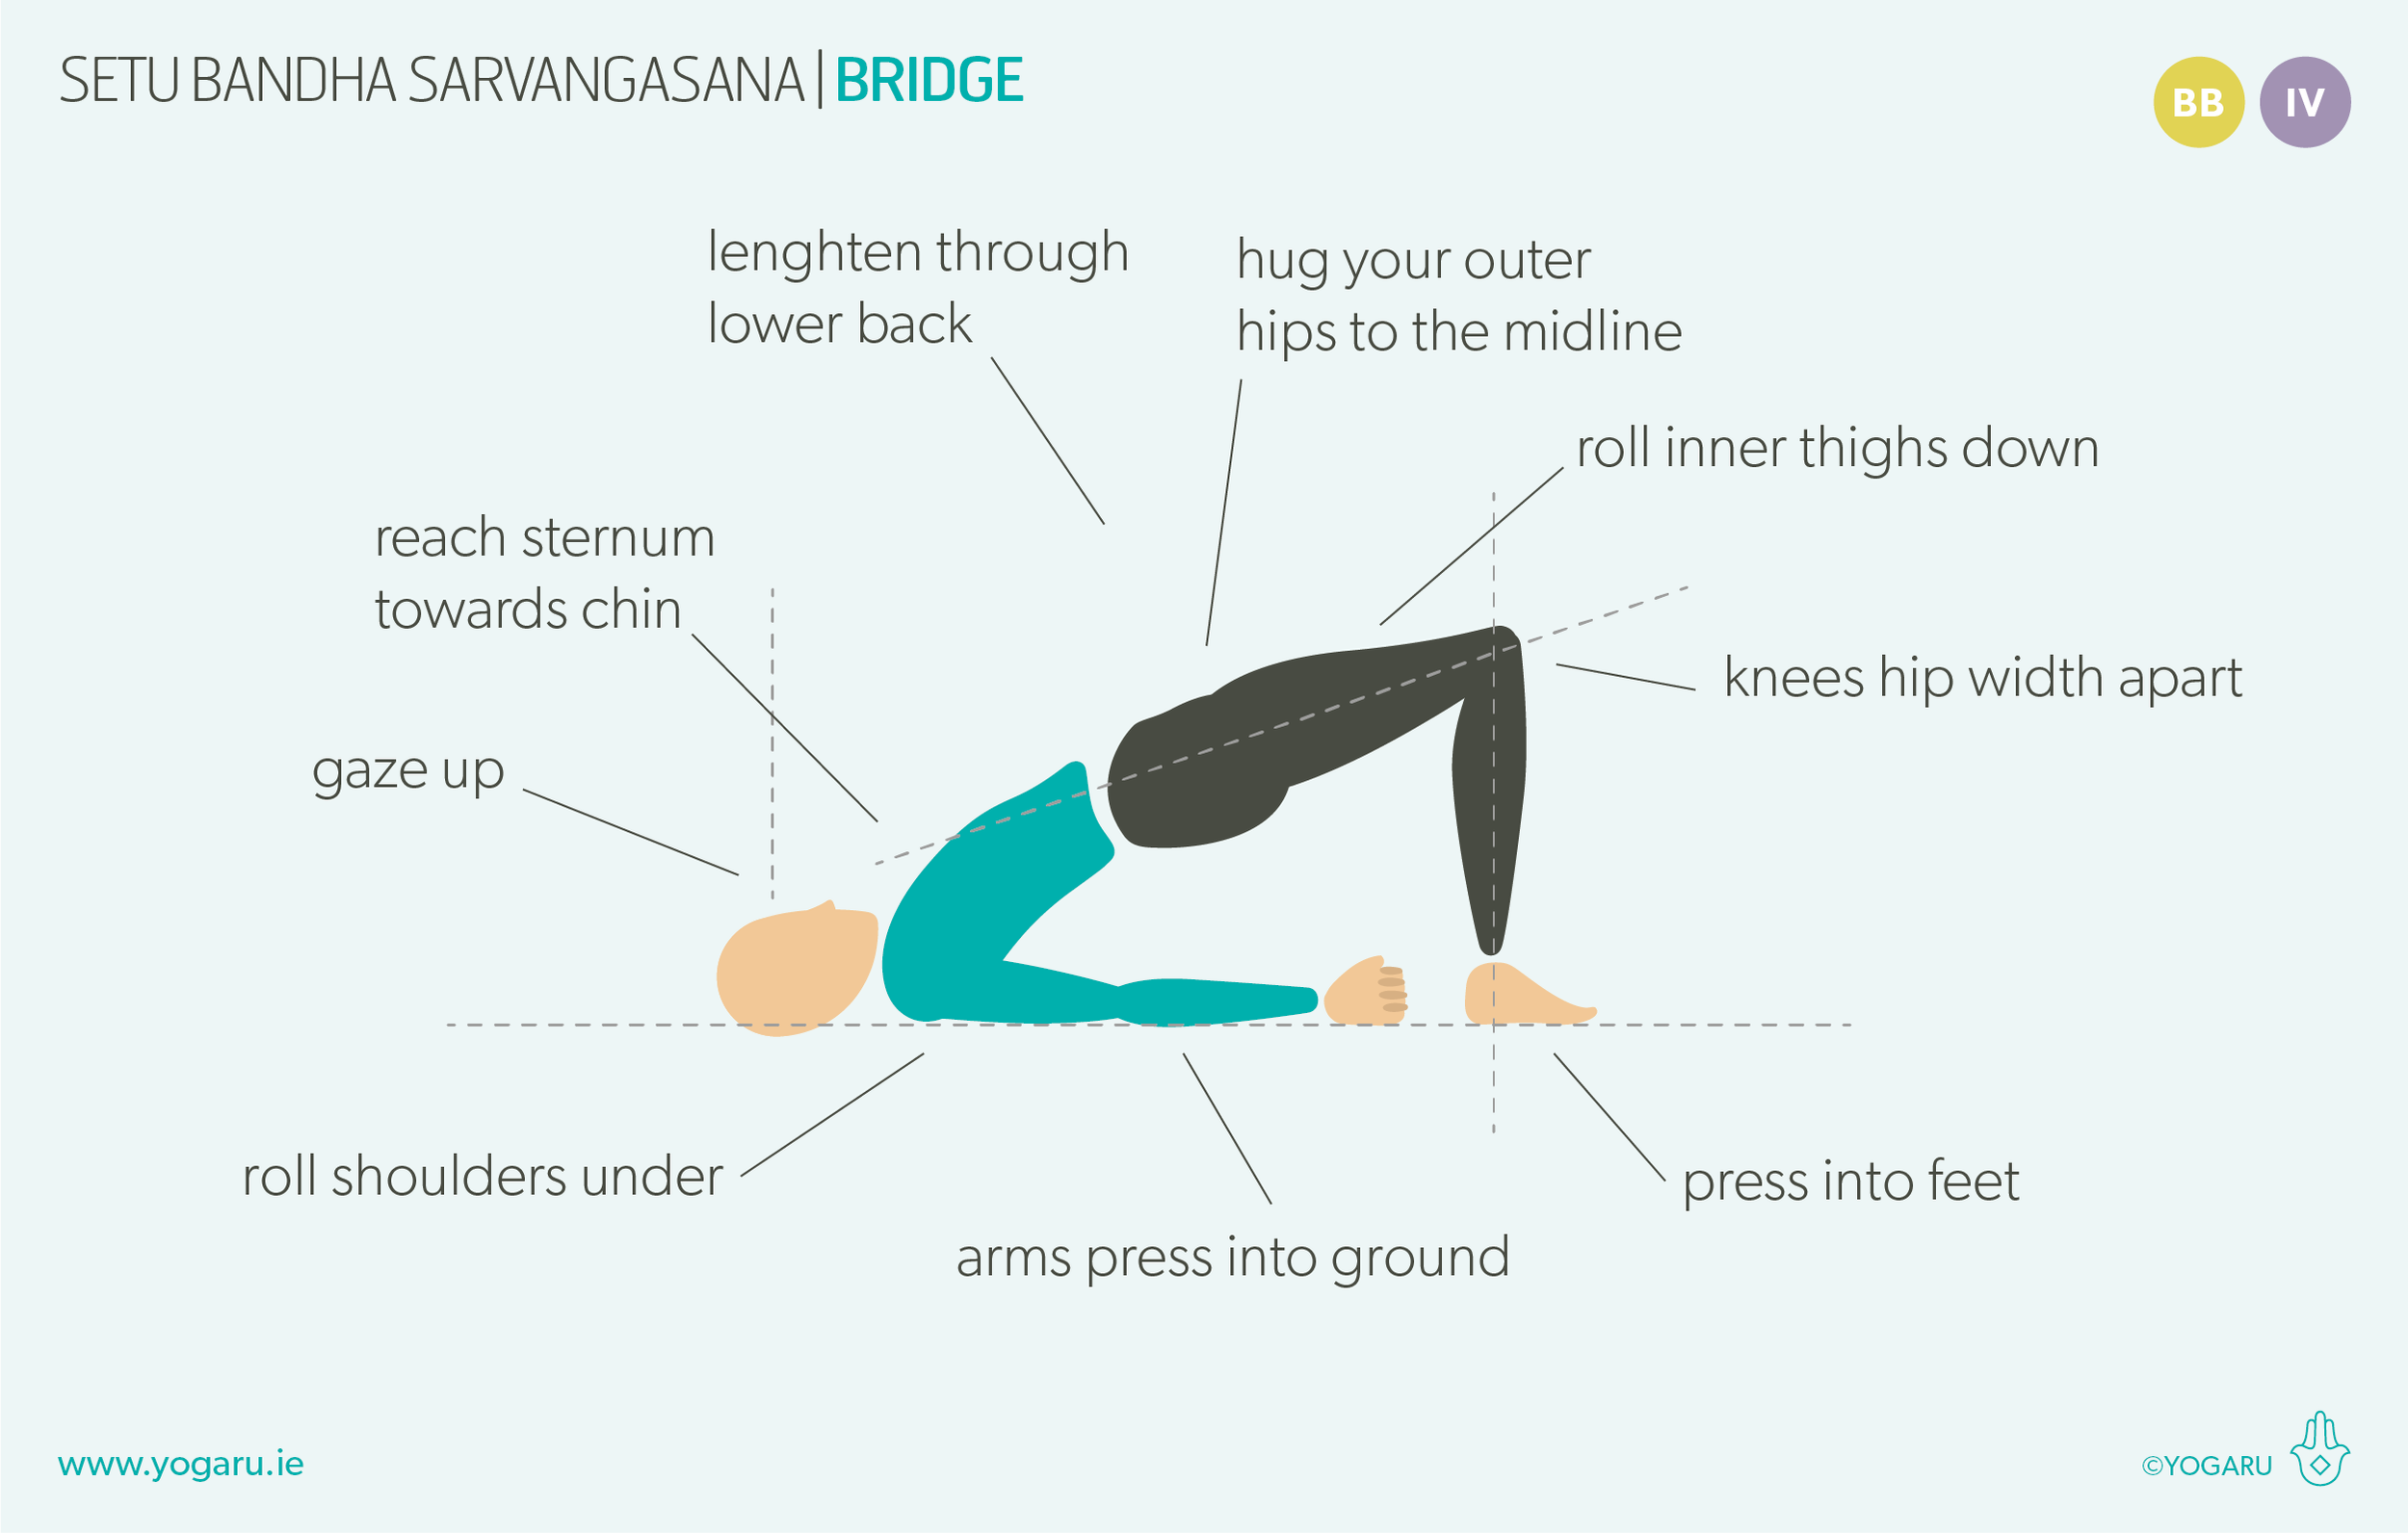
  • Lie on your back with your knees bent, feet parallel and hip width apart, heels close to your sit bones.

  • Arms pressed into the ground beside you. Root through your big toe mound and inner heels, inhale here.

  • Exhale, lift your hips up, knees extend forward, sternum lift up and towards your chin.

  • Lightly press into the back of your head, back of the neck long. Roll your shoulders under and clasp your hands under your pelvis, extend your arms towards your feet.

  • Hug your outer hips to the midline, thighs parallel to the ground, roll your inner thighs down, gaze up.

To save the images for personal use click and hold down the image until the ‘save image’ option appears; on Mac hold down ‘control’ and click the image to get the option box; on PC right click on the image to get the option box. Scroll down in the ‘option box’ and click ‘save image’.

Ruth Delahunty Yogaru