STOP STRETCHING HARDER – PREPARE YOUR TISSUES FIRST
If stretching feels uncomfortable, ineffective, or your muscles tighten up again shortly afterwards, the issue may not be a lack of flexibility.
Many people assume they simply need to stretch more, stretch deeper, or hold stretches for longer. In reality, if the tissues aren't prepared to lengthen, stretching can feel like pulling against resistance. The body senses this tension and responds by protecting itself, often causing muscles to tighten rather than release.
Preparing the tissues first can make all the difference.
FASCIA, THE MISSING PIECE
When we think about stretching, we tend to think about muscles. But muscles don't work in isolation. Every muscle is wrapped in and connected by fascia – a body-wide web of connective tissue that runs continuously from head to toe.
Fascia acts as the body's internal scaffolding, helping to distribute force, support movement, protect tissues, and assist repair. It also plays an important role in hydration. Fascia contains hyaluronic acid, a substance that attracts and holds water, helping tissues glide smoothly against one another.
When fascia becomes dehydrated or restricted, movement can feel stiff, heavy, and limited. The layers of tissue don't slide as freely, and stretching often feels less effective.
This is where myofascial release (MFR) self massage comes in.
RELEASE WITH MFR FIRST
MFR is a simple self-massage technique using balls, rollers, or other tools to improve the quality of the tissues before stretching. MFR helps prepare the body for stretching by:
increasing mobility
increases hydration
improving circulation
restoring glide between tissue layers
reduces tension
distributing stretch forces more evenly
stimulating the parasympathetic nervous system
As the tissues become more hydrated and mobile, stretch forces can be distributed more evenly throughout the body rather than concentrating in one tight area. Instead of fighting against resistance, you're creating the conditions for movement to happen more naturally.
In short, MFR helps your body become more receptive to stretching.
THEN STRETCH TO CAPTURE THE LENGTH
One of the most noticeable effects of MFR is an immediate improvement in mobility. You may find you can move further or more comfortably within minutes.
However, mobility gains don't always last.
The tissues have a natural tendency to return to familiar patterns over time. This is where stretching becomes important. After releasing tension with MFR, gentle stretching helps reinforce and maintain the new range that has been created.
The goal isn't to force the body into deeper positions. In fact, stretching at around 60% of your maximum range is often more effective. You don’t necessarily need long holds. Around one minute per muscle group, five times per week, is enough to create change. Working gently allows the nervous system to feel safe, reducing the likelihood of protective muscle tension.
Think of stretching after MFR as capturing the new length. MFR creates the opportunity; stretching helps the body keep it.
RECOVER AND MOVE BETTER
Together, MFR and stretching create a powerful combination to:
improve mobility
Improved hydration
Improved circulation
nervous system regulation
reduce stiffness
ease DOMS
help you recover faster
and even help you sleep better
The stretch formula = Release + Stretch + Recover
Give this sequence a go or join my new The Stretch Reset class on SYFL for a guided session combining MFR and stretching to help your body move better and recover faster. Use the code YOGARU50 to get 50% off your first month.
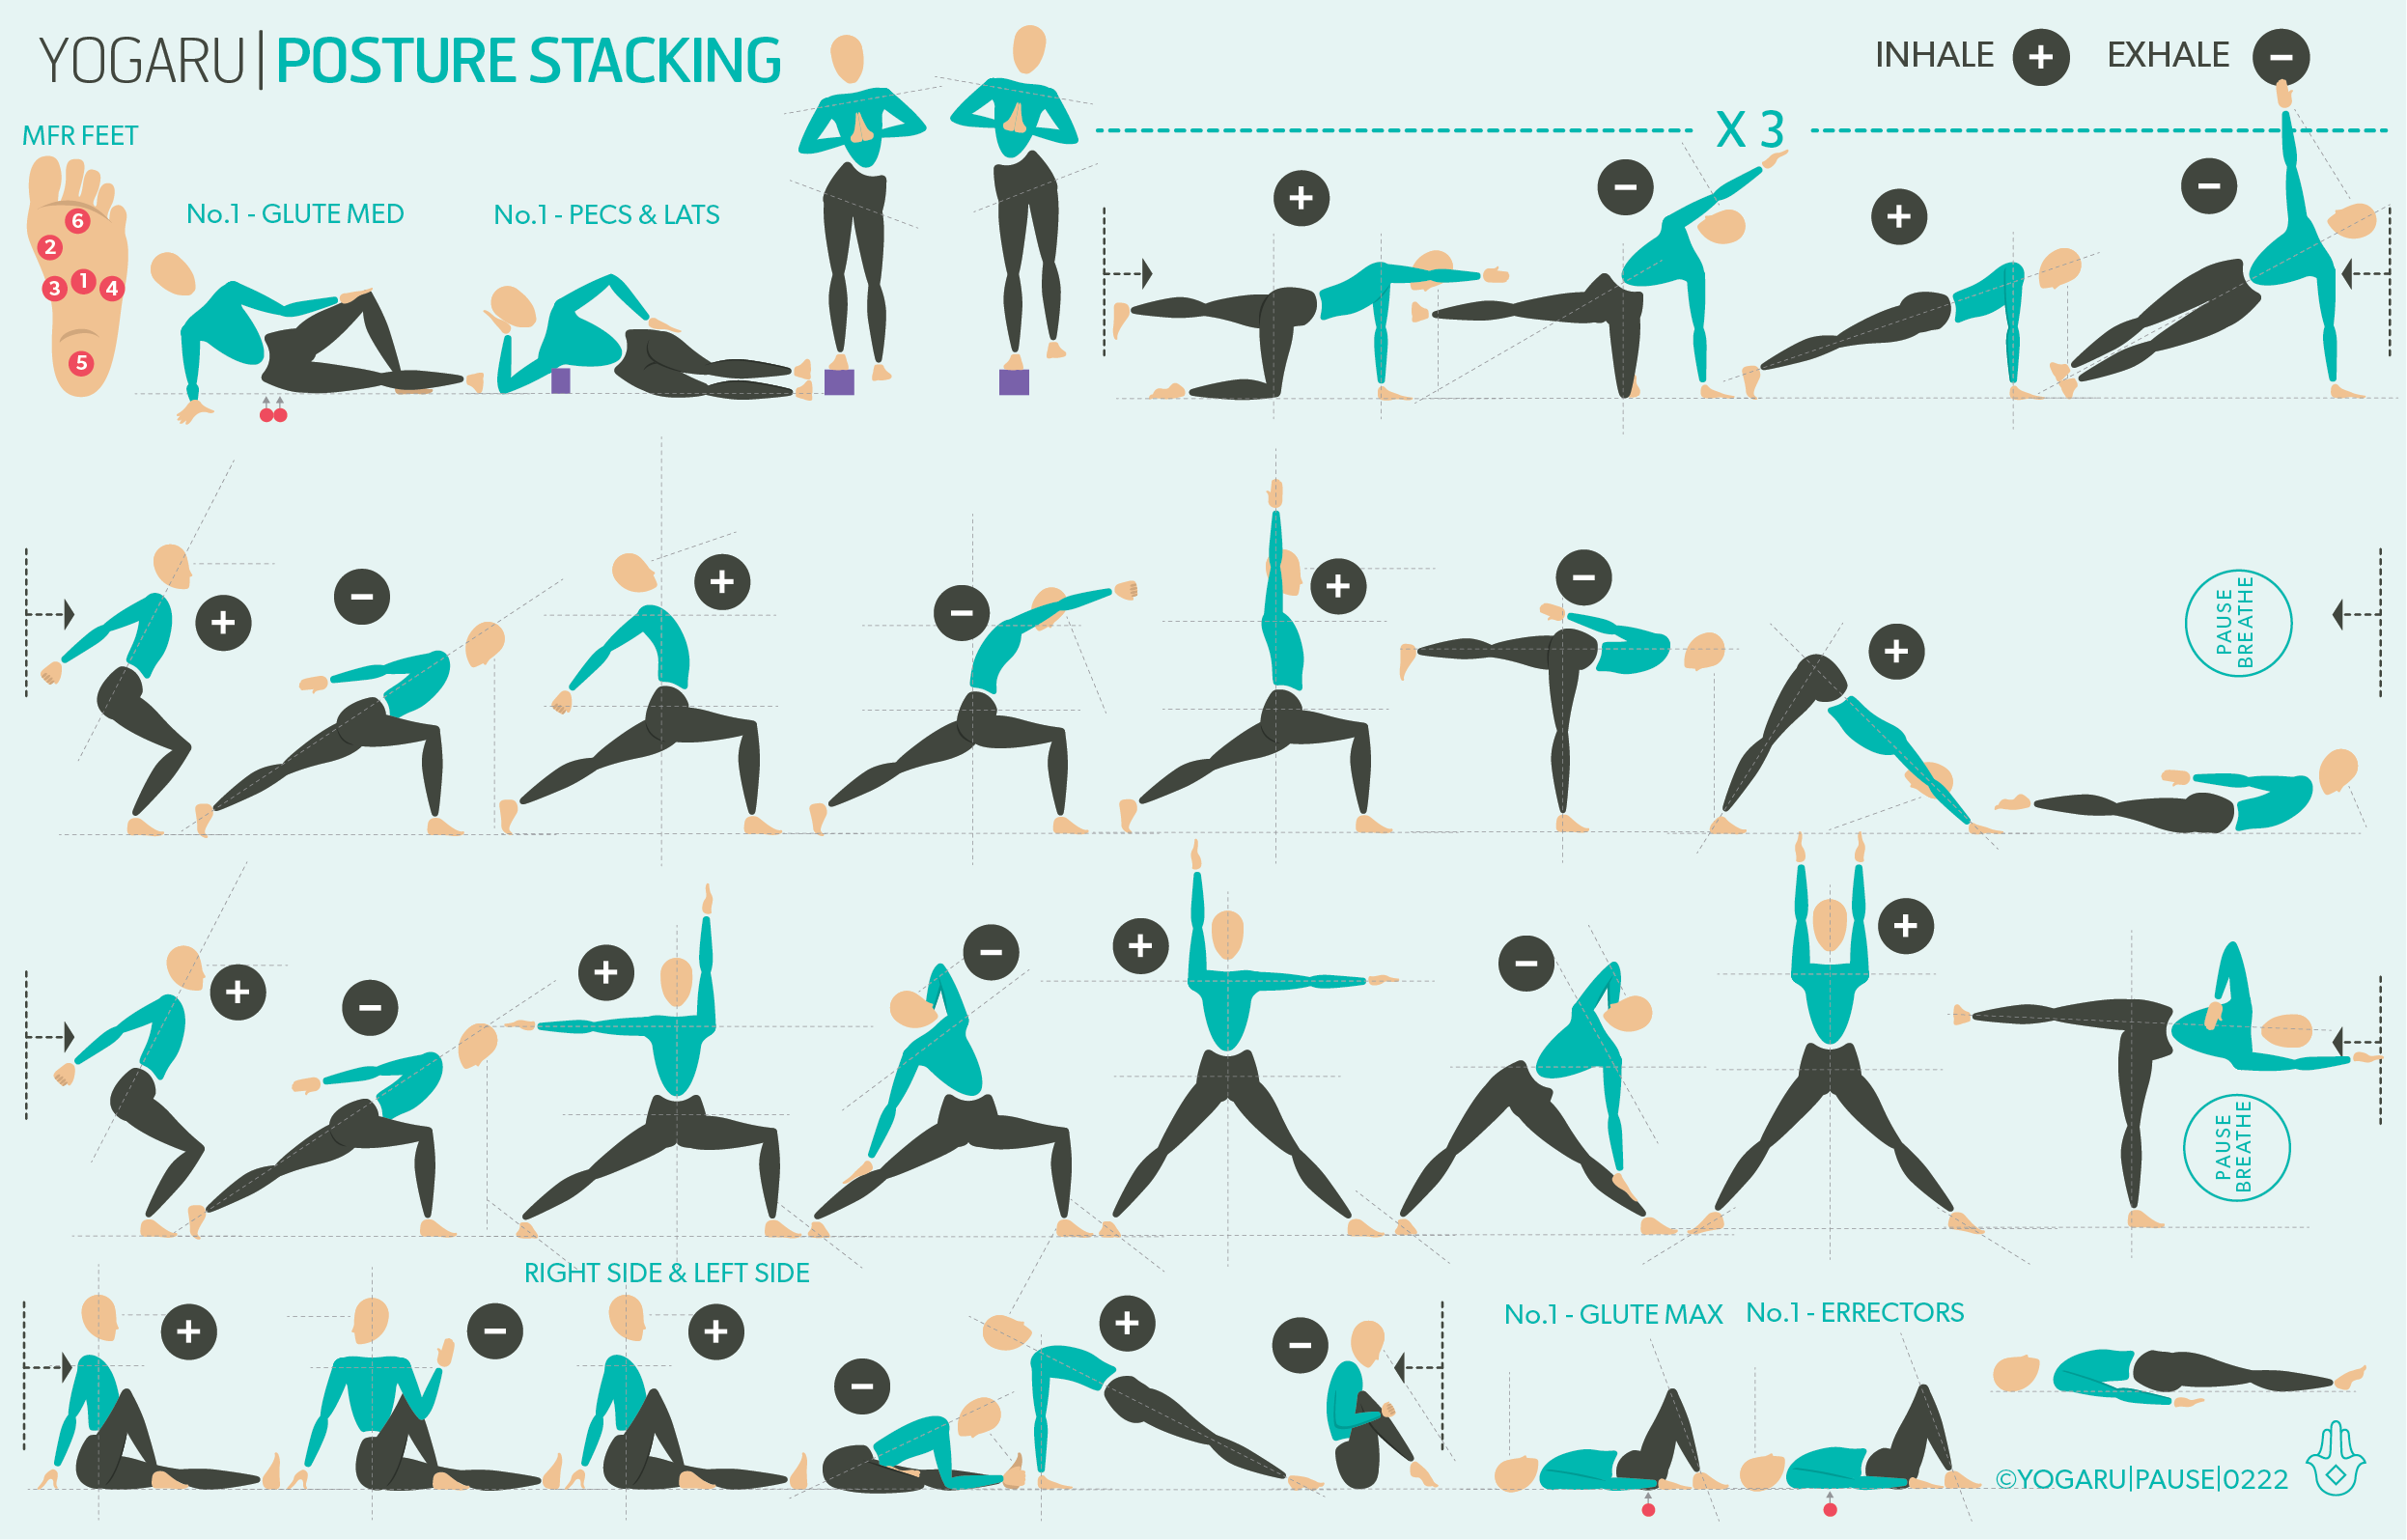
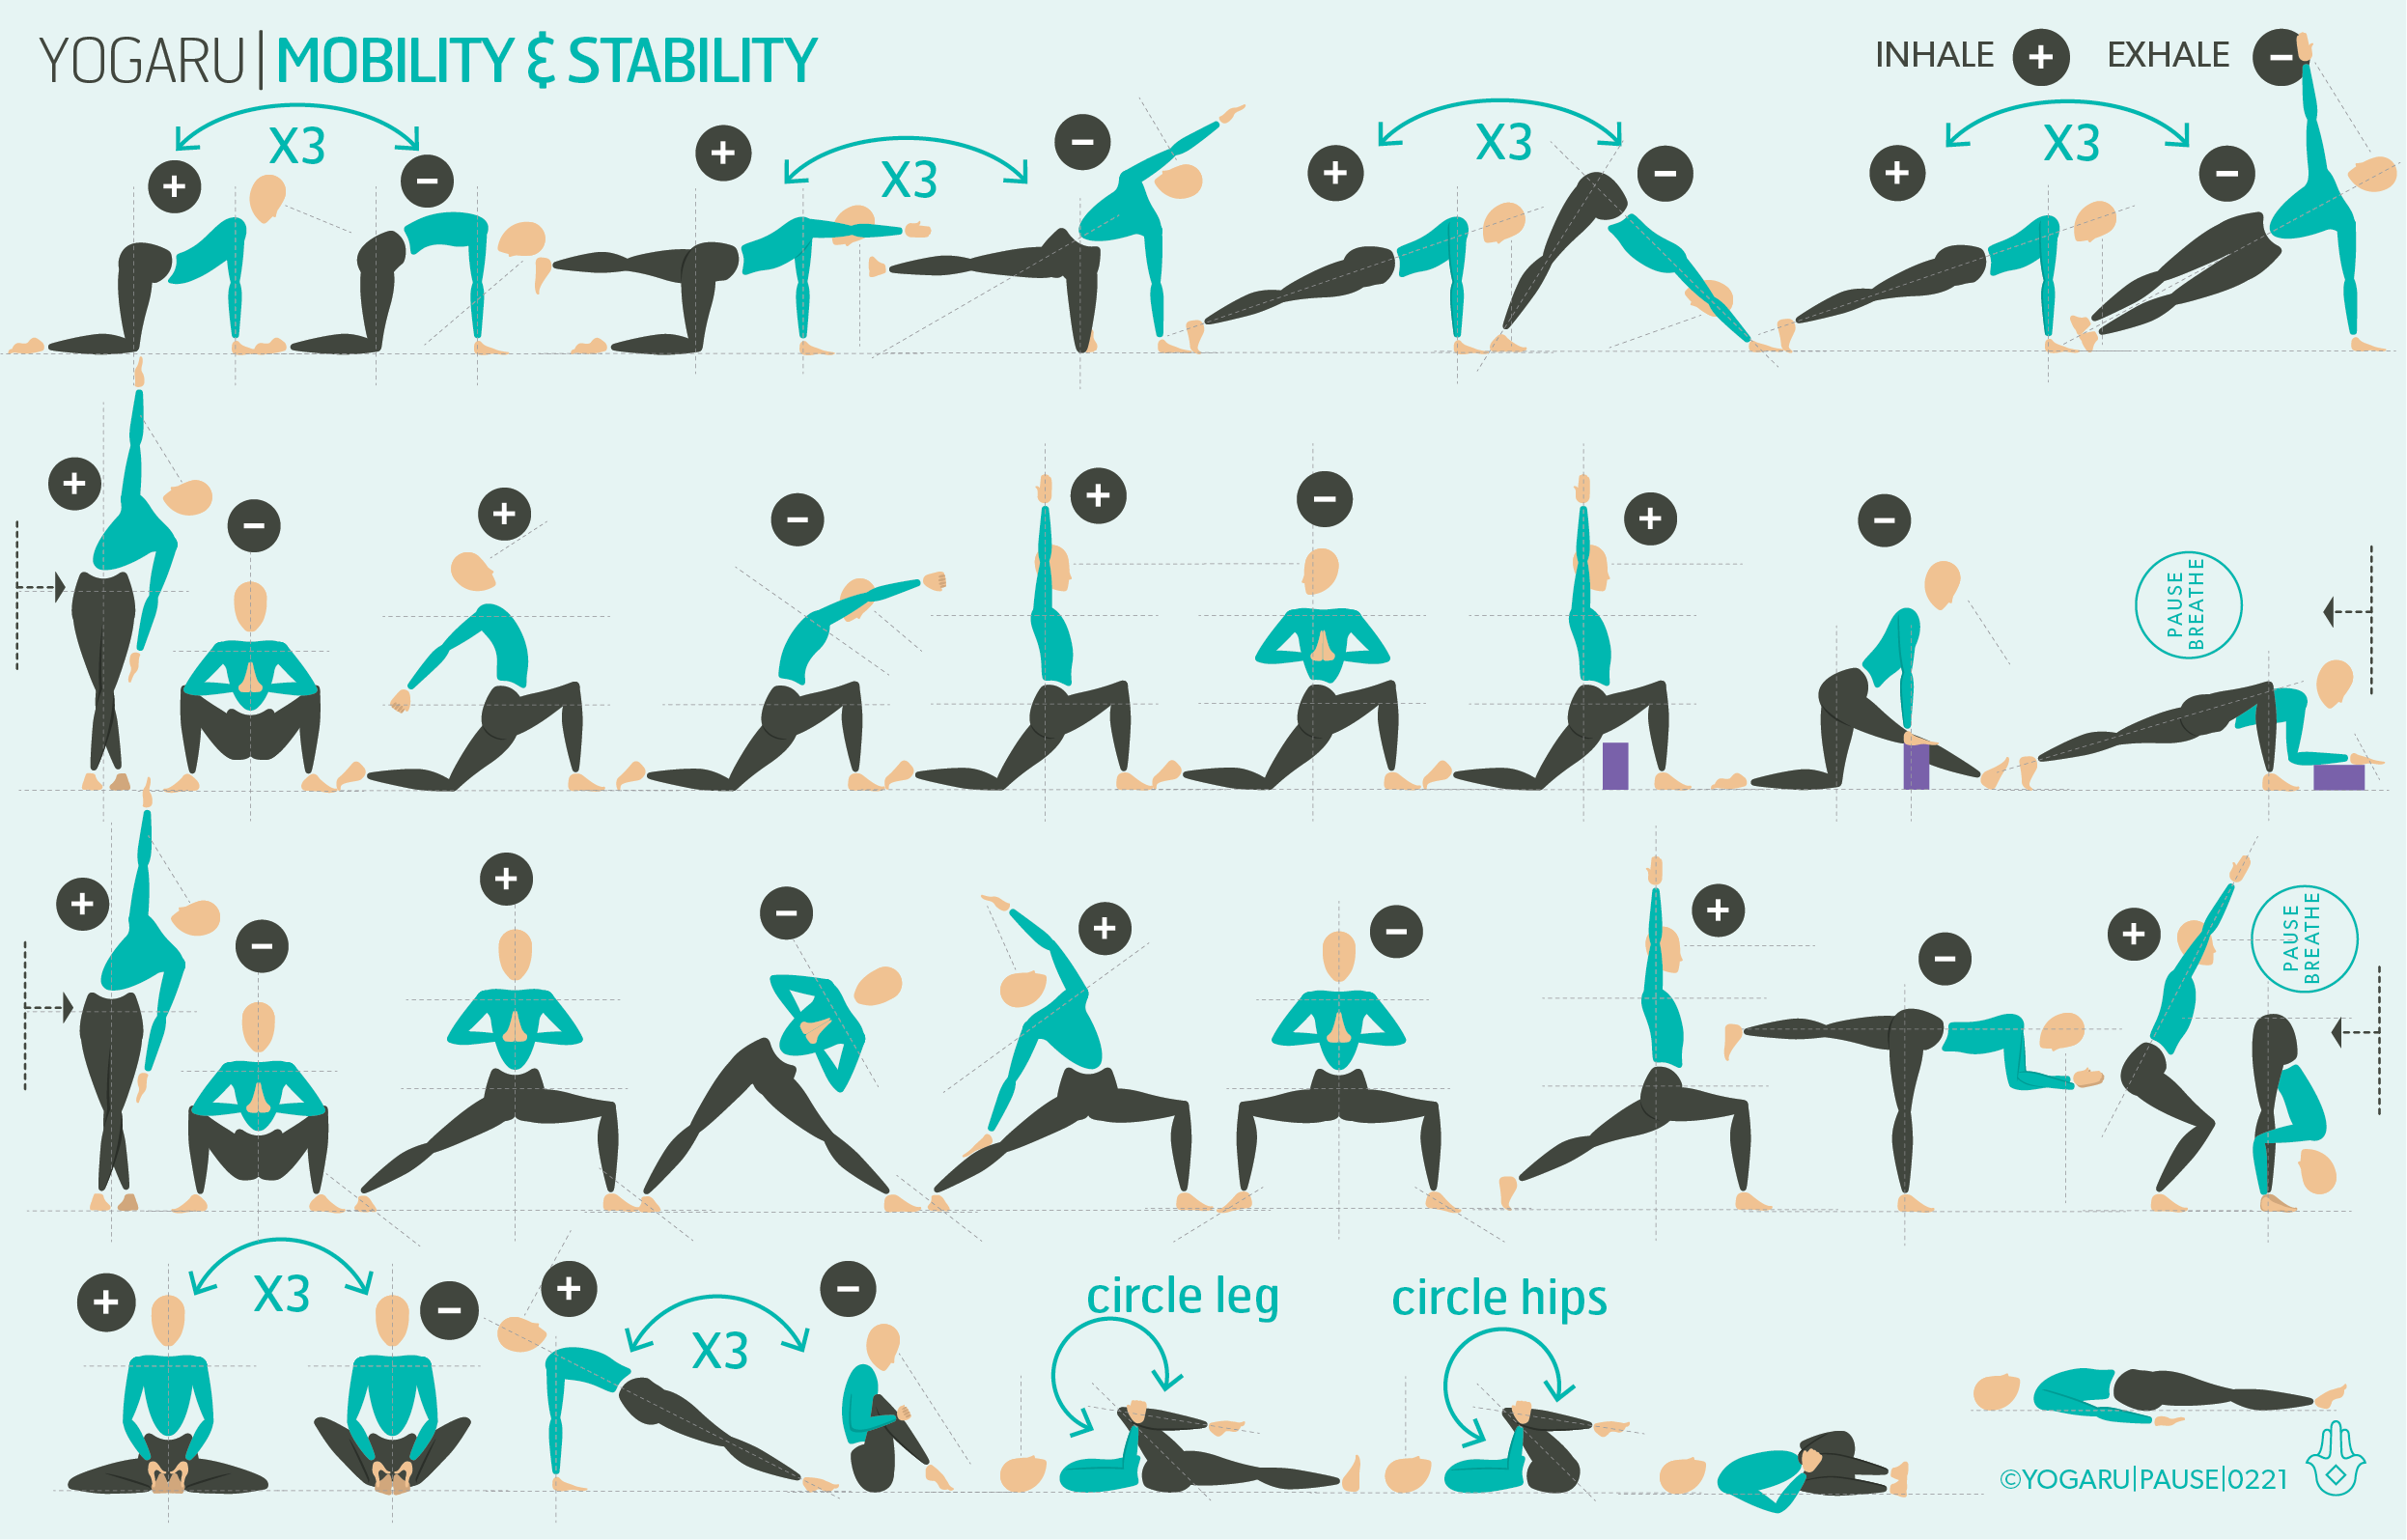
EXPLORING RELEASE, STRETCH, RECOVER IN YOUR PRACTICE
This sequence combines myofascial release (MFR) and gentle stretching to help restore mobility, ease tension, and support recovery – perfect after training, after a long day sitting, or whenever your body needs a reset.
It is divided into three sections – hips, shoulders and spine. To maximise the effect of the MFR you will follow it with both dynamic stretching with two mini and static stretching immediately after.
Take your time and spend 30-60 seconds per area with the MFR and 60 seconds in each static stretch. Notice any changes in your range of movement and your fluid movement after.
ALIGNMENT CUES
Below are the MFR and stretching techniques used in this sequence. The props you’ll need are:
1 x bolster - or 2 towels, wrapped around a horizontally rolled pillow and tied to secure.
1 x yoga blankets - or any wool, thick cotton or fleece blanket with density.
2 x yoga bricks - or two thick similar sized dictionaries.
2 x MFR balls - or 1 tennis ball.
MFR
No.1 - hams
Compression - from seated, place 2 x balls on a brick at the top of your thigh, gently press down with an inhale and release on the exhale x 5 breaths.
Sheer - slowly lean forward over your extended leg to gently stretch the hamstrings x 5.
Roll & cross fibre - roll the leg side to side, up and down.
No.2 - glute max
Compression - from supine with knees bent, place 2 x balls in the centre of each buttock muscle, gently press down with an inhale and release on the exhale x 5 breaths.
Sheer - slowly lift and lower one knee at a time towards your chest x 5. Place your right foot on your left knee and lower and lift your right knee.
Roll & cross fibre - roll around the whole buttocks area.
No.3 - pecs & lats
Rocking - from side lying, place the brick on its mid height in the centre of the armpit. Rock your weight back and forward for the lats then pull the brick a little more forward and rock forward and back for the pecs.
No.4 - quadratus lumborum
Compression - from supine with knees bent, place 2 x balls above the back of the hips either side of the spine, gently press down with an inhale and release on the exhale x 5 breaths.
Sheer - slowly lift and lower one knee at a time towards your chest x 5.
Roll & cross fibre - roll up and down the lower spine below the ribs.
To save the images for personal use click and hold down the image until the ‘save image’ option appears; on Mac hold down ‘control’ and click the image to get the option box; on PC right click on the image to get the option box. Scroll down in the ‘option box’ and click ‘save image’.
Ruth Delahunty Yogaru