Sequences

Transitions

A TIME OF CHANGE
Transitions are the period of time where change occurs. There are lots of transitions happening in the world at the moment. Some are met with celebration and some with trepidation. One of the biggest transitions we experience throughout life is the annual single day of New Years, as opposed to the gradual change of seasons or the personal transition of birthdays. There is a shared sense of history being defined by the changing number as we all experience this transition together globally within a 24hr period. Some use this as an opportunity to set New Year resolutions and others, like myself, reflect on what affirmation we would like to set for the year ahead and set aspirational goals.

You could also say that our entire life is a series of mini transitions – from the big transitions like changing jobs or moving houses to daily transitions like changing from sleep to awake or traveling to and from work. The idea of transitions can evoke the feeling of impatience, dread or nervousness in some. My contemplation for you is to reframe your relationship to the idea of transitions and see the journey as just as important as the destination. Slow down and be excited and curious about change as much as the end result. Every element that makes up life is to be savoured rather than rushed.

TRANSITIONS IN YOGA
Transitions in our yoga practice are the connections between poses. We are inclined to rush through life and bring this same mindset onto our practice and rush from pose to pose too. Think of the practice as a string of pearls – the poses are the pearls and the transitions are the string that hold it together. Both have their own function, both exist separately, but together they make a beautiful thing. The spaces between the poses are to be savoured in order to get the most out of your time on your mat.

Transitions are an opportunity to build physical strength, coordination and stability. As you move from pose to pose your brain needs to work out how to get from A to B safely. Transitions build a library of muscle memory for your body to refer back to in your everyday life – like getting up and down from the ground or working out how to balance with one leg lifted. They are also a very effective way of working on standing stability and reducing fall risk, which is an important life skill to train at every age.

Moving slowly in transitions is more physically demanding than using momentum. With slow transitions you’ll notice all your muscles working hard to stabilise you and move you into the next pose. Moving with momentum is a missed opportunity to strengthen your whole body – ankles, legs, core and spine in particular. Moving at a faster pace is also where potential injuries are more likely to happen rather than the static poses themselves. When you slow down you naturally move in a more considered, controlled and safer way. Slow transitions need your full attention and are a great way to distract you from your busy life and help you build concentration, focus and mindfulness.

EXPLORING TRANSITIONS IN YOUR PRACTICE
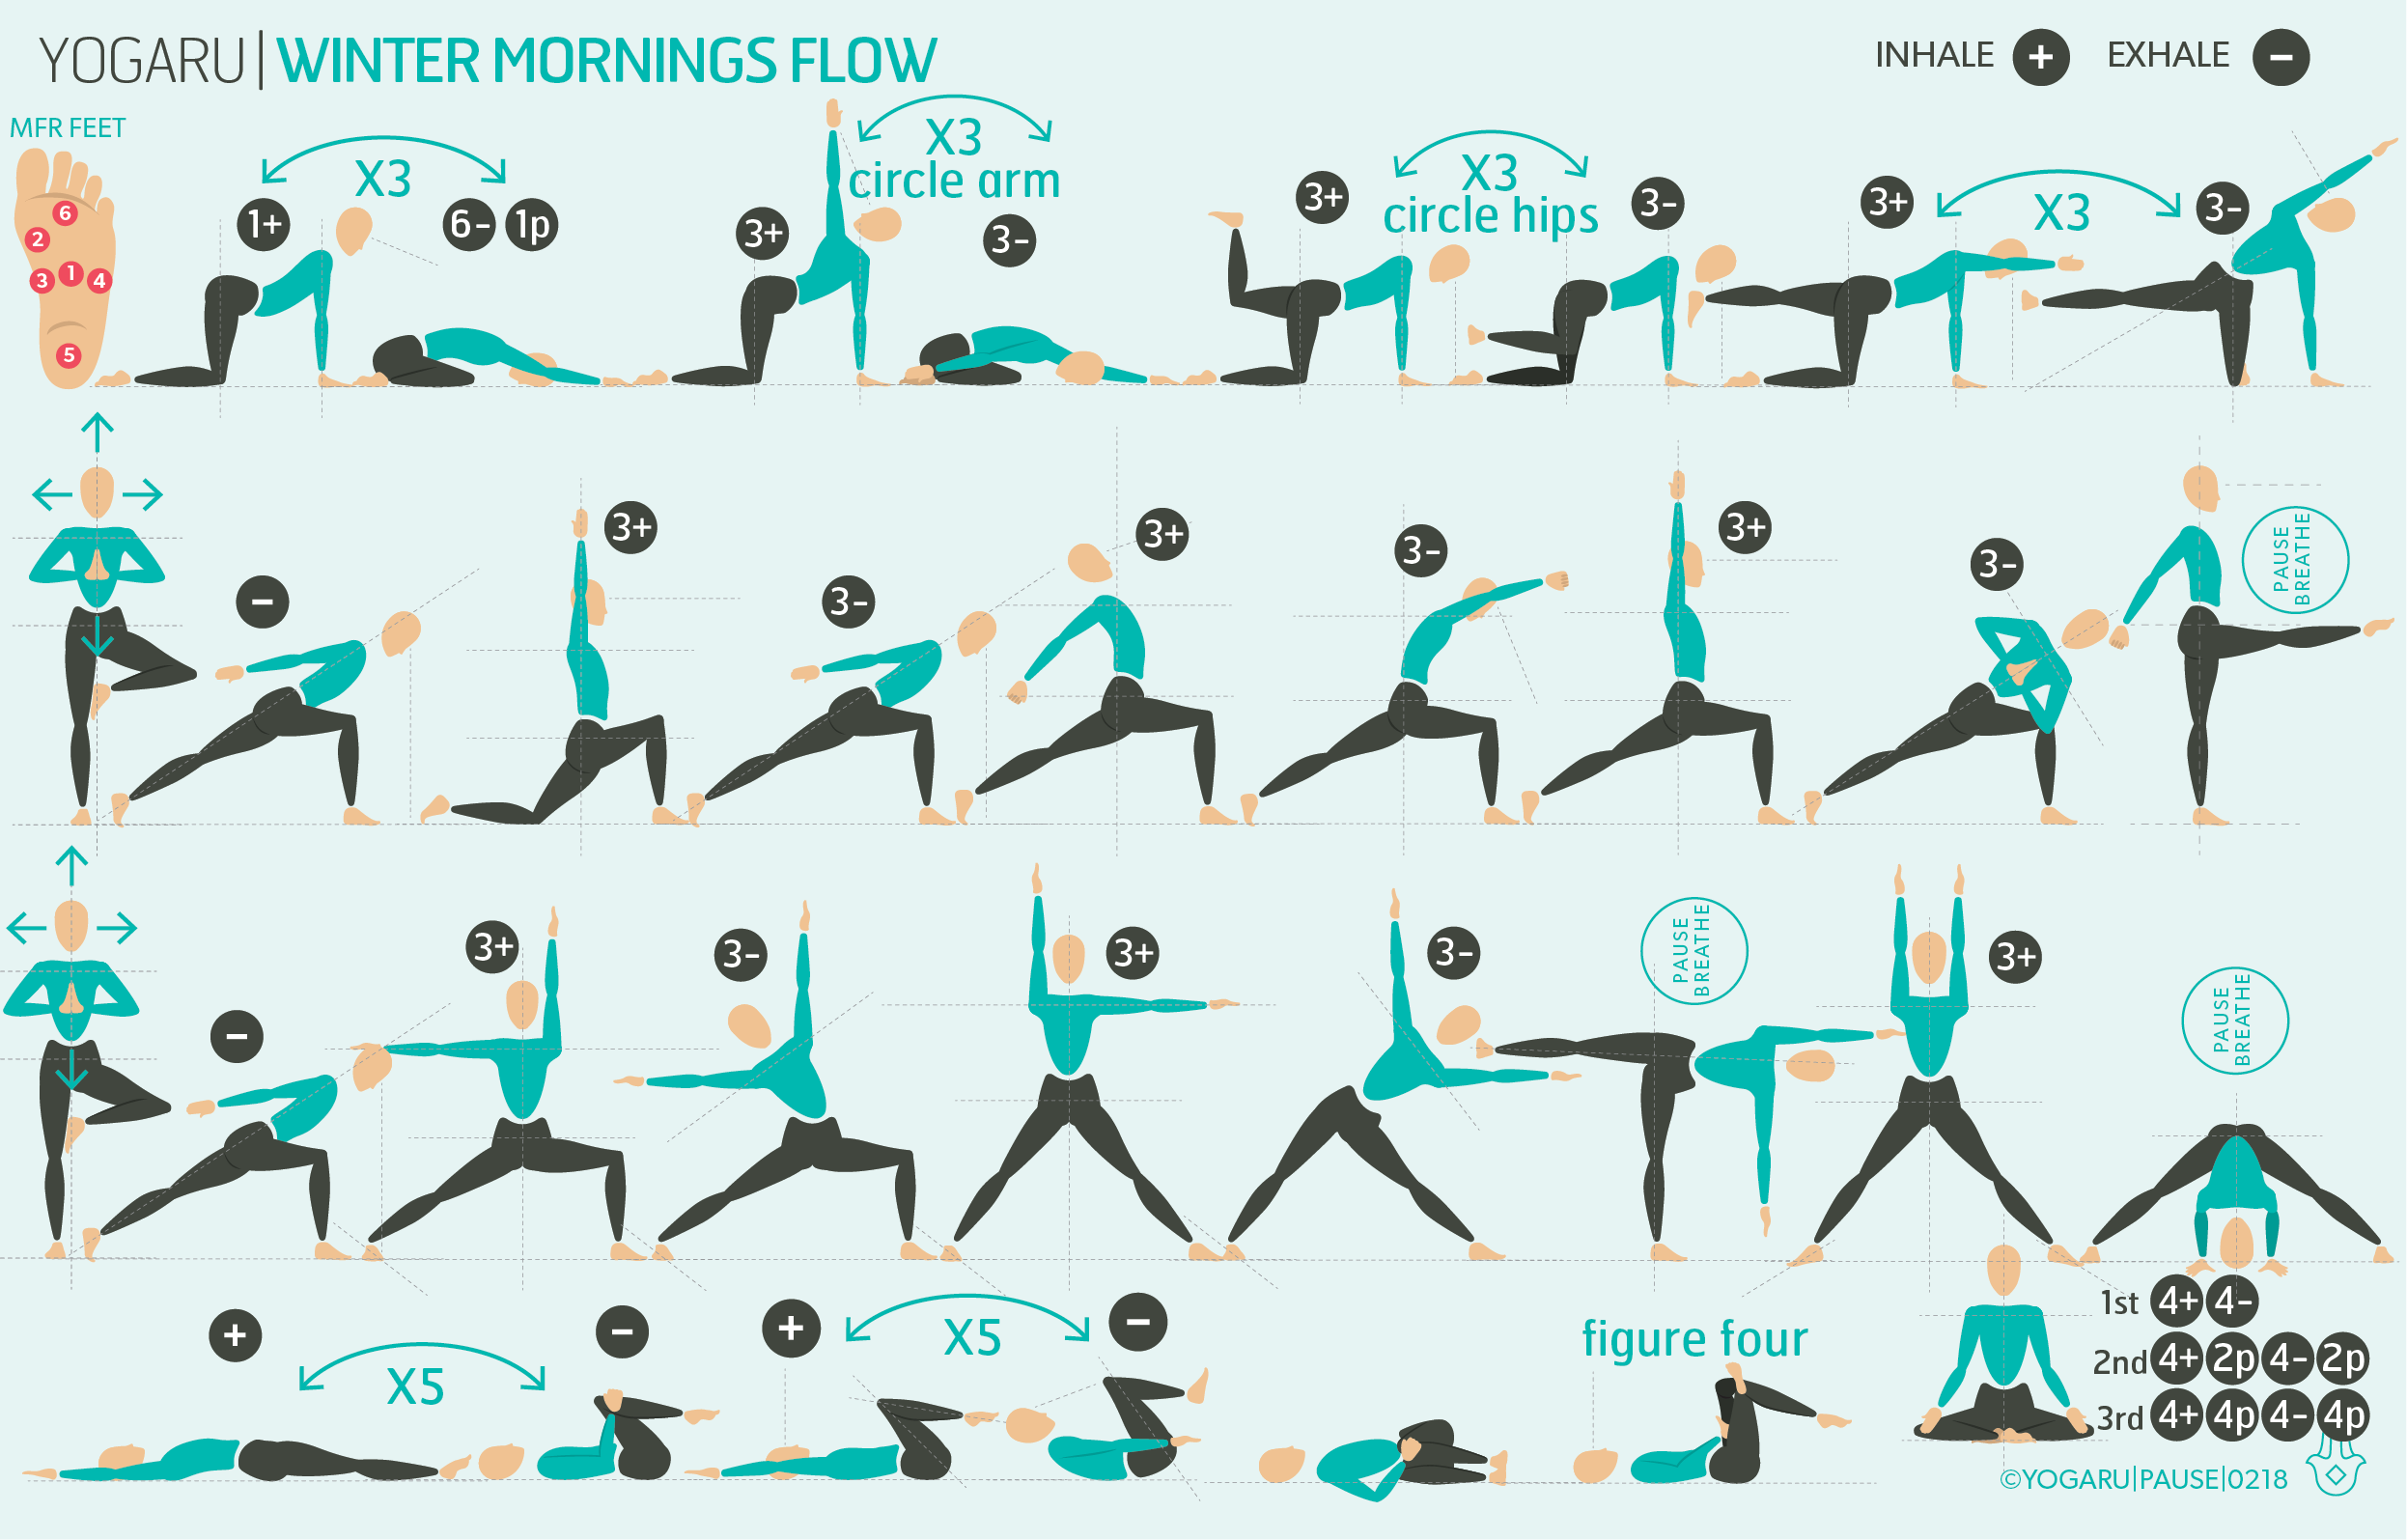
This sequence starts with two child’s pose flows to help you link your breath with your movement and get into the rhythm of moving slowly. Row two and three are your two standing flows. Start with row two by stepping your right leg forward, complete the row and then repeat it by stepping your left foot forward. Do the same for row three. IN both these rows, and in the seated flow, you will inhale for the count of four and exhale for the count of four. This will help slow you down and access your strong muscles to make considered and coordinated transitions. The final row is a six pose seated flow, using the four count breath again. Bend the right leg up first and then repeat the six poses with the left leg bent.

ALIGNMENT CUES
Have a read of the tips below and either print out the sequence or save it onto your device:

  • Move slowly through the sequence using the breath count as your guide. Inhale is indicated with a ‘+’, exhale is a ‘-”. You can increase or decrease the count to suit what feels comfortable for you.

  • Breath all the way into your belly to access the full capacity of your breath.

  • Repeat the two standing flows for three rounds per side, stepping right leg forward first then left leg.

  • Give yourself at least 5 mins in Savasana to transition back into your day.

To save the images for personal use click and hold down the image until the ‘save image’ option appears; on Mac hold down ‘control’ and click the image to get the option box; on PC right click on the image to get the option box. Scroll down in the ‘option box’ and click ‘save image’.

Ruth Delahunty Yogaru

Christmas hols flow

SIMPLE AND ACTIONABLE
I’ve written lots of articles with sequences for Chritsmas  and New Years over the years. From The ultimate Christmas flow and Christmas mini flows to Step gently into the New Year and Mini flows for 2020. This year I’m going to keep it really simple and give you a sequence which includes all my favourite techniques I’ve been using recently in my own practice, my classes and with my private students. I’ll keep it short and sweet and divide it into a few different sections to make it easier for you to proactively make time to step on your mat to do the full sequence or to pick and chooses some of the different techniques if you are short on time or just need an SOS moment to yourself before resuming your festivities. You could choose to practice the breath work first thing in the morning or the standing flow, some MFR or a restorative pose in the evening to help you relax. Catching a few minutes to yourself each day makes all the difference to help you continue to enjoy your Christmas hols. 

MY FAVOURITE TECHNIQUES
We know that doing yoga makes us feel good physically and mentally. It increases our mobility and strength, helps with good posture and balance and even reminds us to breathe better. Along with yoga poses I love to add MFR (myofascial release), pranayama (breathwork) & restorative poses (relaxation) to my practice. By using this multi faceted approach I ensure that I am optimising my time on my mat in a holistic way. Pranayama and MFR are quick and potent tools for stress relief while restorative yoga can be used to build an adaptable nervous system and rewire the brain's response to stress. Pranayama breathwork is the fastest way to reduce stress. It has an immediate effect on mood and energy – increased breath rate is invigorating and energising, while decreasing breath rate is calming and relaxing. It can also be used to manage pain by stimulating the relaxation response and pain signals. MFR has many benefits but is used mainly to increase range of movement and ease aches and pains. It also stimulates receptors under the skin called ruffinis that initiate our relaxation response and can be used at the end of the day to help switch off in preparation for sleep. Restorative is considered the king of all yoga when it comes to stress resilience. It is a relaxation practice that turns down the dial on the stress response and helps you consciously relax. By practising restorative poses you teach the nervous system to recognise and deal with stress in everyday life. When stress is reduced the body can focus on the functionality of the immune, respiratory, cardiovascular and endocrine systems. Helping the body as it strives for balance.

EXPLORING CHRISTMAS HOLS FLOW IN YOUR PRACTICE
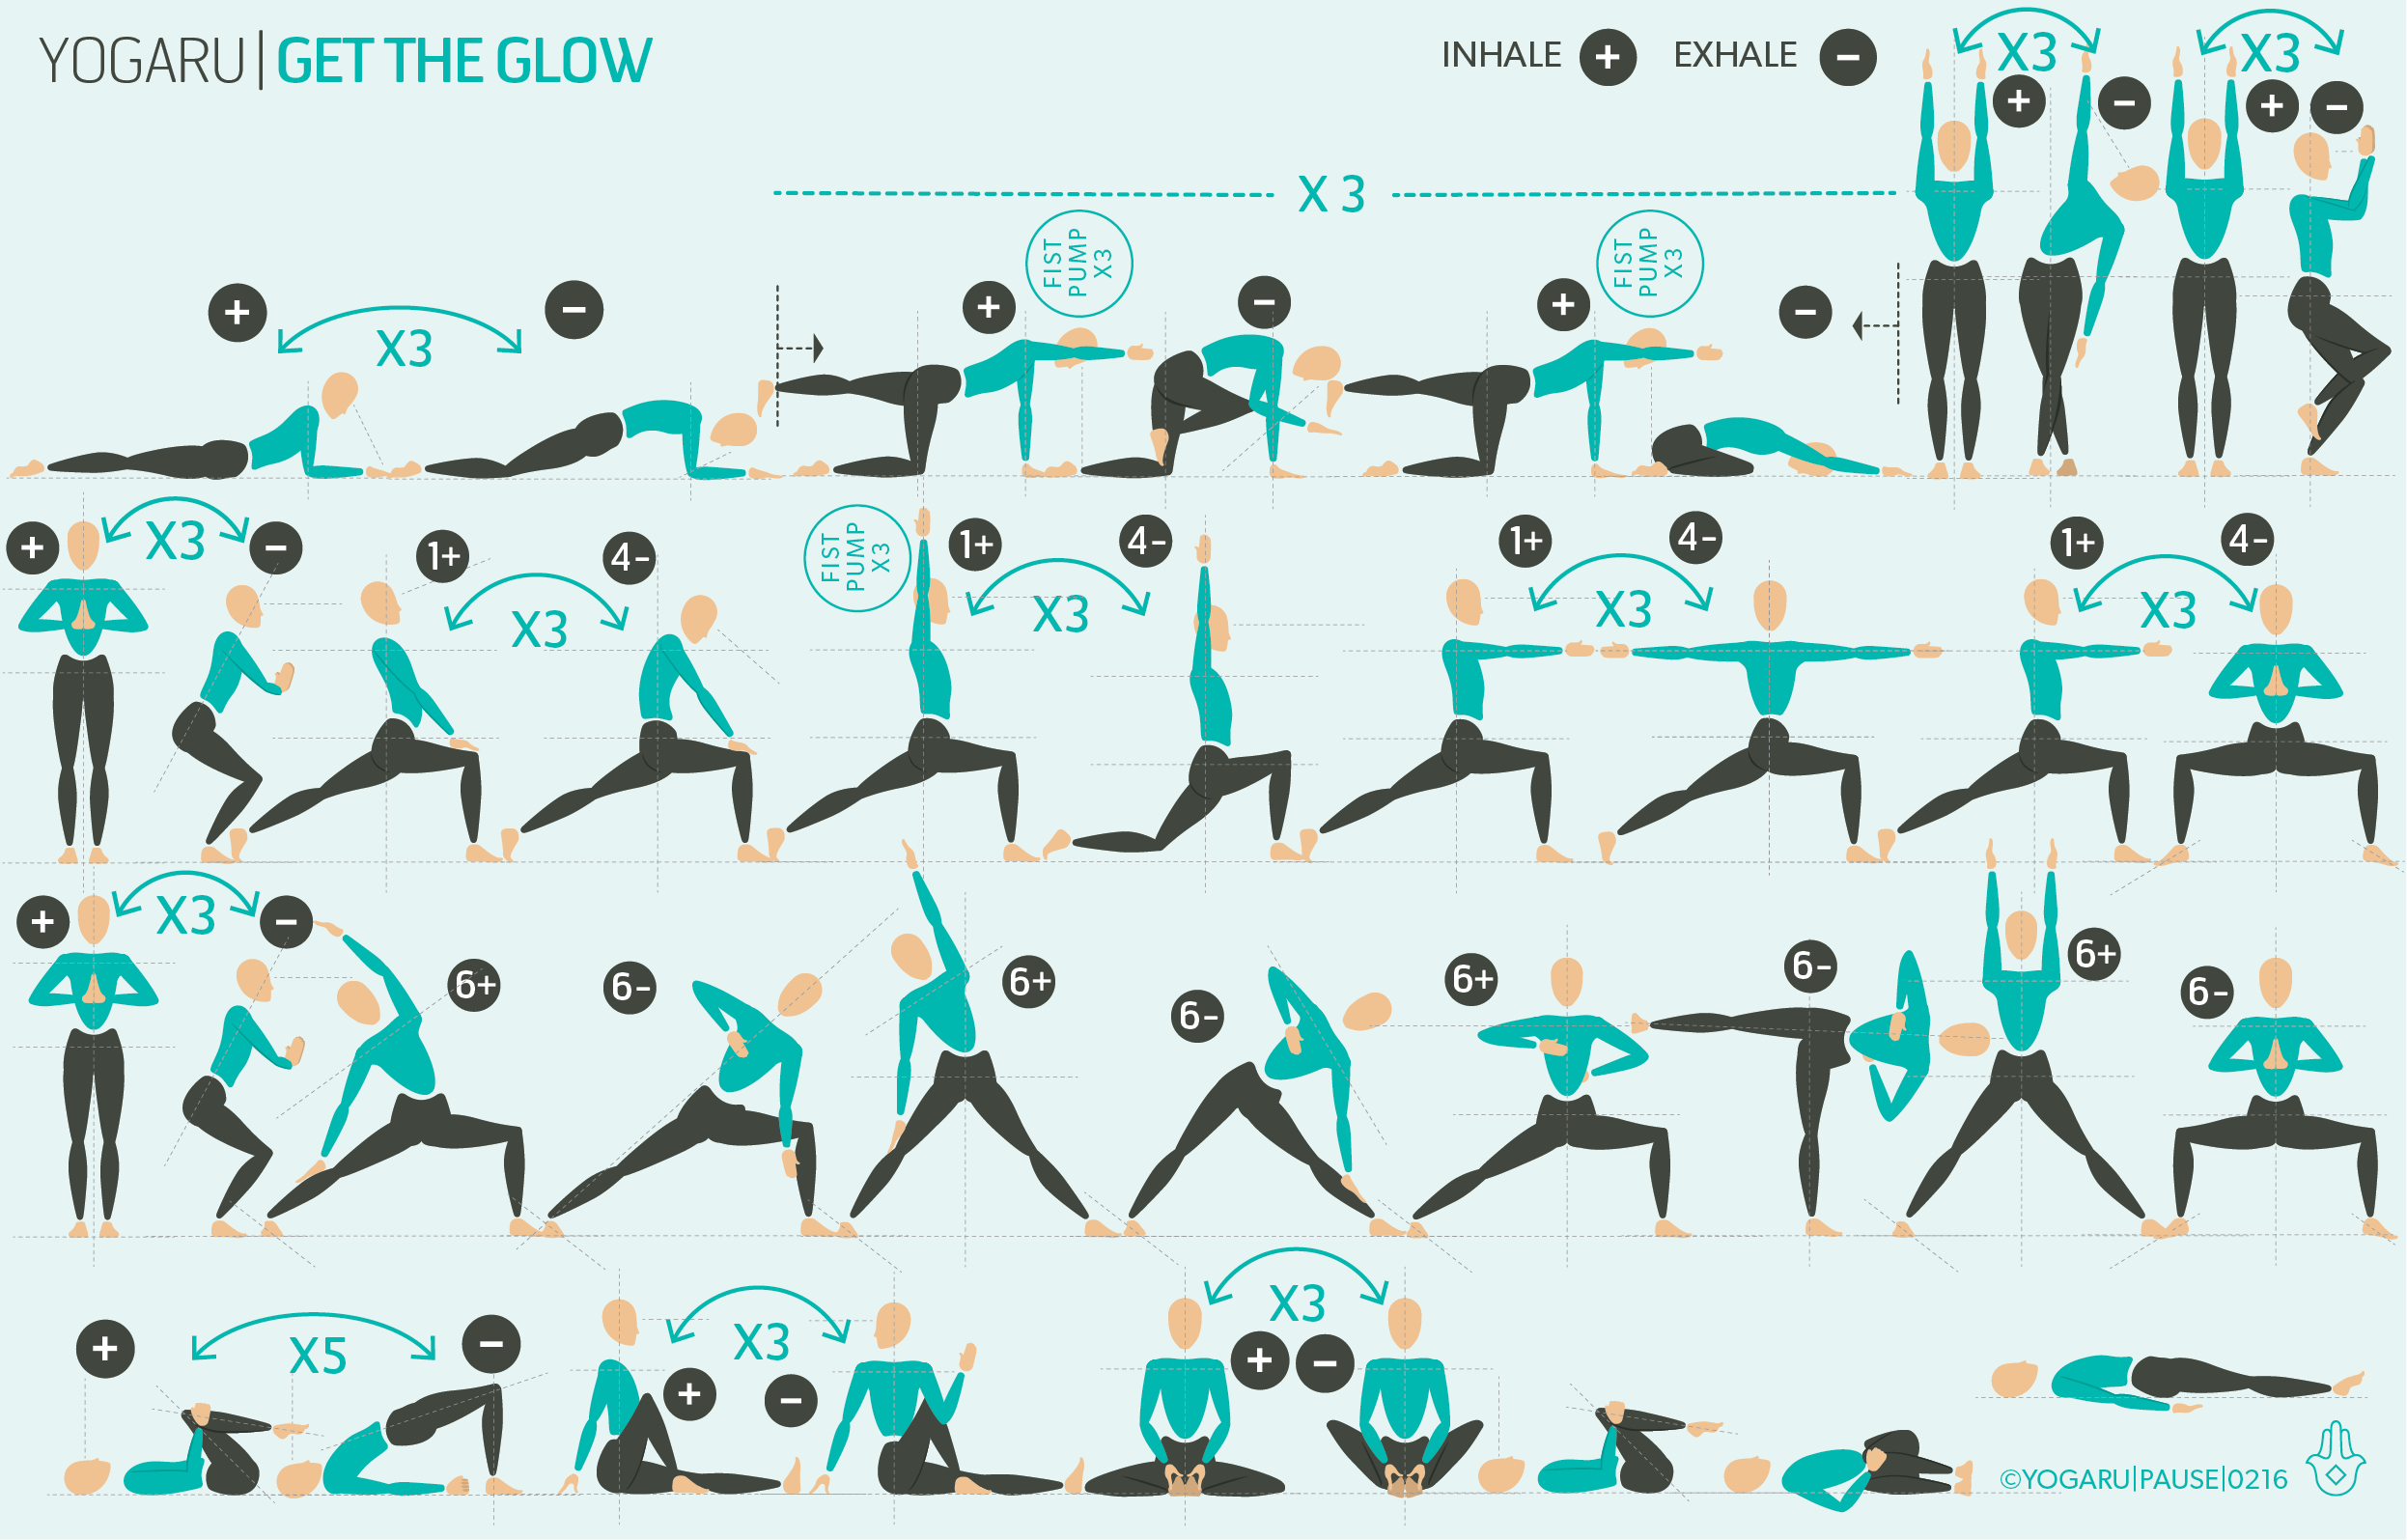
This sequence starts with a pranayama practice as described below. You can also do the pranayama at the end of your practice if you prefer. This sequence has an outer hip focus so you will start with MFR on the outer hips and the glutes, as detailed below, to prepare the area and allow you to access its strength as you flow through the standing flows. The second and third row are the two main standing flows. In row two you will step the right leg forward first, do the full flow and then repeat it with the left leg forward. Do the same for the second flow in row three. The final row starts with MFR on the shoulders as detailed below to help initiate the relaxation part of your practice. Followed by two gentle two pose flows and two restorative poses. Practice the whole sequence or mix and match sections to meet your changing demands over the festive period.

ALIGNMENT CUES
Below are the pranayama, MFR and restorative techniques used in this sequence. The props you’ll need are:
2 x MFR balls - or 2 tennis balls.
1 x bolster - or 2 towels, wrapped around a horizontally rolled pillow and tied to secure.
2 x yoga blankets - or any wool, thick cotton or fleece blanket with density.

Pranayama
Sit in a comfortable position – cross legged, sitting up on a brick or straddling a bolster.  Inhale for the count of 4, exhale for the count of 4 x 3 rounds. Inhale for the count of 4, pause for 2, exhale for the count of 4, pause for 2 x 3 rounds. Inhale for the count of 4, pause for 4, exhale for the count of 4, pause for 4 x 3 rounds. 

MFR
No.1 - Hips (gluteus medius)
Compression
- from side lying up on your forearm, stack  2 x balls behind your frontal hip bone on your outer hip, gently press down with an inhale and release on the exhale x 5 breaths.
Sheer - slowly lift and lower your leg x 5.
Roll & cross fibre - roll up and down on your outer hip.

No.2 - Glutes (gluteus maximus & piriformis)
Compression
- from supine with knees bent, place 2 x balls in the centre of each buttock muscle, gently press down with an inhale and release on the exhale x 5 breaths.
Sheer - slowly lift and lower one knee at a time towards your chest x 5. Place your right foot on your left knee and lower and lift your right knee.
Roll & cross fibre - roll around the whole buttocks area.

No.3 - Shoulders (trapezius & supraspinatus)
Compression
- from supine with knees bent, place 2 x balls in the centre of each upper shoulder, gently press down with an inhale and release on the exhale x 5 breaths.
Sheer - slowly circle arms overhead and back to the ground x 5. 

Restorative
No.1 - Supported childs
Come into a kneeling position with your hips on your heels. Nestle a bolster between your knees, vertically along your mat with a folded blanket on the far end. Place your hands either side of the bolster. With an inhale lengthen through the whole spine and on an exhale gently place your front spine along the centre of the bolster. Place your right cheek on the bolster. Feel the breath in the back of the ribs and lungs. Swap to your left cheek half way through the pose.

No.2 - Mountain brook
Half roll a four fold blanket and place it at the top of your mat. Accordion fold the other blanket and place it below your top blanket where your shoulder blades will lie. Place the bolster towards the bottom of your mat where your knees will be. Lie supine on your back, nestle the rolled part of the top blanket in the curve of your neck, place the accordion folded blanket under the lower tips of your shoulder blades and the bolster under the creases of your knees. Legs and arms extended, palms facing up, feet fall out to the side. Feel the rise and fall of the props supporting your back body.

To save the images for personal use click and hold down the image until the ‘save image’ option appears; on Mac hold down ‘control’ and click the image to get the option box; on PC right click on the image to get the option box. Scroll down in the ‘option box’ and click ‘save image’.
Ruth Delahunty Yogaru

Top 5 MFR

HOW MFR CAN HELP YOU
MFR, or myofascial release, is a therapeutic self massage technique using mainly two small rubber balls. What is great about MFR is that it is very user friendly and easy to slot into your daily routine. It just takes a few minutes and all you need is your two balls and space on the floor or a wall to roll on. You don’t necessarily need to change into workout gear or even roll your yoga mat out. It eases your aches and pains, increases your range of movement, improves your posture, enhances your sporting or hobbies performance, and builds emotional resilience. Huge return for a small bit of time invested in this self care technique. My preferred routine is to slot it in pre yoga, post a workout or at the end of the day to help me switch off and relax. For more information on the science of MFR check out my earlier article. You’ll notice it is the same sequence as this newer article (the top 5 are still the top 5!) but in this article I expand on when to use MFR.

When you start to use MFR you will feel immediate and cumulative benefits. You will feel a warmth to the area you have rolled and a heightened sense of awareness in and around the area. It might feel freer, more fluid and less stiff and chalkie. It also stimulates little receptors under our skin called ruffinis which communicate with the rest and restore branch of our nervous system and help you feel lovely and relaxed. Longer term benefits can range from a relief from aches, pains and stiffness to stress reduction and better sleep. It can be adapted depending on what your desired outcome is.

The golden rule with MFR is to stay within the parameter of mild discomfort, you are encouraging your muscles to relax around the ball, not contract and protect themselves. If you are clenching your jaw, not breathing or gripping muscles it is too intense and counterproductive on both the nervous system and the health of the tissues. You can reduce the intensity by leaning a bit lighter, adding a second ball to the area or placing a blanket over the balls. 

If you’re interested in joining my next in person or online MFR workshop please send me an enquiry:

WHEN TO USE MFR
For pain management – shorter practice + frequently: when we roll on the balls the gentle pressure releases hormones (oxytocin & serotonin) which help reduce pain sensitivity. It also stimulates receptors under the skin called nociceptors whose job is to detect pain. When they are stimulated in this controlled environment it desensitises them, increases our pain tolerance and resets pain signals that can get caught in a chronic pain loop. MFR can also treat the potential source of the pain by releasing trigger points which are muscle knots and help repair injured tissues. 

Relaxation – long or short practice + lighter: MFR stimulates nerve receptors found under the skin called ruffini receptors whose job is to initiate the rest and restore response. These receptors communicate with the nervous system and send happy relaxation signals to the whole body which is why MFR can feel very relaxing. It is very adaptable and can be used to down regulate the nervous system during the day if you are feeling stressed or tired, or in the evening to help you relax and prepare for a good night's sleep.

Pre yoga – shorter practice + lighter: the pressure of rolling affects the viscosity and hydration of the fascia. This improves glide and slide of our muscles, tissues and organs and increases our mobility. Receptors under the skin called mechanoreceptors respond to pressure, when rolled they release the muscles, increasing mobility. This increase in mobility is acute and needs to be captured through stretching which is why MFR prior to yoga is the perfect way to increase your mobility.

Post yoga – longer practice + deeper: similar to the principle of Savasana, MFR after yoga helps you relax after your practice and allows your body to assimilate all the benefits of your practice. Think of it as an energy bank. When we spend energy on our practice we need to invest back with practices like MFR and taking time to reinvest in our energy bank with Savasana.

Pre sports – shorter practice + lighter: when it comes to pre sports we are looking to increase circulation and warm the muscles and increase mobility without decreasing the strength of the muscle. Previously we used stretch before sports but now the science says that this loosens the muscles too much and you lose the spring effect of the muscles. MFR prepares the muscles without losing any of their power. It also releases trigger points and knots and improves coordination and communication within the muscles to meet the demand.

Post sports – longer practice + deeper: when we exercise we create micro tears in the muscles. These micro tears are repaired by the fascia within the muscles. MFR stimulates and increases the rate of the repair process. It also increases circulation and helps with post exercise fatigue and alleviates delayed onset muscle soreness (DOMS).

THE BENEFITS OF MFR
MFR is used for both therapeutic and preventative measures for:

  • Increased muscle & fascia hydration.

  • Increased glide & slide.

  • Healthy connective tissue.

  • Increased mobility.

  • Increased circulation.

  • Better nervous system communication.

  • Rest and relaxation.

  • Pain management.

  • Better tissue repair.

  • Reduced physical & mental tension.

  • Better body awareness.

  • Support immune function

  • Pre exercise to help prepare the muscles.

  • Post exercise to help recover the muscles.

EXPLORING TOP 5 MFR IN YOUR PRACTICE
Less is more when using MFR. If you are gritting your teeth and ignoring intense discomfort you will hinder the process and it will become counterproductive. You are looking for mild discomfort with the ability to consciously relax the muscles you are working on. Use your exhale to help relax the muscles under the ball(s). If you hit a tender spot that triggers your muscles to tighten, work indirectly around the area before directly. Avoid bony areas where there is very little muscle to work on and can be very uncomfortable. You will notice that different areas will be more tender than others. Adjust your applied pressure to create an even sensation throughout your practice. In areas where you roll individual sides it is good to lie down between sides to notice the difference. In areas where you do both sides at the same time, take a moment to lie down and sense the effects locally and around the whole body. You might notice the massaged area is more relaxed, less tight; more fluid, less chalkie; more free, less stiff; more neurological feedback, less disconnected.

THINGS TO REMEMBER

  • 30/60 seconds per area.

  • 5 min a day is better than 20 min a week.

  • Less is more, look for mild discomfort.

  • Work indirectly before directly on trigger points.

  • Should never be painful or sharp.

  • Use two balls instead of one or place a blanket over the balls to reduce the intensity.

  • Avoid bones, joints, nerves.

  • Avoid inflammation, bruises, broken skin, varicose veins.

ALIGNMENT CUES
Below are MFR techniques used in this sequence:

No.1 - Feet
Compression - from standing or seated, place 1 x ball at position No.1, gently press down with an inhale and release on the exhale x 5 breaths and move on to No.2. Continue to No.5. 
Roll & cross fibre - with the toes on the ground place 1 x ball at No.5, roll the ball across your heel x 5. Place 1 x ball at No.6, roll the ball across the knuckles of your toes x 5. Place 1 x ball at No.6, roll in one direction from toes to heel x 5. 
Scribble - roll and scribble across the sole of the foot. Repeat all steps on the other foot.

No.2 - Shoulders (trapezius & supraspinatus)
Compression - from supine with knees bent, place 2 x balls in the centre of each upper shoulder, gently press down with an inhale and release on the exhale x 5 breaths. 
Sheer - slowly circle arms overhead and back to the ground x 5. 

No.3 - Lower back (quadratus lumborum & erectors)
Compression - from supine with knees bent, place 2 x balls above the back of the hips either side of the spine, gently press down with an inhale and release on the exhale x 5 breaths.
Sheer - slowly lift and lower one knee at a time towards your chest x 5.
Roll & cross fibre - roll up and down the lower spine below the ribs.

No.4 - Glutes (gluteus maximus & piriformis)
Compression - from supine with knees bent, place 2 x balls in the centre of each buttock muscle, gently press down with an inhale and release on the exhale x 5 breaths.
Sheer - slowly lift and lower one knee at a time towards your chest x 5. Place your right foot on your left knee and lower and lift your right knee.
Roll & cross fibre - roll around the whole buttocks area.

No.5 - Hips (gluteus medius)
Compression - from side lying up on your forearm, stack 2 x balls behind your frontal hip bone on your outer hip, gently press down with an inhale and release on the exhale x 5 breaths.
Sheer - slowly lift and lower your leg x 5.
Roll & cross fibre - roll up and down on your outer hip.

To save the images for personal use click and hold down the image until the ‘save image’ option appears; on Mac hold down ‘control’ and click the image to get the option box; on PC right click on the image to get the option box. Scroll down in the ‘option box’ and click ‘save image’.

Ruth Delahunty Yogaru