Marjaryasana & Bitilasana - Cat & Cow

ANIMAL MOVEMENT
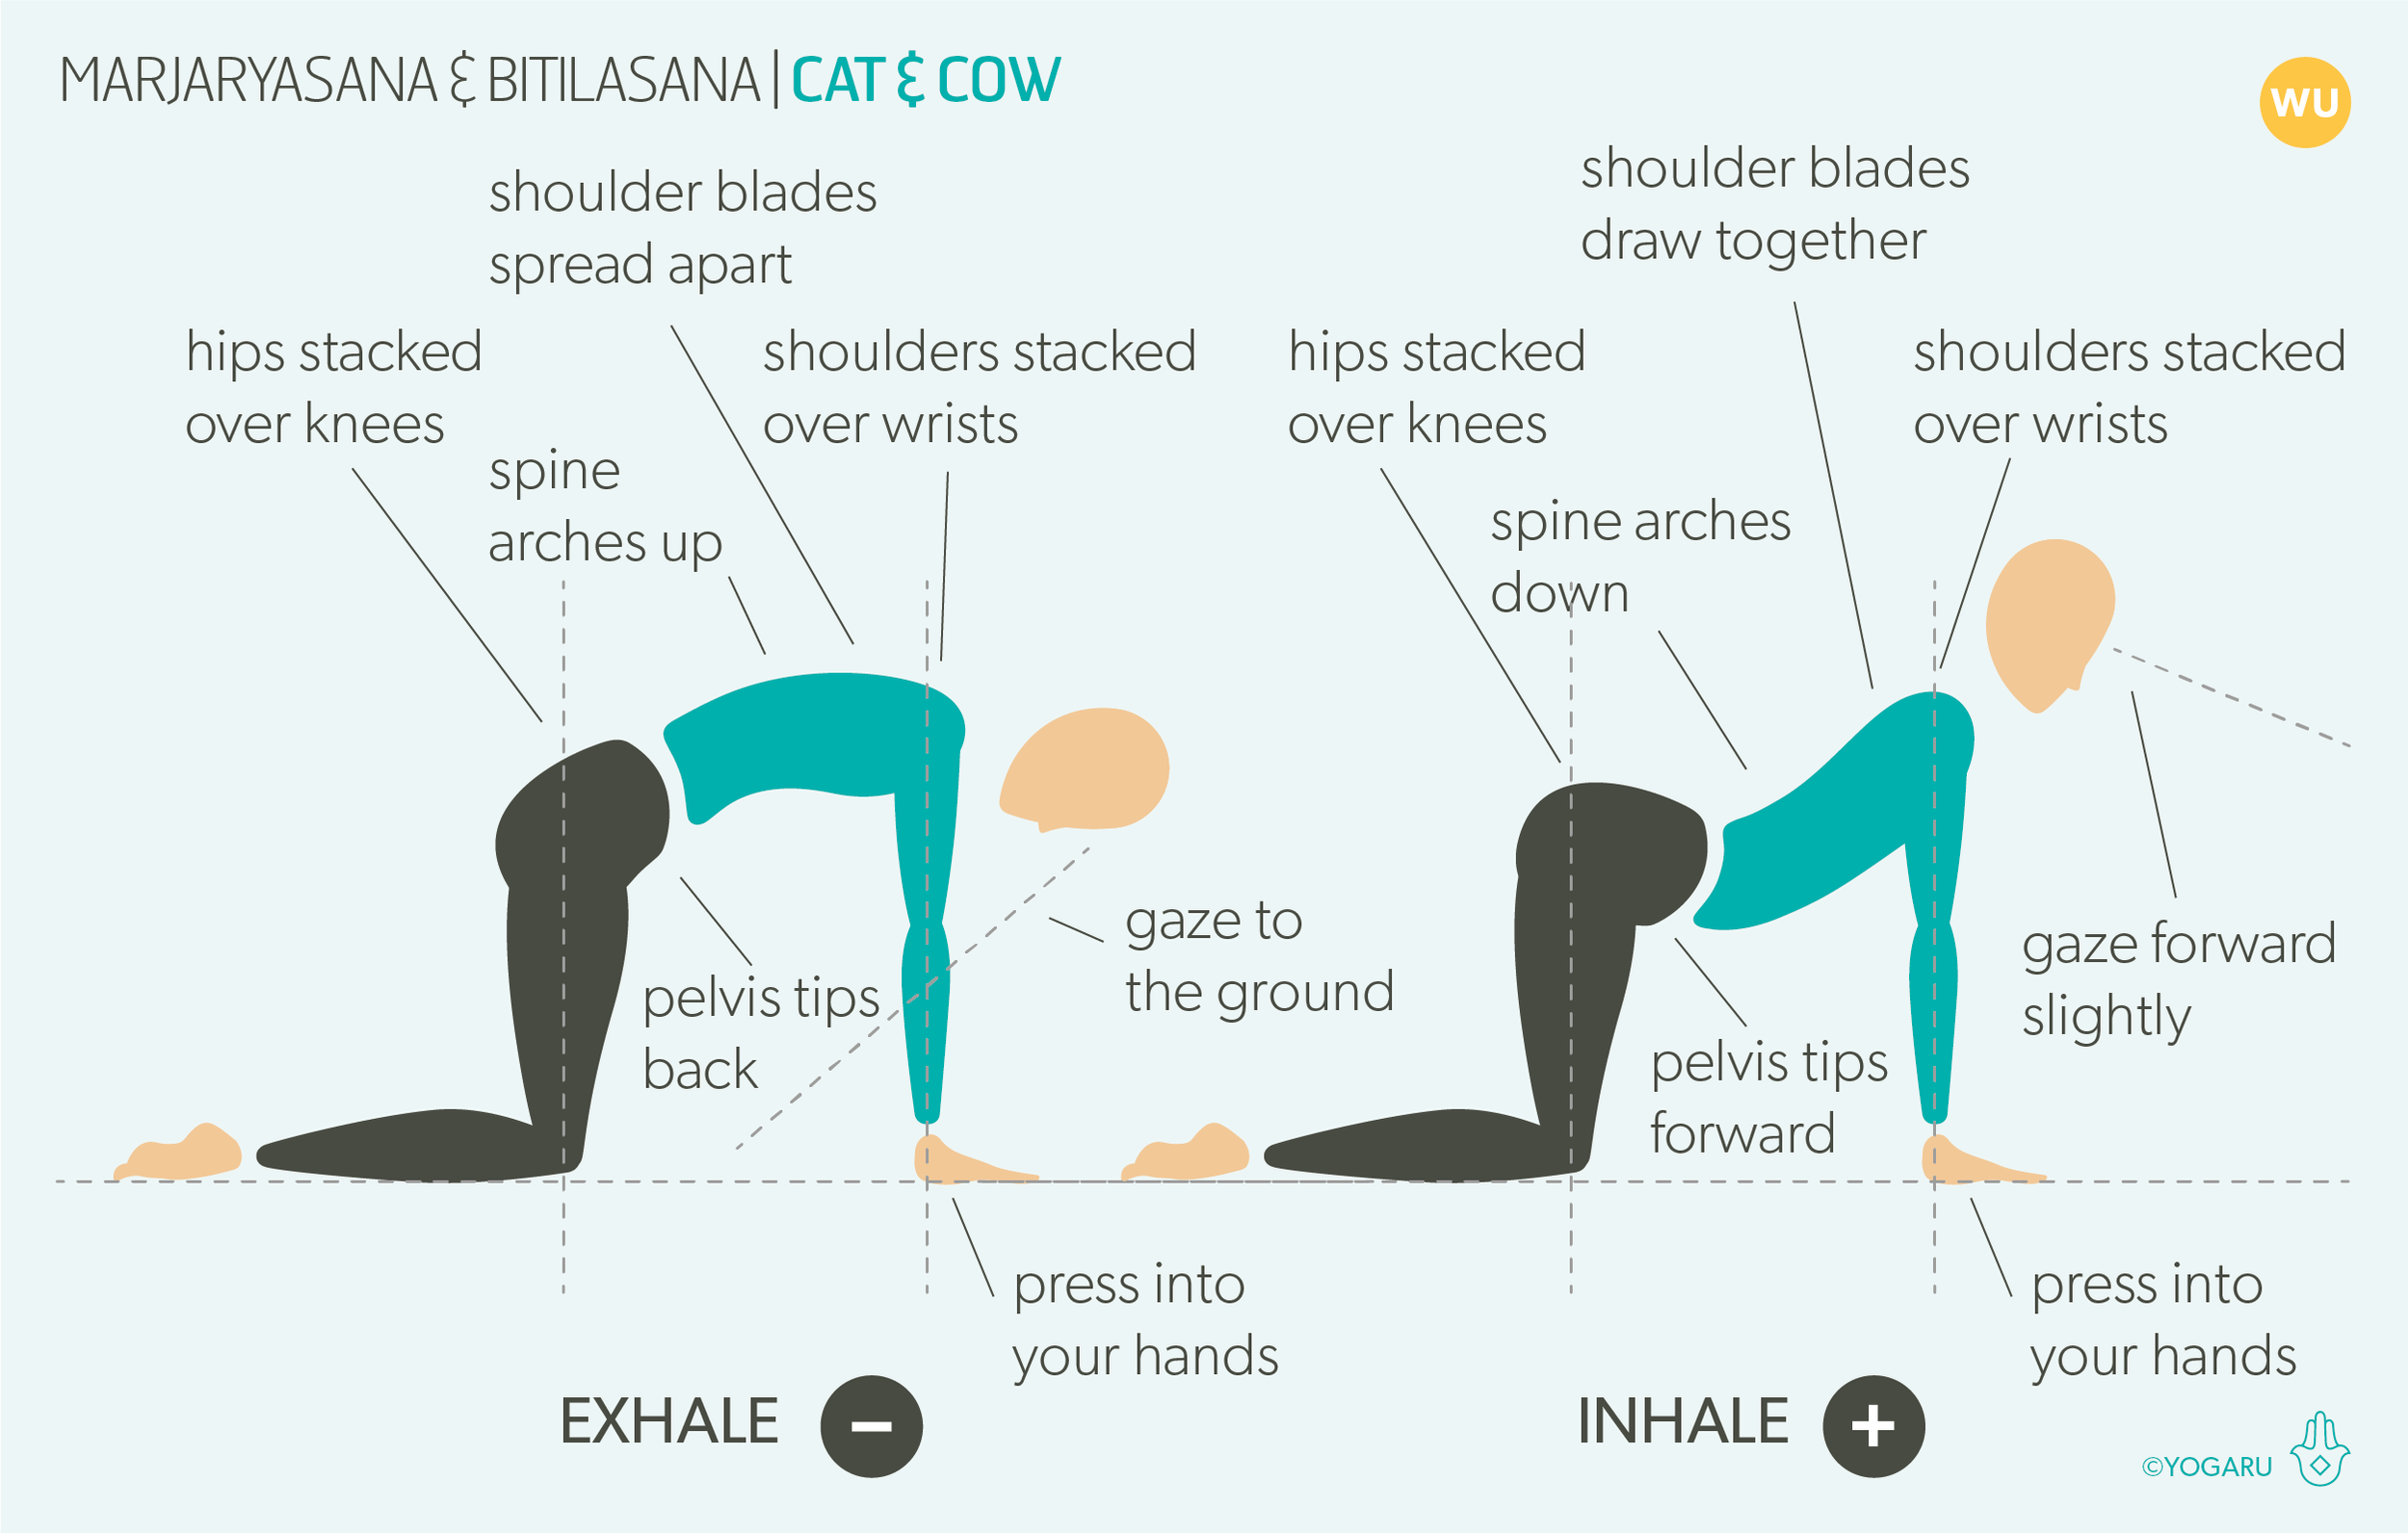
Marjaryasana/Cat and Bitilasana/Cow go together like two peas in a pod and are perfect at any stage of your sequence to warm up, or ease out tension in the hips, spine and shoulders. I start off all of my own yoga practices and lots of my sequences with a few rounds of Cat & Cow. Even though they are often referred to as Cat & Cow it makes more sense to me to practice them as Cow first, with an inhale, and Marjaryasana/Cat after, with an exhale. In Bitilasana/Cow, when we inhale, the top of the pelvis tips down, the shoulder blades retract and draw together on the back, and the back of the shoulders reach towards the back of the hips. While in Marjaryasana/Cat, when we exhale, the pelvis tips up, the shoulder blades protract and spread apart on the back, and the front of the shoulders roll forward. All these opposites, in this simple two pose movement, make it a very good way to stretch and strengthen the hips, spine and shoulders joints. They are also very accessible with minimum scope for injury.

THE BENEFITS OF MARJARYASANA & BITILASANA - CAT & COW
Bitilasana/Cow strengthens the spine, and back of the shoulders, and stretches the front of the shoulders, chest, core and back of the hips. In Marjaryasana/Cat the opposite is happening – it stretches the spine, and back of the shoulders, and strengthens the front of the shoulders, chest, core and back of the hips. Bitilasana/Cow is a good prep for backbends while Bitilasana/Cow is a good prep for forward bends and poses like Bakasana/Crow. They are also very good poses for spinal health and massaging all the organs of the abdominal region. As we move from one pose to the other we are also linking the breath with movement, which is a valuable method for reduces stress and anxiety.

EXPLORING MARJARYASANA & BITILASANA - CAT & COW IN YOUR PRACTICE
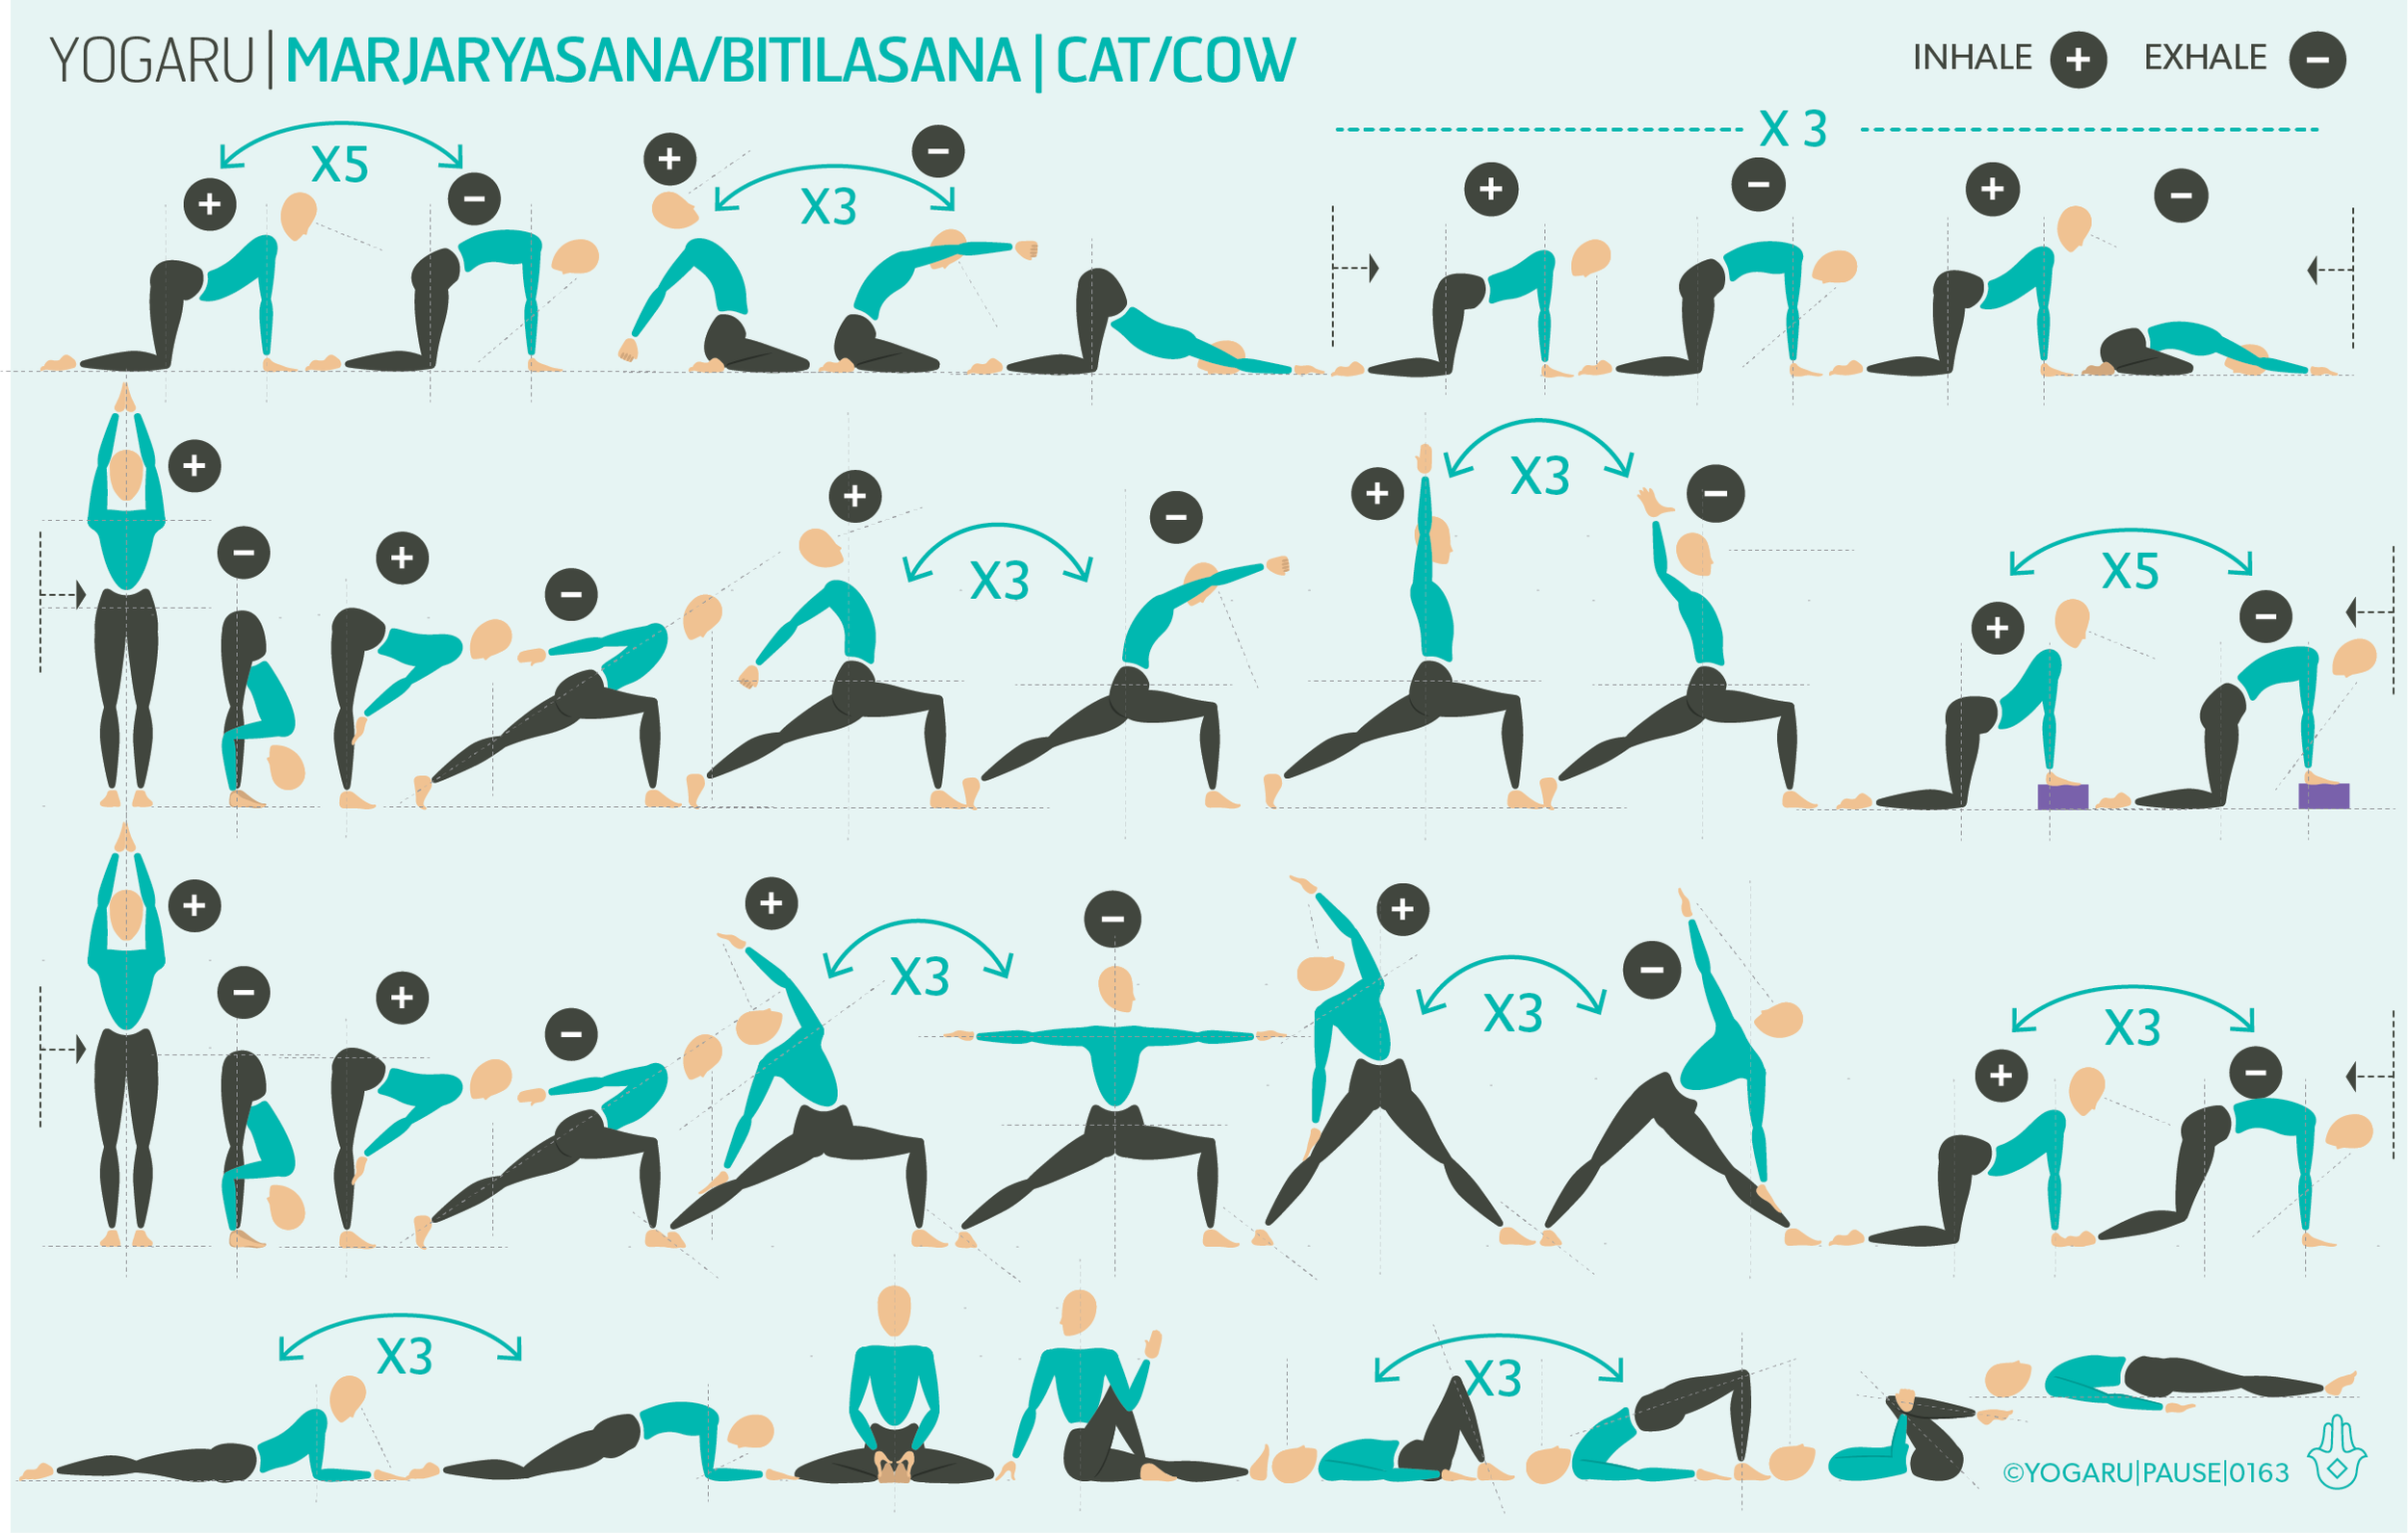
Marjaryasana/Cat and Bitilasana/Cow can be added at pretty much any stage of your practice. You can even add it into other sequences to counterpose from a mini flow with lots of spinal, hip or shoulder work. In this sequence I have added them in as much as possible and added versions of Marjaryasana/Cat and Bitilasana/Cow to show how versatile they can be too. If you find your wrists are uncomfortable, place a rolled up blanket under the heels of your hands to reduce the angle at the wrist. If this doesn't relieve the discomfort, place your forearms on one or two bricks.

ALIGNMENT CUES
Below you will find the alignment cues for both Marjaryasana/Cat and Bitilasana/Cow. Even though these two poses partner together perfectly, take your time to get familiar with what you are looking for in each pose.

MARJARYASANA/CAT – EXHALE

  • From all fours, hips stacked over knees, shoulders stacked over wrists.

  • Exhale, arch your spine up, pelvis tips back, shoulder blades spread apart.

  • Press into all five knuckles of your hands, the tops of your feet and your knees.

  • Back of the neck long, gaze at the ground under your navel.

  • Inhale, into Bitilasana, repeat 5-10 rounds to warm up the spine.

BITILASANA/COW – INHALE

  • From all fours, hips stacked over knees, shoulders stacked over wrists.

  • Inhale, dip your navel down, pelvis tips forward, sit bones spread, broaden your collarbones, move your sternum forward and up, shoulder blades draw together.

  • Press into all five knuckles of your hands, the tops of your feet and your knees.

  • Back of the neck long, gaze forward to the front of your mat.

  • Exhale, into Marjaryasana, repeat 5-10 rounds to warm up the spine.

To save the images for personal use click and hold down the image until the ‘save image’ option appears; on Mac hold down ‘control’ and click the image to get the option box; on PC right click on the image to get the option box. Scroll down in the ‘option box’ and click ‘save image’.

Ruth Delahunty Yogaru

Energising flow

ENERGY = FUEL
We have two main sources of fuel to energise all functions in our bodies from movement to every metabolic chemical reaction in our cells. These two sources are food and oxygen. To get these two sources into all the cells of our bodies we need to supply them with fuel in the form of good quality food as close to nature as possible and fresh air. Below I discuss what yoga tools we will use in this sequence to help build energy. But there is another very valuable tool that can be used on and off the mat to create energy. Challenging yourself brings oxygen to the brain and wakes you up. Challenging yourself on your mat can be as simple as staying an extra breath in a strong standing pose or really focusing in a standing balancing pose. Challenging yourself off your mat might mean being comfortable with occasionally stepping out of your comfort zone and trying new things, waking yourself up and not spending your days on autopilot.

HOW TO BUILD ENERGY
In our practice we can assist the two systems that are in charge of taking in food and oxygen – the digestive system and the respiratory system – and the system that helps distribute and transport it – the circulatory system.

The digestive system, or the enteric nervous system, processes food, absorbs nutrition, and removes toxins. Moving and massaging the digestive system with twists and backbends help to maximise absorption and detoxification – feeding the cells and removing toxins that will interfere with their efficient functionality. They also bring fresh blood flow to the blood vessels in the walls of the digestive system which helps the circulatory system distribute this fuel source around the whole body. Massaging the gut helps to keep you regular by encouraging peristalsis in the walls of the gut to move the waste food along. Once the body has taken what it needs from our food it is very important to remove the waste so that it doesn’t stagnate in our gut.

The respiratory system fuels our cells with oxygen so they can grow and replicate. Breathing feeds the cells and flushes out the by-product of carbon dioxide. In our practice, when we inhale our heart rate increases, the cells receive oxygen, and we feel energised. The circulatory system then takes over and helps to distribute the oxygen to our whole body. While backbends will help to expand the lungs and bring in more oxygen, the challenge of standing poses and standing balancing poses create heat and help boost circulation.

EXPLORING ENERGISING FLOW IN YOUR PRACTICE
This sequence is part of a series of sequences where I look at how yoga can help regulate our moods. Each of these sequences start with the same warm up that will move all the main joints of the body – the spine, shoulders and hips. This repetition gives you ‘comfort in familiarity’ as you can practice this series, while at the same time ensuring you are warmed up and ready for the themed mini flows that follow.

The sequence has lots of standing poses and standing balancing poses to boost circulation, expand the lungs and wake the thinking brain up. It also has plenty of poses that will massage the digestive system. Notice your energy levels before, during and after your practice. Be open to challenges and when you encounter one breath into it. .

ALIGNMENT CUES
There is no specific peak pose in this easy going flow. Use the cues below to help you flow through the sequence with ease and fluidity.

Have a read of the tips below and either print out the sequence or save it onto your device:

  • Use the breath guide in the sequence to help you link breath with movement in the flow. Inhale is indicated with a ‘+’, exhale is a ‘-”.

  • In the warm up focus your attention on the area you are warming up as indicated by the sequence.

  • If there are specific poses that you would like to stay longer in, give yourself three deep breaths in those poses and pick up the next pose with the allocated inhale or exhale as indicated by the sequence.

  • For a longer practice, linger in each of the poses of the three mini flows for the first round and then move with the breath for the second and third round.

To save the images for personal use click and hold down the image until the ‘save image’ option appears; on Mac hold down ‘control’ and click the image to get the option box; on PC right click on the image to get the option box. Scroll down in the ‘option box’ and click ‘save image’.

Ruth Delahunty Yogaru

Salamba Sarvangasana - Shoulderstand

CALMING INVERSION
Salamba Sarvangasana/Shoulderstand is very calming to the nervous system and increases circulation to the thyroid and endocrine glands. It is an inversion that can be held for longer periods of time than some of the other more challenging inversions like Adho Mukha Vrksasana/Handstand or Salamba Sirsasana/Headstand. Which means you can linger a little longer to get all the benefits from inversions. Some yogis even use Salamba Sarvangasana/Shoulderstand as their meditation pose! Whether you intend to go down this route or not this is a pose that should be approached with care for the neck in particular. In Salamba Sarvangasana/Shoulderstand the full body weight sits mainly on the shoulder girdles. If you don’t have sufficient strength in your shoulder girdle the weight will collapse into the back of the neck which, with repeated practice, could cause strain to the back of the neck. A good judge on whether you are ready to try Salamba Sarvangasana/Shoulderstand is if you are comfortable in Setu Bandha Sarvangasana/Bridge and feel that you are able to press into the shoulder girdle rather than the back of the neck.

THE BENEFITS OF SALAMBA SARVANGASANA/SHOULDERSTAND
Salamba Sarvangasana/Shoulderstand strengthens the shoulders, arms, spine, and core. It also stretches the back of the neck and stretches the back of the shoulders. Inversions are fantastic poses to practise to strengthen your immune system – they boost circulation and flush out toxins from all the systems of the body and allow it to work more efficiently. This gives your immune system the resources to do its important job of protecting us from harmful microorganisms. Inversions are also very beneficial for good digestion; increasing metabolism; regulating hormones; stimulates abdominal organs; reduces fatigue; nourishing the cells of the brain; balancing hormones; building focus and concentration; eases stress, tension and anxiety; suppprts fertility; alleviates insomnia; and helps relive symptoms of menopause and sinusitus.

EXPLORING SALAMBA SARVANGASANA/SHOULDERSTAND IN YOUR PRACTICE
For most students it feels safer to give the neck a bit more space by lifting the upper arms and shoulders up a little higher than the head. To do this place one or two folded blankets at the top of your mat with enough room for your head to drop behind it onto your mat. The blankets should be folded big enough for your upper arms and shoulders to fit along the length of it. When positioning yourself make sure there is about 2 inches between the top of your shoulder and the edge of the blanket so that when you roll into position your shoulders don't fall off the edge of the blanket. Remember this is a shoulderstand not a neck stand!

If Salamba Sarvangasana/Shoulderstand is not for you there is plenty in this sequence to do all but the peak pose. Instead of Salamba Sarvangasana/Shoulderstand you can linger a little longer in Setu Bandha Sarvangasana/Bridge, take either of the supported Half Sarvangasana/Shoulderstand – either support the hips with a brick or place the hands, fingers facing up, just at the top of your hips and let your legs just drape over your head rather than reaching them straight up.

Before you come into the pose be sure to tuck your elbows into your body and your shoulder blades together to ensure that when you roll up you are pressing the weight of the body into the shoulder girdle. When you have raised your hips up over your chest, check your elbows haven’t splayed out and adjust them back in line with the shoulders if they have. It is much easier to adjust them now than in the full pose. When you are in Salamba Sarvangasana/Shoulderstand it is very important to not turn your head. Believe me when I say, this can cause a very uncomfortable nerve pinch in the neck.

ALIGNMENT CUES
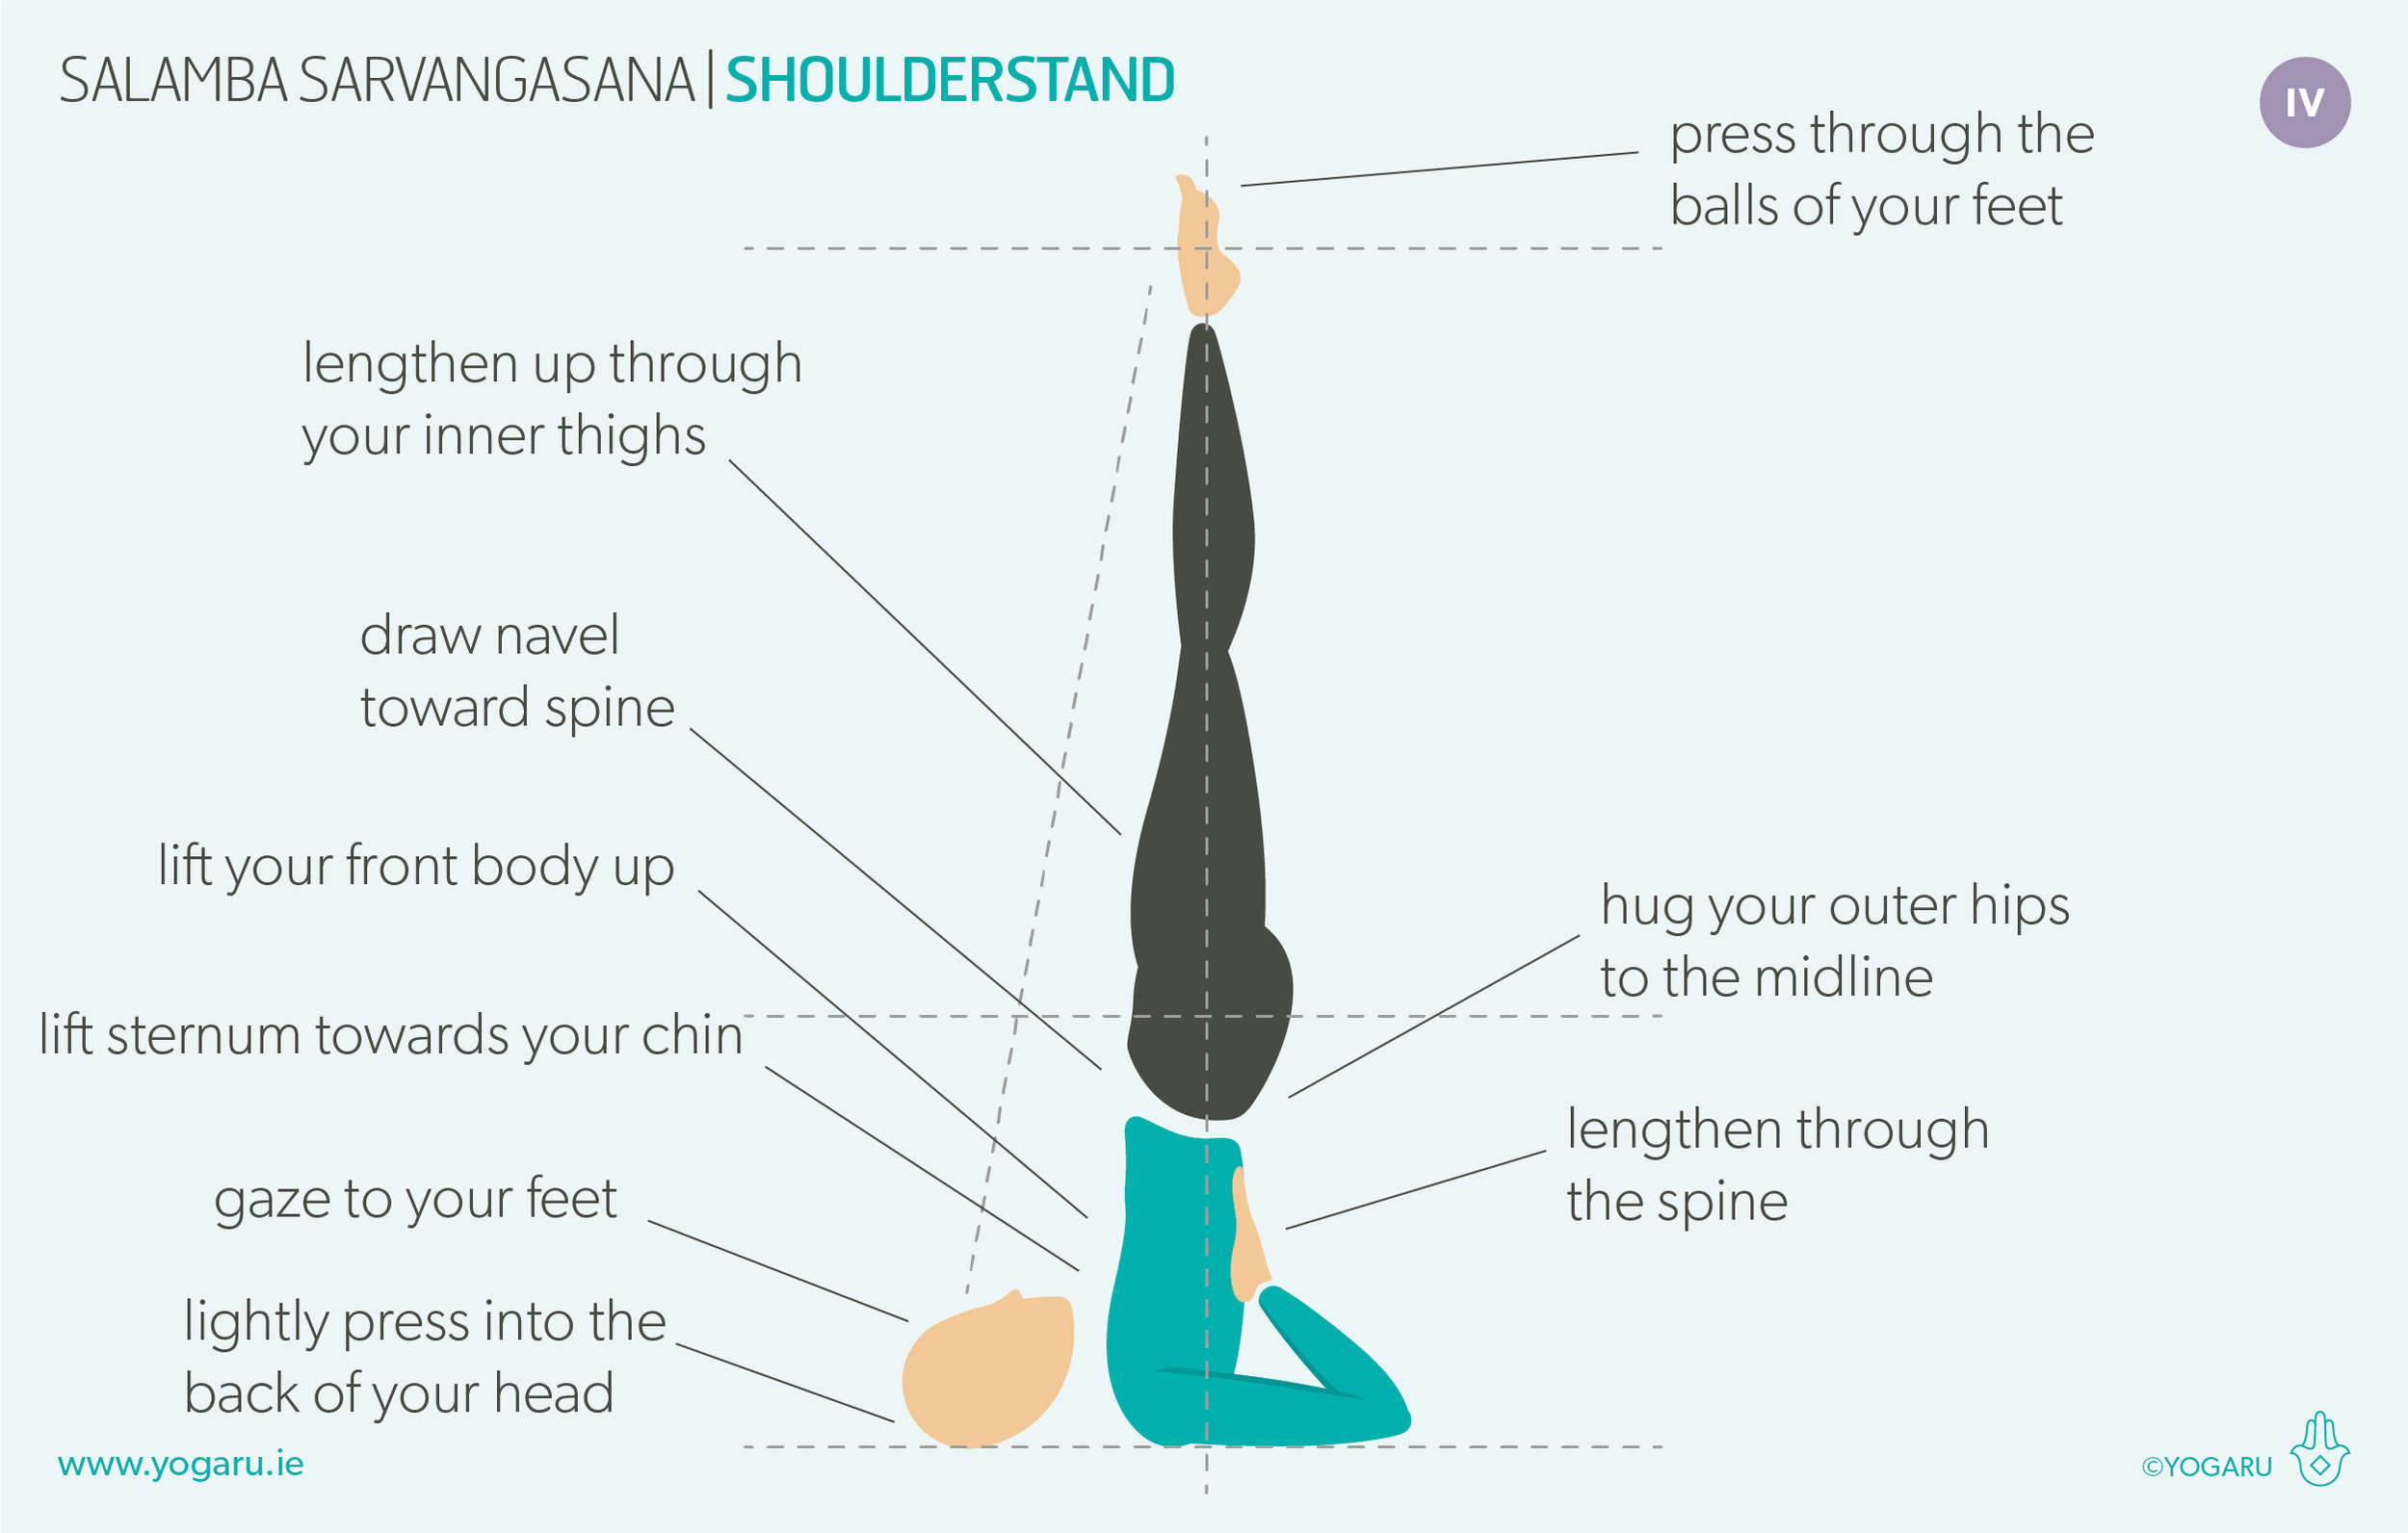
For this sequence remember to hug the outer hips to the midline in Salamba Sarvangasana/Shoulderstand and squeeze to the midline.

Have a read of the tips below and either print out the sequence or save it onto your device:

  • Lie on your back, inhale, arms press into the ground beside you. Exhale, bend your knees, lift your hips up and roll your legs towards your head.

  • Place your hands on your lower back, fingers facing up, elbows shoulder width apart. Straighten your legs up high, lengthen up through your inner thighs, press through the balls of your feet. Walk your hands down your back towards your shoulders.

  • Hug your outer hips to the midline, lift your front body up, lengthen your spine. Lift sternum up and towards your chin, lightly press into the back of your head, gaze to your feet. To come down, use your arms to support your lower back and slowly roll back down.

To save the images for personal use click and hold down the image until the ‘save image’ option appears; on Mac hold down ‘control’ and click the image to get the option box; on PC right click on the image to get the option box. Scroll down in the ‘option box’ and click ‘save image’.

Ruth Delahunty Yogaru