Anjaneyasana - Low Lunge

THE PSOAS MUSCLE
Anjaneyasana/Low Lunge is a lovely heart opening pose to add into your practice if you have been sitting for long periods of time and are feeling tightness in the hip flexors. When we sit we shorten the front muscles of the hips called the hip flexors or more specifically the psoas muscle. This muscle connects the upper and lower body, its job is mainly to lift the leg to walk and in movement. It is also strongly connected to the ‘fight or flight’ nervous system response as it prepares the body to fight back or take flight. When it is tight from something as simple as sitting, or repeated flexion from sports like cycling, it sends ‘fight or flight’ signals to the nervous system and causes this physical tension to become mental tension too. Lengthening out the psoas in poses like Anjaneyasana/Low Lunge helps to break this cycle and relieve this built up physical and mental tension.

Anjaneyasana/Low Lunge is also a very good pose to prepare the body for its sister pose Ashta Chandrasana/Crescent Pose. Anjaneyasana/Low Lunge is the same pose with the back knee down rather than lifted. This gives you the opportunity to explore the stretching and strengthening components of the pose without the effort of the standing and balancing.

THE BENEFITS OF ANJANEYASANA/LOW LUNGE
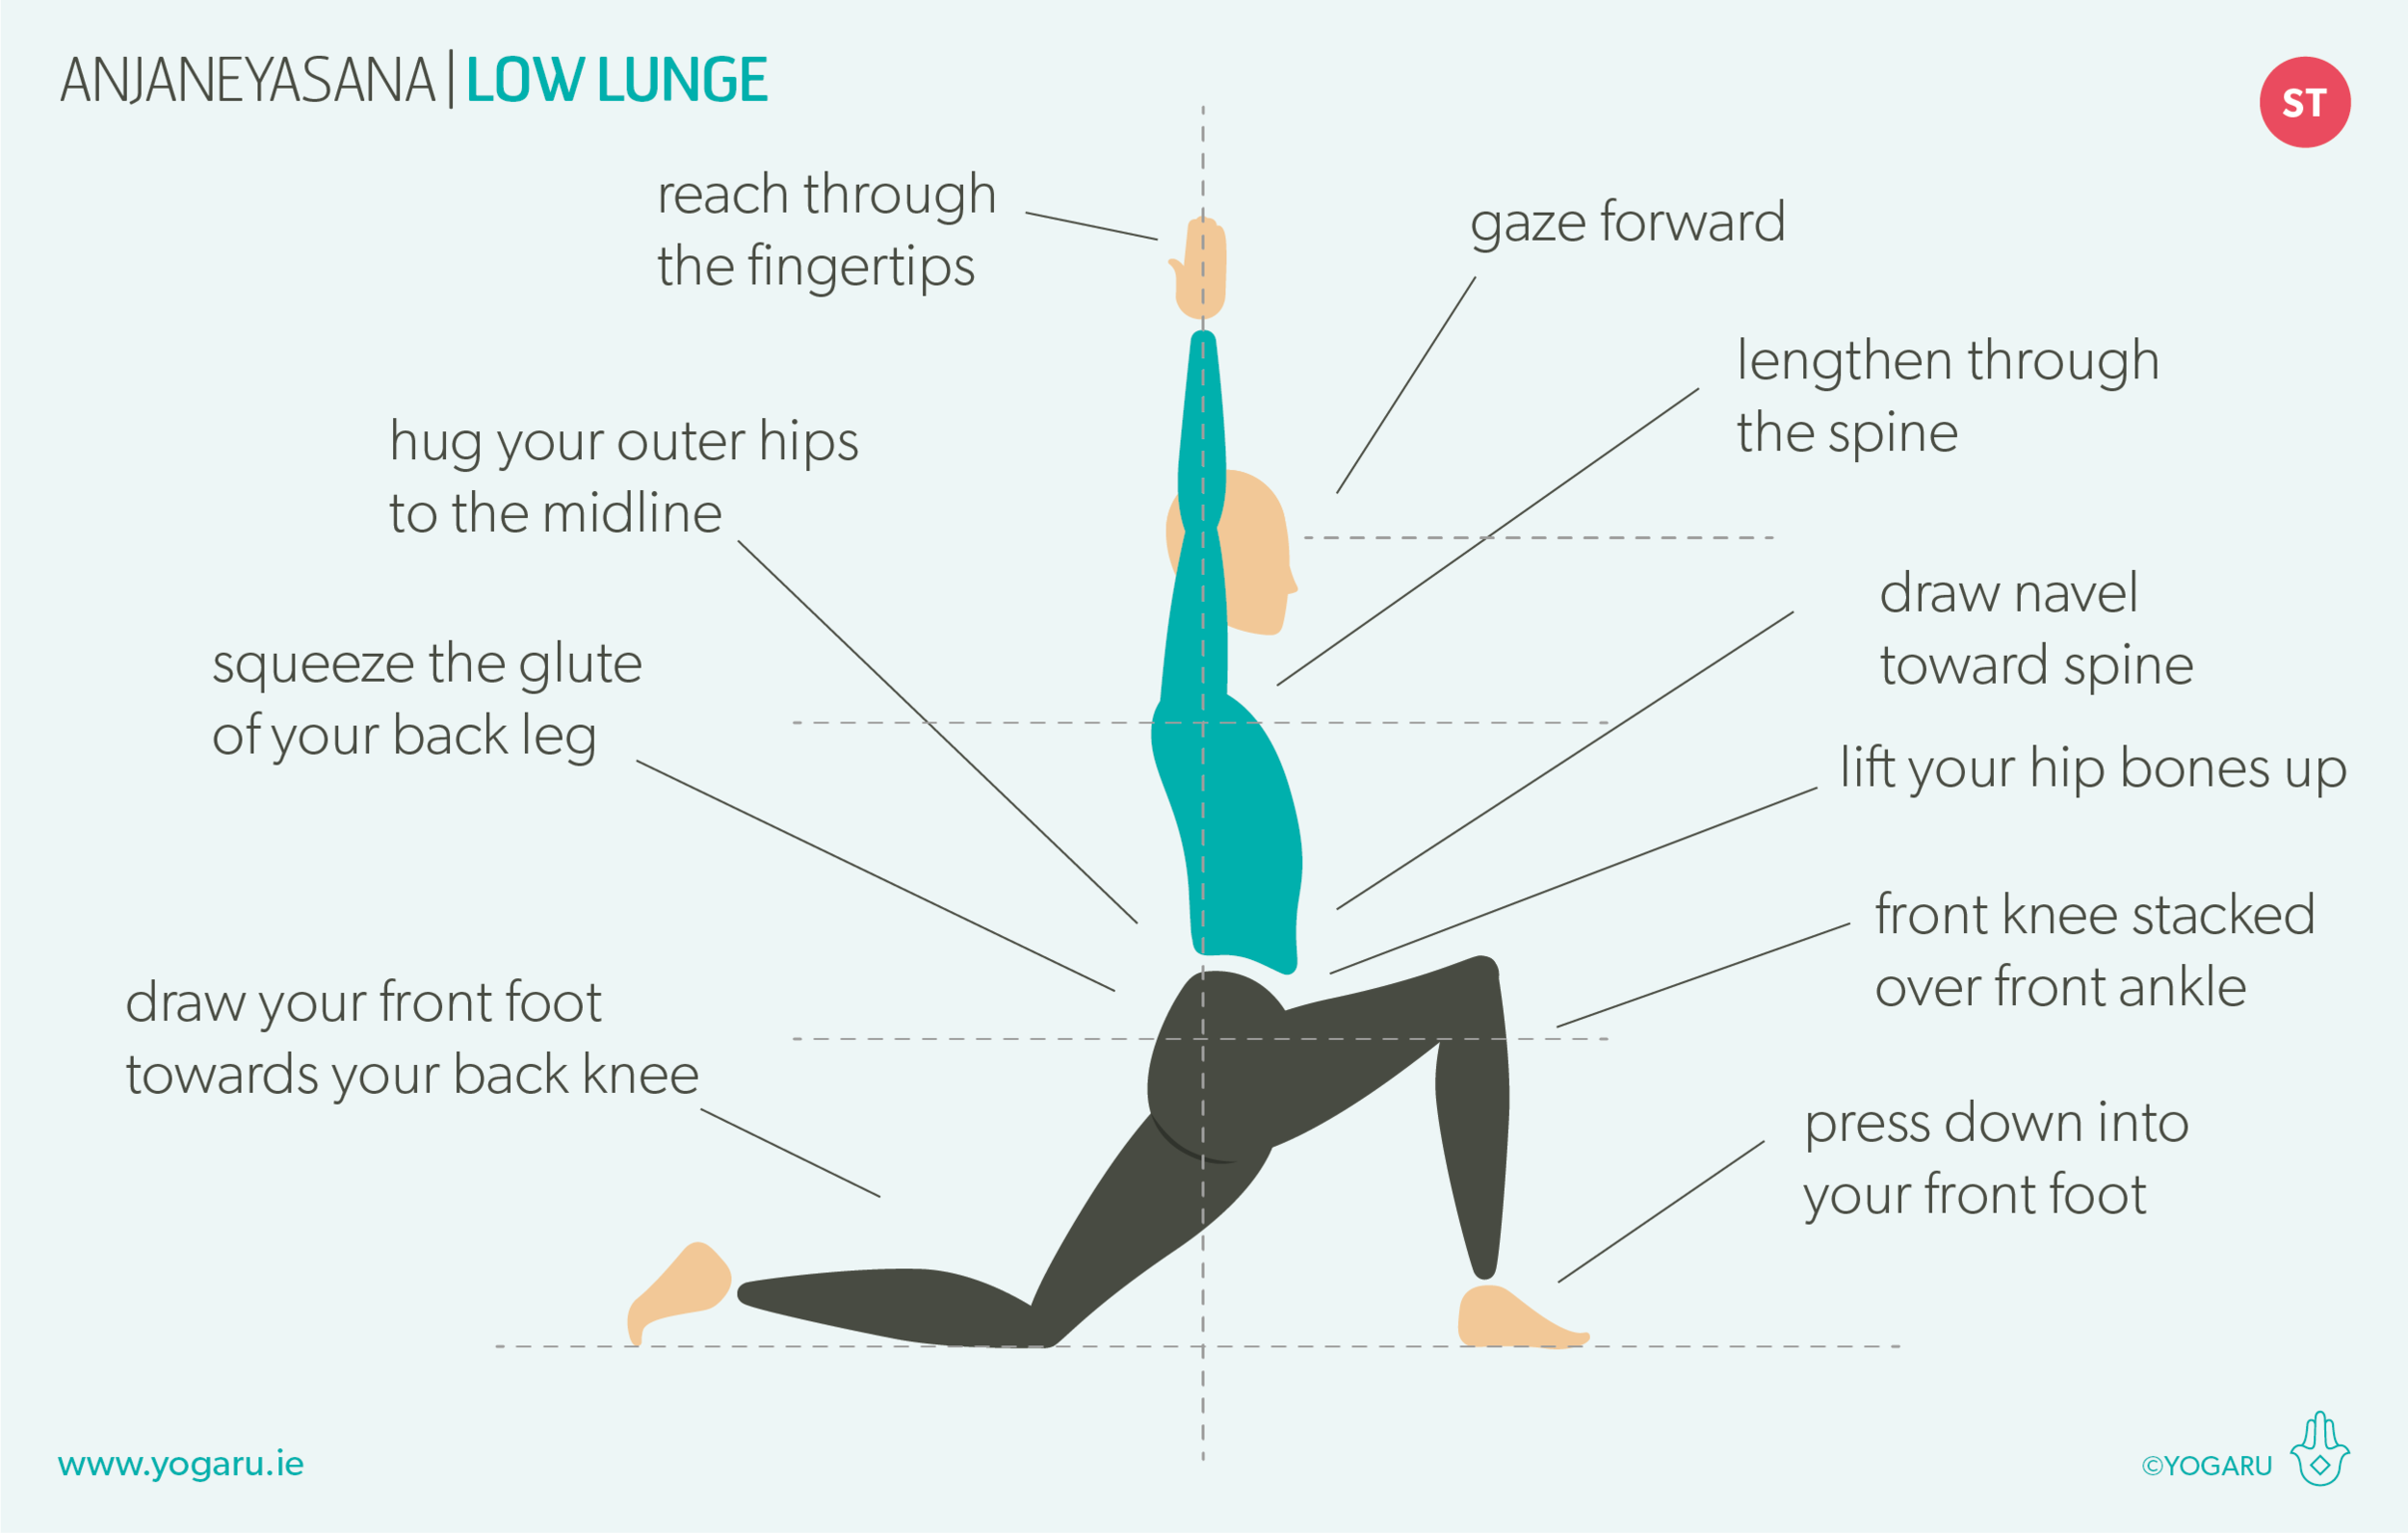
Anjaneyasana/Low Lunge stretches the inner groin, quad and the hip flexor of the back leg, and the glute of the front leg; and the strengthens the spine, shoulders, hip flexor and quads of the front leg; and glutes and hamstrings of the back leg. You may feel a slight stretch in the hamstring of the front leg but as the leg is bent it will mainly be the glutes stretching. Similar to Ashta Chandrasana/Crescent Moon it also builds focus, heat, stamina, strength, increases circulation, metabolism, improves posture, spinal health and coordination. There are two ways to approach Anjaneyasana/Low Lunge. The first approach, and my preferred option, stretches the front hip area of the back leg by keeping the pelvis stacked, squeezing the buttocks muscle and concentrating on lifting the pointy hip bones up. The second approach stretches the inner groin of the back leg by bending the front knee beyond the front ankle and dipping the pelvis down. In this version it is important to lengthen through the spine and ensure you distribute the backbend equally to avoid overarching into the lower back. Regardless of which version you take, it is important to support the descent of the hips with the muscles of the hips. Allowing gravity to take over in this extended position can compromise the connective tissue of the tendons at the top of the muscles. You can support your hip muscles by pressing your front foot into the ground and scissoring it back towards your back knee, you hug your outer hips to the midline and zip the seam of your core up from your public bone to your sternum.

EXPLORING ANJANEYASANA/LOW LUNGE IN YOUR PRACTICE
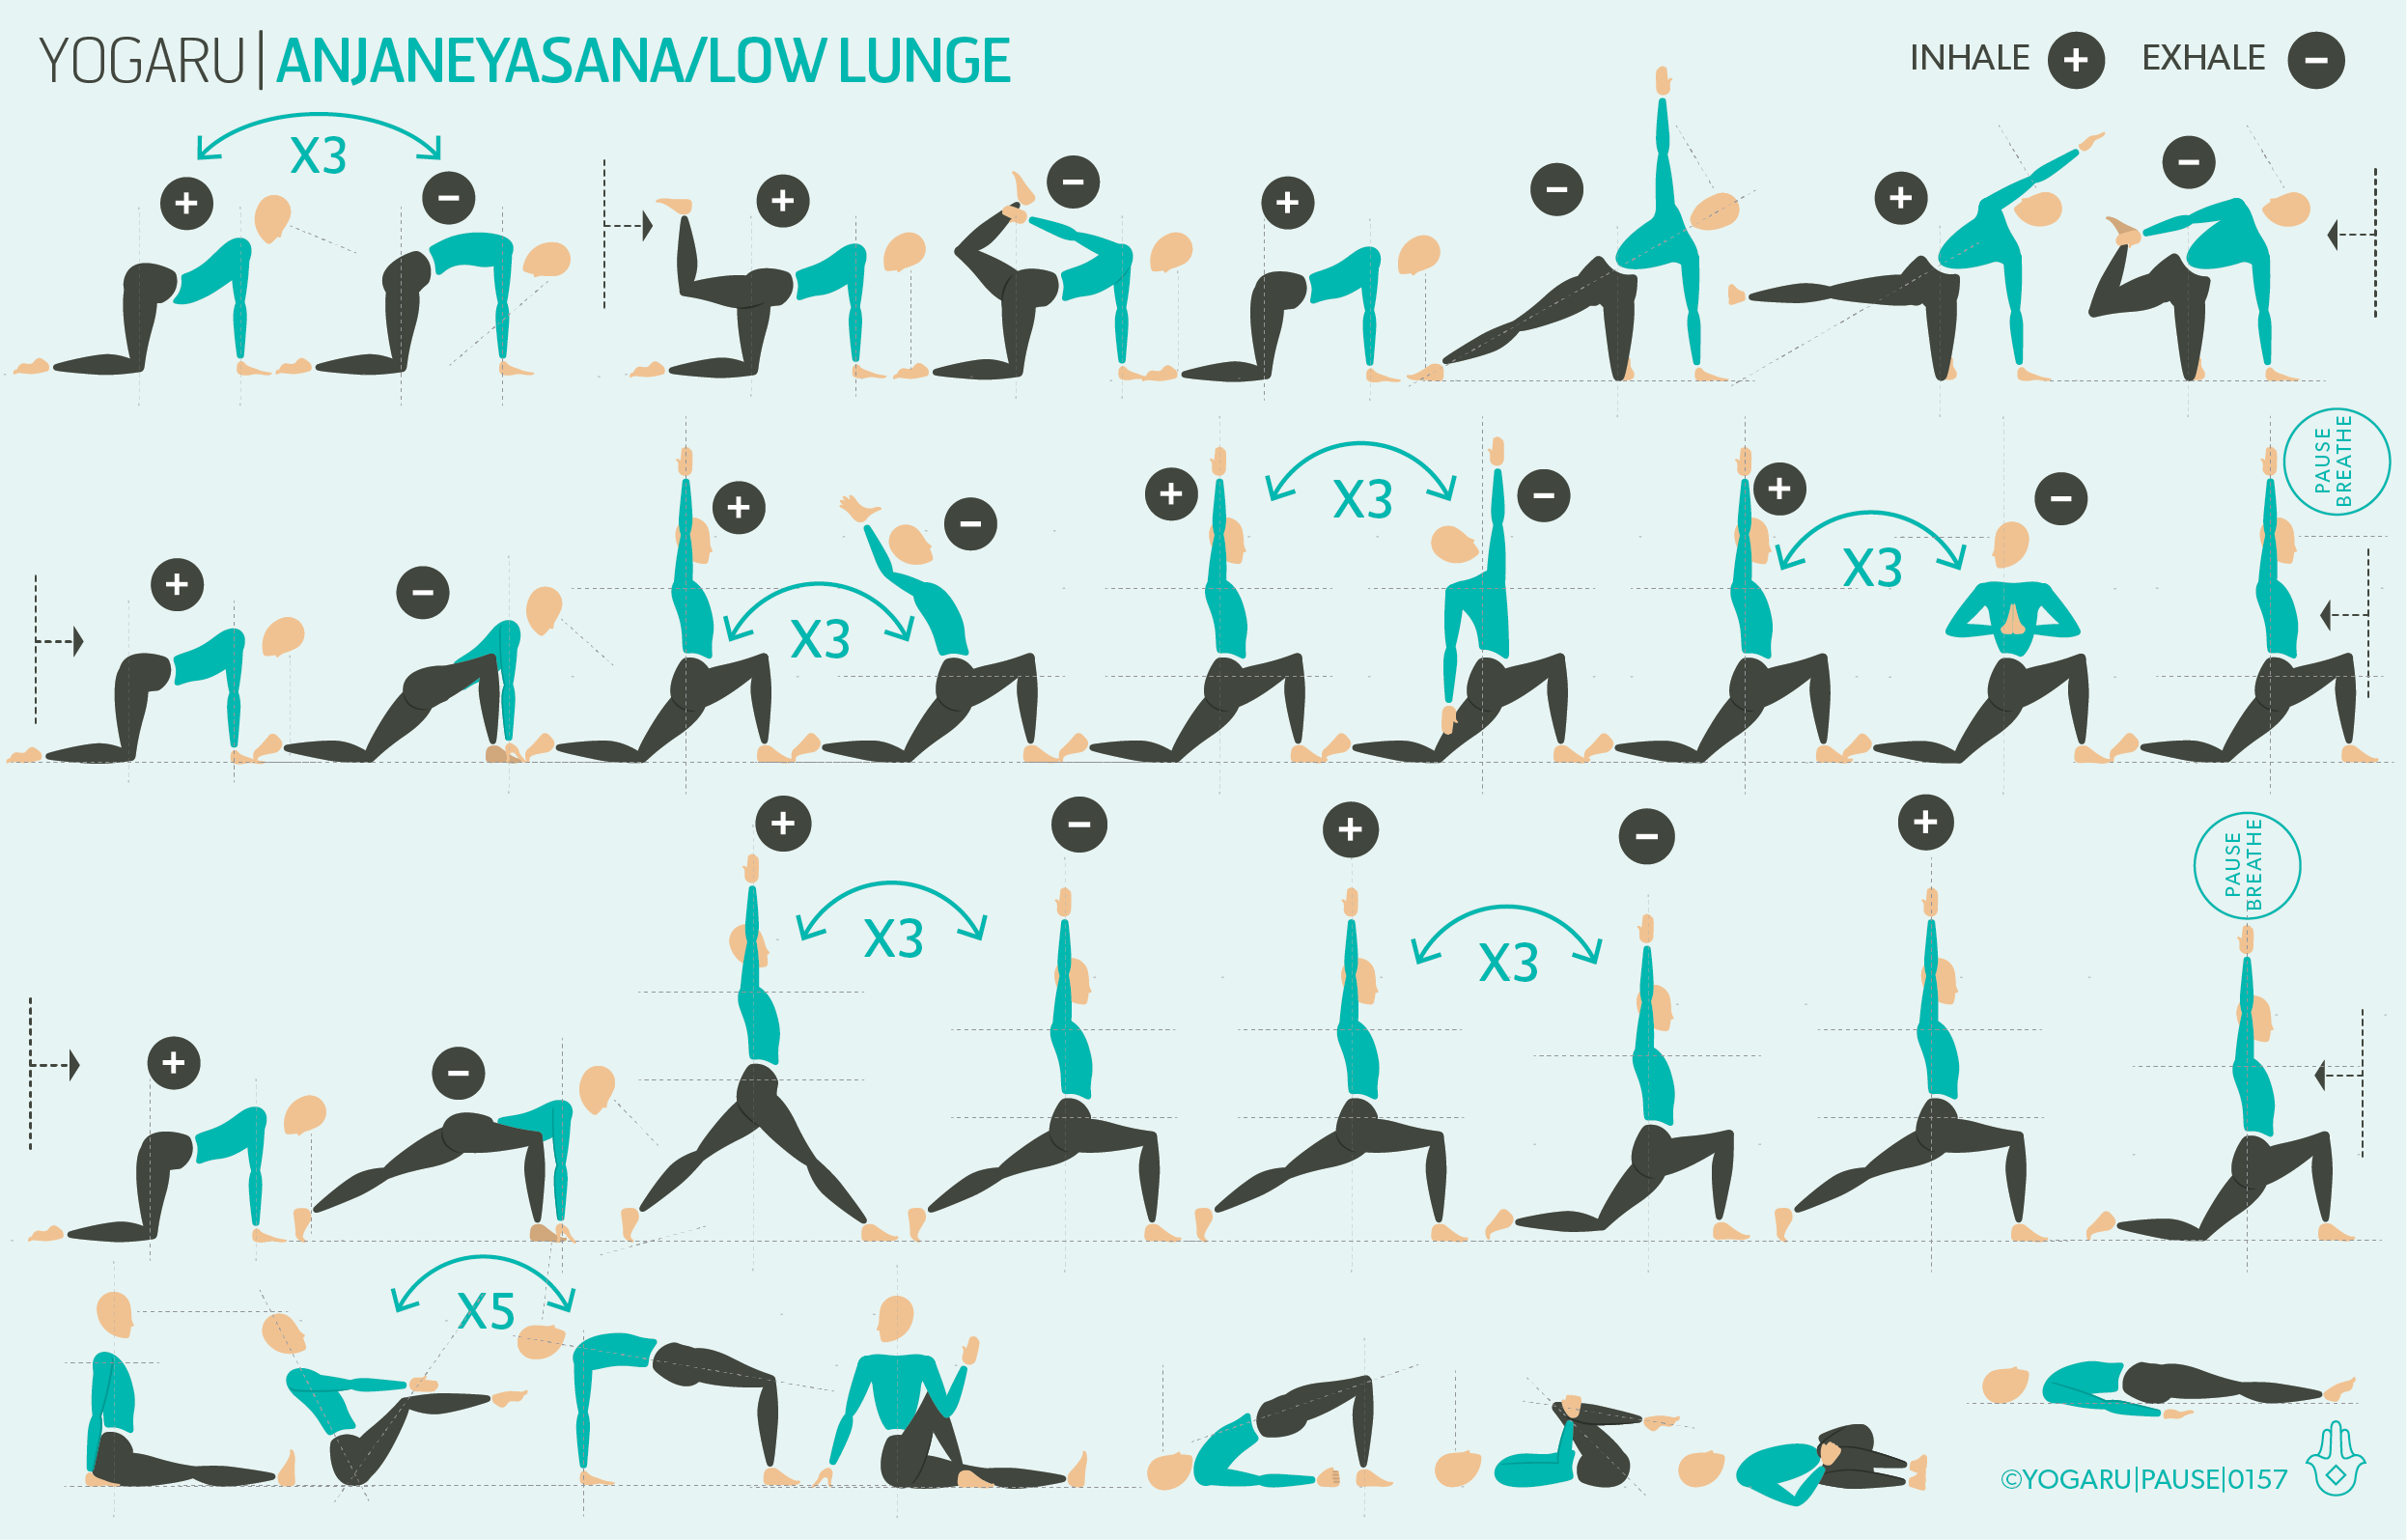
This sequence starts by building a blueprint for Anjaneyasana/Low Lunge with a warm up that opens the front of the hips and strengthens the spine with some poses where we hold the back leg. Adding some extended arms to the poses too to build shoulder strength. When you reach your first Anjaneyasana/Low Lunge, pause here before you start into the three mini flows, and try out the two different options of the peak pose as described above and notice where you feel a stretch and what you feel strengthening in each. At the end of each standing flow you have an opportunity to take the peak pose and pause for a few breaths, notice do you feel more at ease in the pose as you progress through the practice.

ALIGNMENT CUES
Remember to use the supportive muscles of the hips throughout this sequence to contain your Anjaneyasana/Low Lunge for strong connective tissue and muscles with longevity.

Have a read of the tips below and either print out the sequence or save it onto your device:

  • From Adho Mukha Svanasana, inhale, step your right foot forward just inside your right hand, lower your left knee to the ground, back leg firm.

  • Hug your outer hips to the midline, gently bend your front knee and lower your hips towards the ground, exhale here.

  • Inhale, reach your arm up high shoulder width apart or palms together.

  • Draw your navel towards your spine, broaden through the collarbones, lengthen through your spine to the tip of your crown, gaze forward or to your fingertips.

To save the images for personal use click and hold down the image until the ‘save image’ option appears; on Mac hold down ‘control’ and click the image to get the option box; on PC right click on the image to get the option box. Scroll down in the ‘option box’ and click ‘save image’.

Ruth Delahunty Yogaru

The immune system

YOUR DEFENCE SYSTEM
The immune system protects you from harmful microorganisms and from your own cells that have malfunctioned. It is your body's defence system against infection, illness and disease. The immune system is made up of millions of white blood cells, called leukocytes, which are mainly made in the bone marrow. They travel through the blood and lymph constantly scanning for signs of invaders. They are very adaptable and able to tackle many different threats. There are two types of leukocytes – phagocytes and T-cells. The phagocytes digest the foreign cells and send signals to lymphocytes in the lymph nodes. This information is processed and T-cells and B-cells are sent to kill the infected cells. These T-cells and B-cells produce antibodies to counteract further similar invasions and build long term immunity to this specific threat.

THE SYSTEMS OF THE BODY
The immune system works best when the body is balanced in homeostasis. For the body to be balanced all the systems of the body need to be working efficiently. Breath awareness and slow mindful movement of yoga stimulates several systems of the body which work hand in hand with a strong, reactive, but not over reactive, immune system – the nervous system, the digestive system, the respiratory system, the circulatory system, and the lymphatic system.

The nervous system
The nervous system is the body's communication and control system. It is responsible for all internal bodily functions and for our reactions to external stimuli. Periods of busyness and stress are a natural part of life. Every day we face challenges, adapt, solve, and move on. In these busy periods our body concentrates its energy resources on the activity and the other systems of the body are put on the back burner. When these challenges become overwhelming, and linger long term, the effect on the functionality of all the systems, including our immune system, starts to suffer. Yoga enhances the malleability of the nervous system – which is our capacity to move easily from activity to rest – by rewiring the brain's response to stress. The breath is one of the fastest ways to stimulate this response, which is why it is so important in yoga.

The digestive system
The digestive system, or the enteric system, is where the body processes food, absorbs nutrition and removes waste from the body – functions which are imperative to a strong immune system. The squeezing and stretching actions in yoga helps the digestive system in two main ways – it encourages fresh blood flow and stimulates the muscles in the walls of the gut. These two actions assist in efficient nutrition absorption, detoxification, and staying regular through the action of peristalsis in the colon.

The respiratory system
The respiratory system is responsible for bringing oxygen to all the cells of the body to facilitate cell growth and replication. The breath is part of the autonomic nervous system, which means it works automatically. What makes the breath unique is that we can also control it to a certain extent. We can extend, shorten and hold the breath depending on our desired outcomes. When we inhale our heart rate increases, the cells receive oxygen, and we feel energised. When we exhale the heart rate decreases, the cells release carbon dioxide, and we feel calmer. The vagus nerve, which is the main nerve responsible for the relaxation response, travels through the diaphragm. When we breathe, in particular an exhale, it stimulates the vagus nerve and initiates the relaxation response.

The circulatory system
The circulatory system, or the cardiovascular system, pumps blood around the body with the heart through a network of blood vessels. The blood carries oxygen, nutrients, and hormones to all the cells of the body, and removes waste products created in the metabolic functions. Think of the circulatory system as housekeeping. When the body is well serviced the immune system is able to work more efficiently. Breath awareness, and extending the inhale and exhale, affects the pace of the heart and in turn increases or decreases circulation and blood pressure. The movement and wide variety of positions in yoga – twists, inversions, backbends – each add their own challenge and benefit to the circulatory system.

The lymphatic system
The lymphatic system is the transport system for the immune system. It carries white blood cells and nutrients around the body, regulates the immune system, removes toxins, balances fluids and controls inflammation. Unlike the circulatory system it doesn’t have a pump to help it move around the body. It relies on gravity, muscle contractions and the rhythmic breath to keep it moving. When we breathe in we increase pressure on the abdominal region and reduce pressure in the thoracic area, when we exhale we reverse this. This increase and decrease in pressure is one the most efficient tools for keeping lymph flowing and is something that we can accentuate in our yoga practice.

All the systems of the body overlap and work in partnership with each other. The circulatory system works with the respiratory system to distribute oxygen; the circulatory system works with the digestive system to distribute nutrients; the digestive system works with the respiratory system to give each other oxygen and nutrients; the respiratory system works with the lymph system to keep lymph flowing; and the nervous system is the conductor that brings everything together in harmony. Within this harmony lies a strong and efficent immune system.

TWISTS, BACKBENDS & INVERSIONS
For the immune system to work at its best all these systems need to be working in symmetry. Although all yoga will help keep these systems in balance – twists, backbends and inversions are the most powerful poses to practice when working with the immune system.

Twists
When we squeeze into a twist, and stretch to open back up again, it stimulates all the abdominal organs. This twisting action helps the gut absorb nutrition and remove waste; the lungs expand and contract; and the blood to transport oxygenated blood to the organs and remove toxins.

Backbends
A similar principle as twists applies to backbends. When we stretch the front of the body in a backbend it stimulates the organs of the abdominal and chest cavity. This action is particularly good for expanding lung capacity. The higher the lung capacity the better our ability to feed all the cells of the body with fresh oxygen.

Inversions
Inversions add an extra bonus of boosting circulation and increase blood and lymph flow which helps clear bacteria and toxins from the body and plays a vital role in building a strong immune system. Inversions are any pose where the heart is above the head. Along with formal inversion poses, like handstand and headstand, they are also all standing forward bends, downward dog, dolphin, and bridge.

EXPLORING THE IMMUNE SYSTEM IN YOUR PRACTICE
Throughout the sequence there are lots of opportunities to twist, backbend and take an inversion. For added benefits you could choose one or two of these poses and linger in them for a few breaths. Towards the end of the first row and the third row there is a chest opening mini flow. To do this, place the fingertips of the raised arm to your temple with the elbow pointing down on your inhale, lift your elbow and rotate the arm open on the exhale. Swap the breath around and notice the difference between opening on the exhale and opening on the inhale. The final pose is Viparita Kirana with the legs up the wall. If you prefer not to move to a wall you can take a simple Savasana fro your resting pose.

ALIGNMENT CUES
There is no specific peak pose in this immune system sequence. Throughout the sequence there are lots of opportunities to twist, backbend and invert. Use the cues below to help you flow through the sequence with ease and fluidity.

Have a read of the tips below and either print out the sequence or save it onto your device:

  • Use the breath guide in the sequence to help you link breath with movement in the flow. Inhale is indicated with a ‘+’, exhale is a ‘-”.

  • If there are specific poses that you would like to stay longer in, give yourself three deep breaths in those poses and pick up the next pose with the allocated inhale or exhale as indicated by the sequence.

  • There are five ‘pause breathe’ poses in the sequence. Take three deep breaths in these poses before you move on to the next pose.

  • For a longer practice repeat the warm up flow on the first line at the start of each of the two standing flows.

To save the images for personal use click and hold down the image until the ‘save image’ option appears; on Mac hold down ‘control’ and click the image to get the option box; on PC right click on the image to get the option box. Scroll down in the ‘option box’ and click ‘save image’.

Ruth Delahunty Yogaru

Salamba Sirsasana - Headstand

KING OF ALL ASANA
Salamba Sirsasana/Headstand is probably one of the most widely practiced inversions. It is more accessible than a Adho Mukha Vrksasana/Handstand for many yogis, because it has a wider foundation to build from, but gives exactly the same benefits as a Adho Mukha Vrksasana/Handstand. Including the thrill of flipping your world upside down! Known as ‘the king of all asana’ it has many benefits – it nourishes the cells of the brain; stimulates circulation; balances the hormones; builds focus and concentration; eases stress, tension and anxiety; flushes toxins out; aids the digestive system; and boosts the immune system. With all these benefits it’s no wonder yogis have a certain glow about them – Salamba Sirsasana/Headstand are also well known for their anti-aging properties. What’s not to like about them!

THE BENEFITS OF SALAMBA SIRSASANA/HEADSTAND
Salamba Sirsasana/Headstand strengthens the shoulders, spine, arms and core. While the journey up into the inversion stretches the hamstrings. Most inversions are known for their energising effects. Salamba Sirsasana/Headstand is the one inversion that does the opposite – it is very calming and nourishing to the nervous system. Making it a good pose to practice at any time of day.

EXPLORING SALAMBA SIRSASANA/HEADSTAND IN YOUR PRACTICE
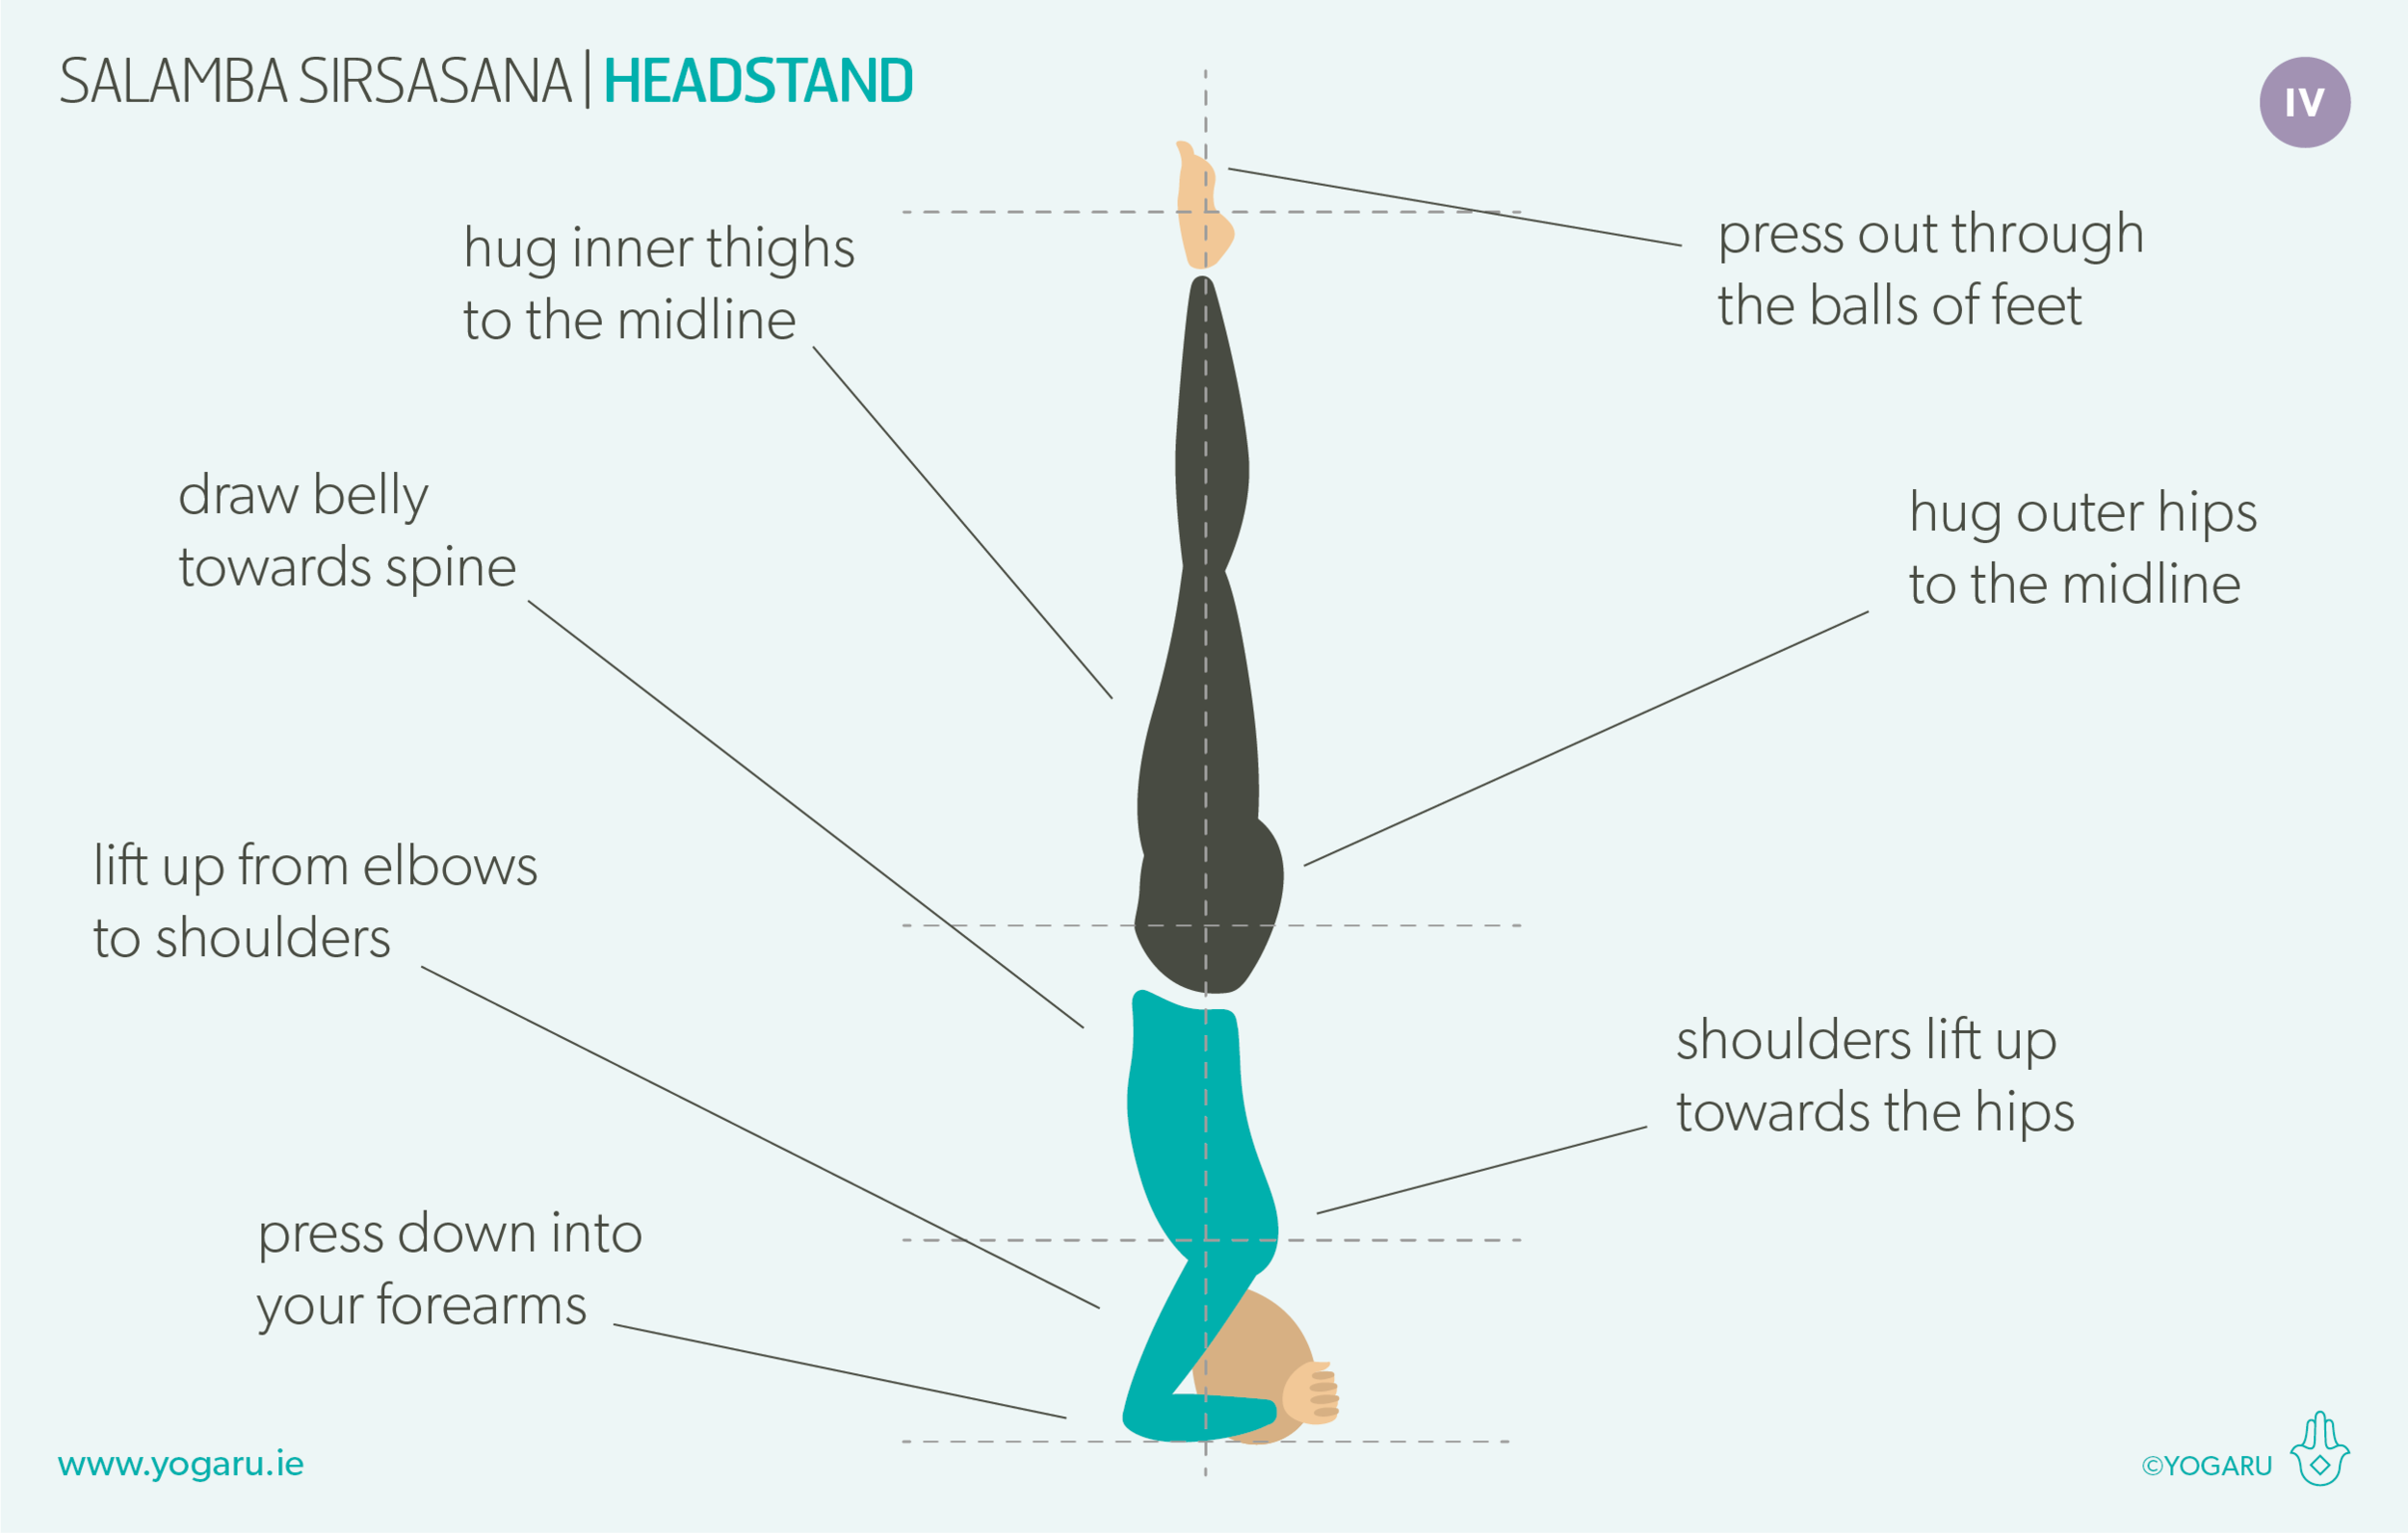
Proper prep and a well warmed up body is essential before you attempt a Salamba Sirsasana/Headstand. The neck wasn’t built for weight bearing, so strong shoulders and core are needed to assist in lifting some of the pressure off the top of the head. It can also help in your prep work to lengthen out the hamstrings at the back of the legs so you can walk your feet in towards your elbows when you are preparing to come into your Salamba Sirsasana/Headstand. Strong core engagement will protect your lower lumbar spine from ‘banana back’ and help you lift up through your shoulders too. You should feel the majority of your body weight through your forearms rather than your head and neck. If you are feeling excessive pressure on your head it would be advisable to revert to the ‘how to lift your legs up’ until you are more able to lift up through the shoulders.

ALIGNMENT CUES
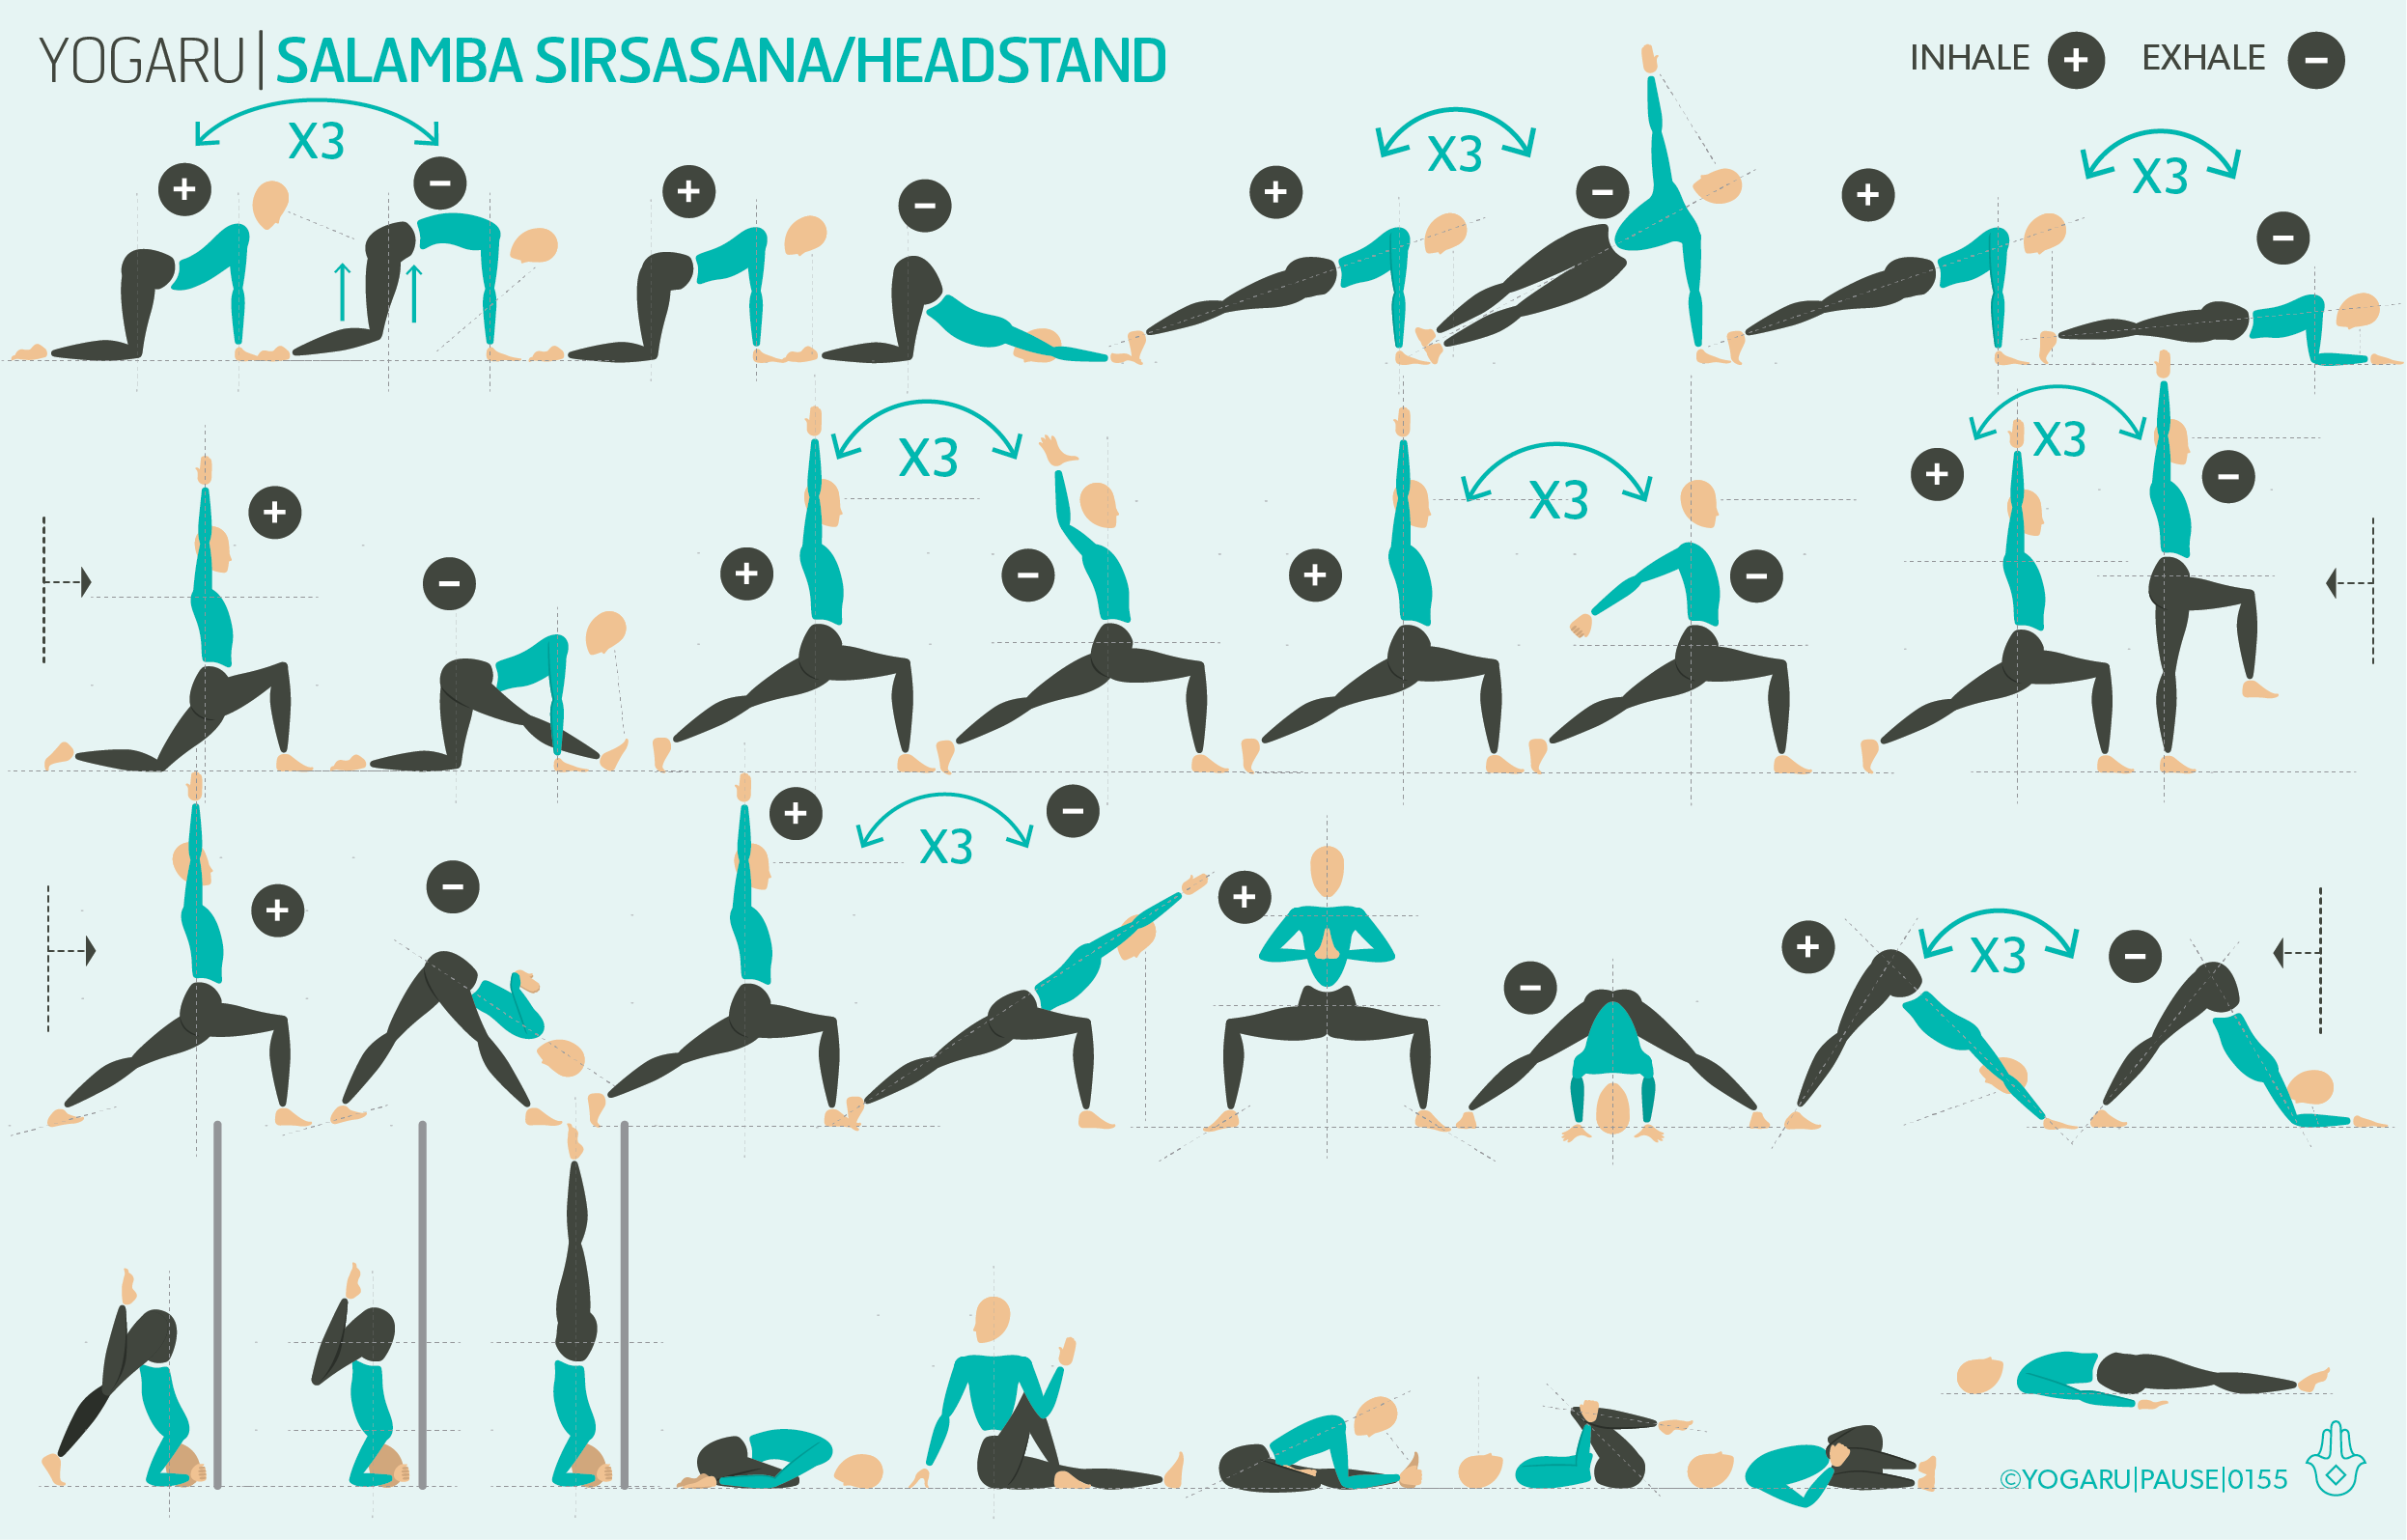
Throughout the sequence lengthen through the whole spine to find strength and build a steady focused practice. Move slowly through the whole flow and then you will be ready to move slowly and carefully for your Salamba Sirsasana/Headstand.

Have a read of the tips below and either print out the sequence or save it onto your device:

HOW TO LIFT YOUR LEGS UP FOR SALAMBA SIRSASANA/HEADSTAND
If you find it hard to get both legs up, work with these tips before you progress into full Salamba Sirsasana/Headstand.

  • Set your yoga mat up short end to the wall. From all fours place your elbows down directly under your shoulders and interlace your fingers. Place your knuckles about an inch away from the wall.

  • Place the crown of your head on the ground using the interlaced fingers as a support wall. Lift your knees up and walk your toes in towards your elbows until you find the support of the wall against your back. Stack your hips over your shoulders and draw your belly strongly towards your spine.

  • Press down into your forearms, lengthen up to your shoulders and hug your upper arms in. Lift your right leg up with a bent knee and draw it into your chest. Squeeze into the back of your knee and reach your toes towards your buttocks.

  • Stack your hips over your shoulders and draw your belly strongly towards your spine. On an exhale, slowly lift your left leg up with a bent knee and reach your toes towards your buttocks.

  • Practice coming up and down with your back supported by the wall until you are comfortable that you can lift without hopping, and you can take some of the weight out of your head with the support of your strong shoulders.

HOW TO USE A WALL FOR SALAMBA SIRSASANA/HEADSTAND
When you’re ready to move on to full Salamba Sirsasana/Headstand stay at the wall until you are very comfortable with balancing without the support of the wall.

  • Set your yoga mat up short end to the wall. From all fours place your elbows down directly under your shoulders and interlace your fingers. Place your knuckles about 5 inches from the wall.

  • Place the crown of your head on the ground using the interlaced fingers as a support wall. Lift your knees up and walk your toes in towards your elbows.

  • Press down into your forearms, lengthen up to your shoulders and hug your upper arms in. Lift your right leg up with a bent knee and draw it into your chest. Squeeze into the back of your knee and reach your toes towards your buttocks.

  • Stack your hips over your shoulders and draw your belly strongly towards your spine. On an exhale, slowly lift your left leg up with a bent knee and reach your toes towards your buttocks.

  • Slowly extend both legs up high using your core as brakes. Hug your outer hips and inner thighs to the midline, press out through the balls of your feet. BREATHE!

  • To come down, slowly bend your knees and lower your feet to the ground. Remember to counterpose your headstand with a few deep breaths in Child Pose.

TIPS
Below are some extra tips to help you along the way.

  • If you are not ready to fully weight bear in Salamba Sirsasana/Headstand practice this sequence and follow ‘How to lift your legs’ with single leg lifts until you get used to carrying extra weight in your head and neck.

  • To work on strengthening your core work on lowering your legs from full Salamba Sirsasana/Headstand as slow as you can all the way down to the ground with knees bent. Sounds easy but very hard to hold the legs steady on the descent!

  • If you are working on your Salamba Sirsasana/Headstand, take advantage of a well warmed up body at the end of class and ask your teacher if you can practice just before they guide the class in Savasana.

  • If you are new to Salamba Sirsasana/Headstand practice with the guidance of a yoga teacher before you incorporate them into a home practice.

  • Avoid practicing Salamba Sirsasana/Headstand if you have a back injury, neck injury, shoulder injury, high blood pressure, glaucoma, sinus infection or it’s your time of the month.

To save the images for personal use click and hold down the image until the ‘save image’ option appears; on Mac hold down ‘control’ and click the image to get the option box; on PC right click on the image to get the option box. Scroll down in the ‘option box’ and click ‘save image’.
Ruth Delahunty Yogaru