Hanumanasana - Monkey or Splits

GOD OF MONKEYS
Splits, or ‘monkey pose’ named after the God of Monkeys Hanuman, is a very challenging pose for most of us – especially if you are a runner, cyclist, or a gym goer. It falls into the ‘hip opener’ category, and stretches the hamstrings in the front leg, and the hip flexors of the back leg. Hip openers are one of those poses that definitely have a feel good factor. They are the most requested poses in a yoga class, and are known for releasing stress, tension and anxiety – physically and emotionally. The psoas (one of the hip flexor muscles) is linked with the ‘fight or flight’ response. When this muscle is tight the fight or flight response is constantly being triggered – leaving you feeling stressed, anxious and exhausted. When it is stretched it stimulates the opposite reaction – the ‘rest, restore and digest’ response. Which is why you feel a calm and happy demeanor after a good hip opening class.

Hanumanasana/Monkey or Splits also help you with your transition into Adho Mukha Vrksasana/Handstand. Handstands are all about getting your hips stacked over your shoulders – the more open your hamstring are, the higher you can lift your top leg, the easier it is to hop up into handstand. This sequence would be a good prep if you are working on your Adho Mukha Vrksasana/Handstand.

Hanumanasana/Monkey or Splits challenge your ego and teach you (sometimes the hard way!) to listen to the messages from your muscles, and respect your limitations. The hamstrings and hip flexors are big muscles and need time to release. Move slowly and take extra time in the prep poses, breathe deeply and let the muscle dictate when it is time to progress. It is a pose that should be approached with care and an ability to tap into feedback from the stretching muscles. The hamstrings in particular are prone to overstretch injuries and an over enthusiastic Hanumanasana/Monkey or Splits can leave you with an overstretch injury for upto 6 to 8 weeks or longer.

THE BENEFITS OF HANUMANASANA/SPLITS OR MONKEY
Hanumanasana/Monkey or Splits is a deep hip opener. It stretches the hamstrings, hip flexors, inner groins and glutes. It counteracts tight hips and the effects of sitting for long periods of time and helps the hips move freer and assists with mobility in everyday activities. It is also a lovely grounding pose, helps balance the nervous system and eases stress, tension and anxiety.

EXPLORING HANUMANASANA/SPLITS OR MONKEY IN YOUR PRACTICE
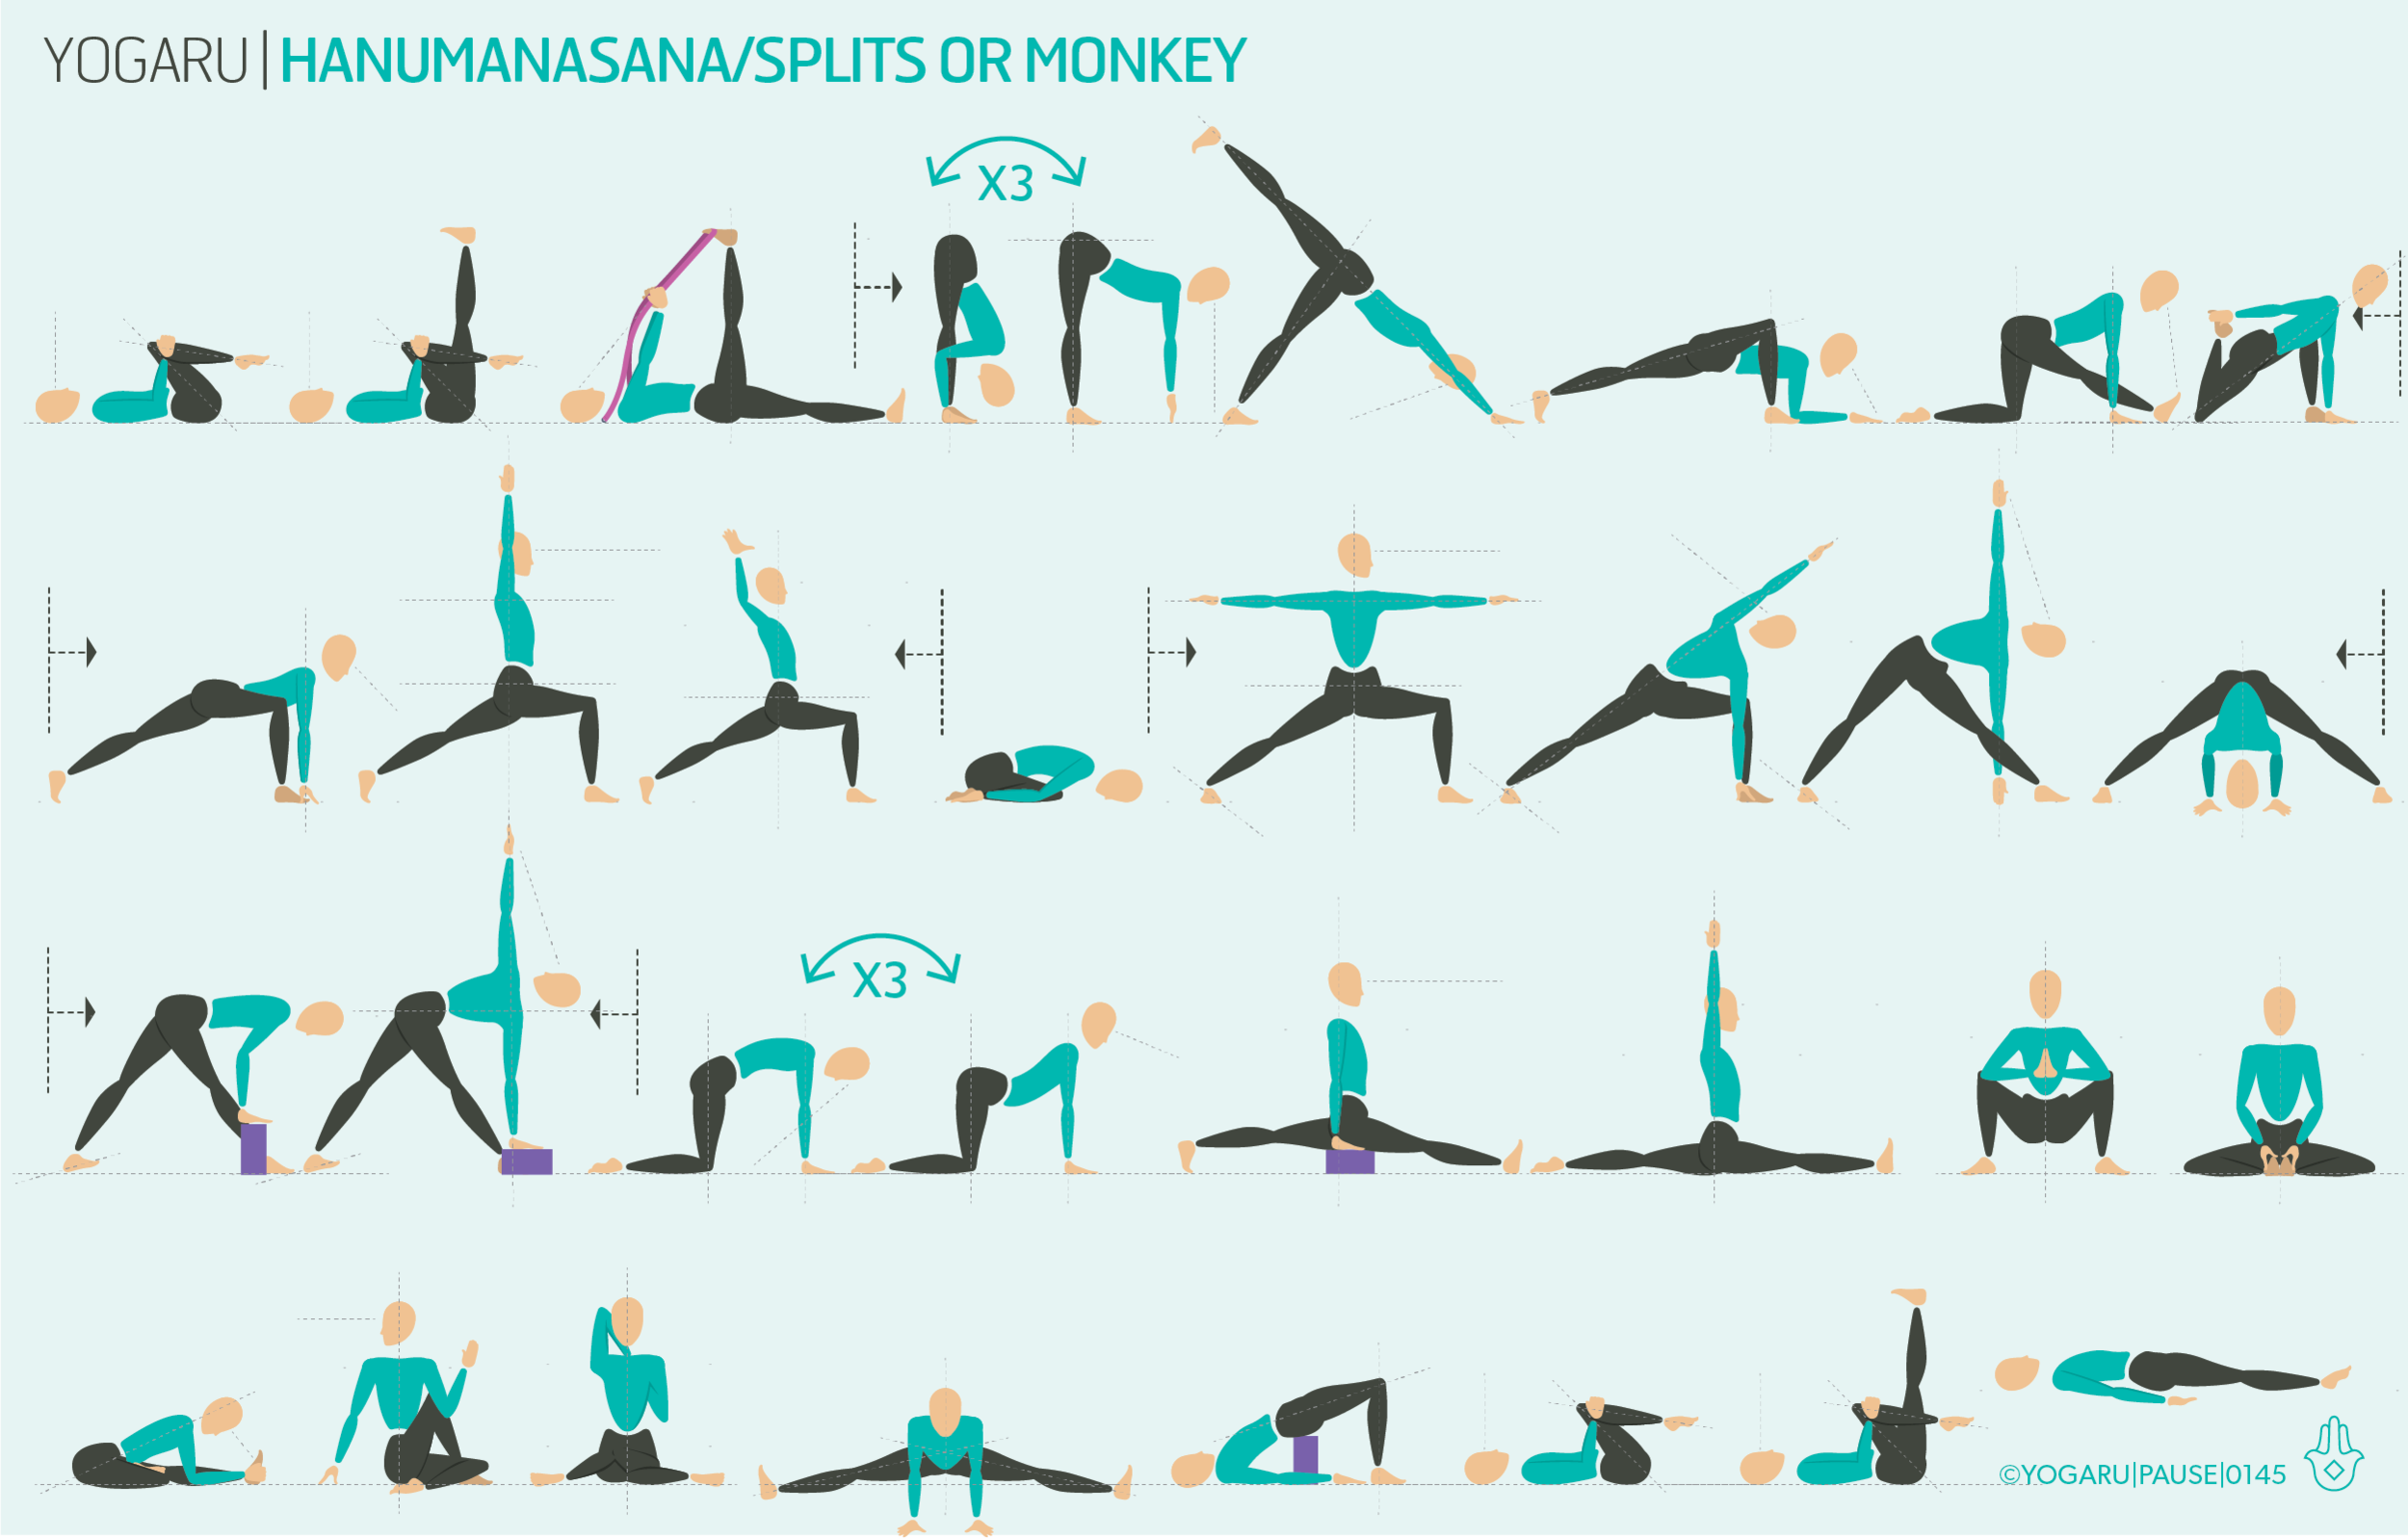
This sequence will gradually warm up your hamstrings and hip flexors. You will have plenty of opportunities to ease them open, so very gently at the start with the supine leg stretch. Move slowly and carefully to ensure you do not overstretch the hamstrings. The best lesson to learn as a yogi is the difference between an opening stretch and a pinchy stretch, which can be an indication of an overstretching muscle.

If your hips are quite high up when you come into Hanumanasana/Monkey or Splits place a bolster, or some cushions, under your pelvis to help support you in the pose. If your hips still don't reach the bolster comfortably, push the bolster further down your front leg, just under your thigh which will support you from the front leg. If you don’t quite need this amount of lift, use a brick or a rolled up blanket under your pelvis for support, as illustrated in the sequence.

Place your hands on bricks, or piles of books, either side of your hips to help you keep your chest open and your hips squared to the front on your mat. Focus on keeping the hips level rather than getting your hips to the ground.

If your hamstrings are not comfortable in any of the above versions, have a look at my Instagram post for some different versions of Hanumanasana/Monkey or Splits.

PAUSE_0145.png

ALIGNMENT CUES
This is definitely a sequence to link your breath with your movement. Pause in the poses where you feel the hips opening and use the inhale to retract slightly from the pose and the exhale to soften into your comfortable range of movement.

Have a read of the tips below and either print out the sequence or save it onto your device:

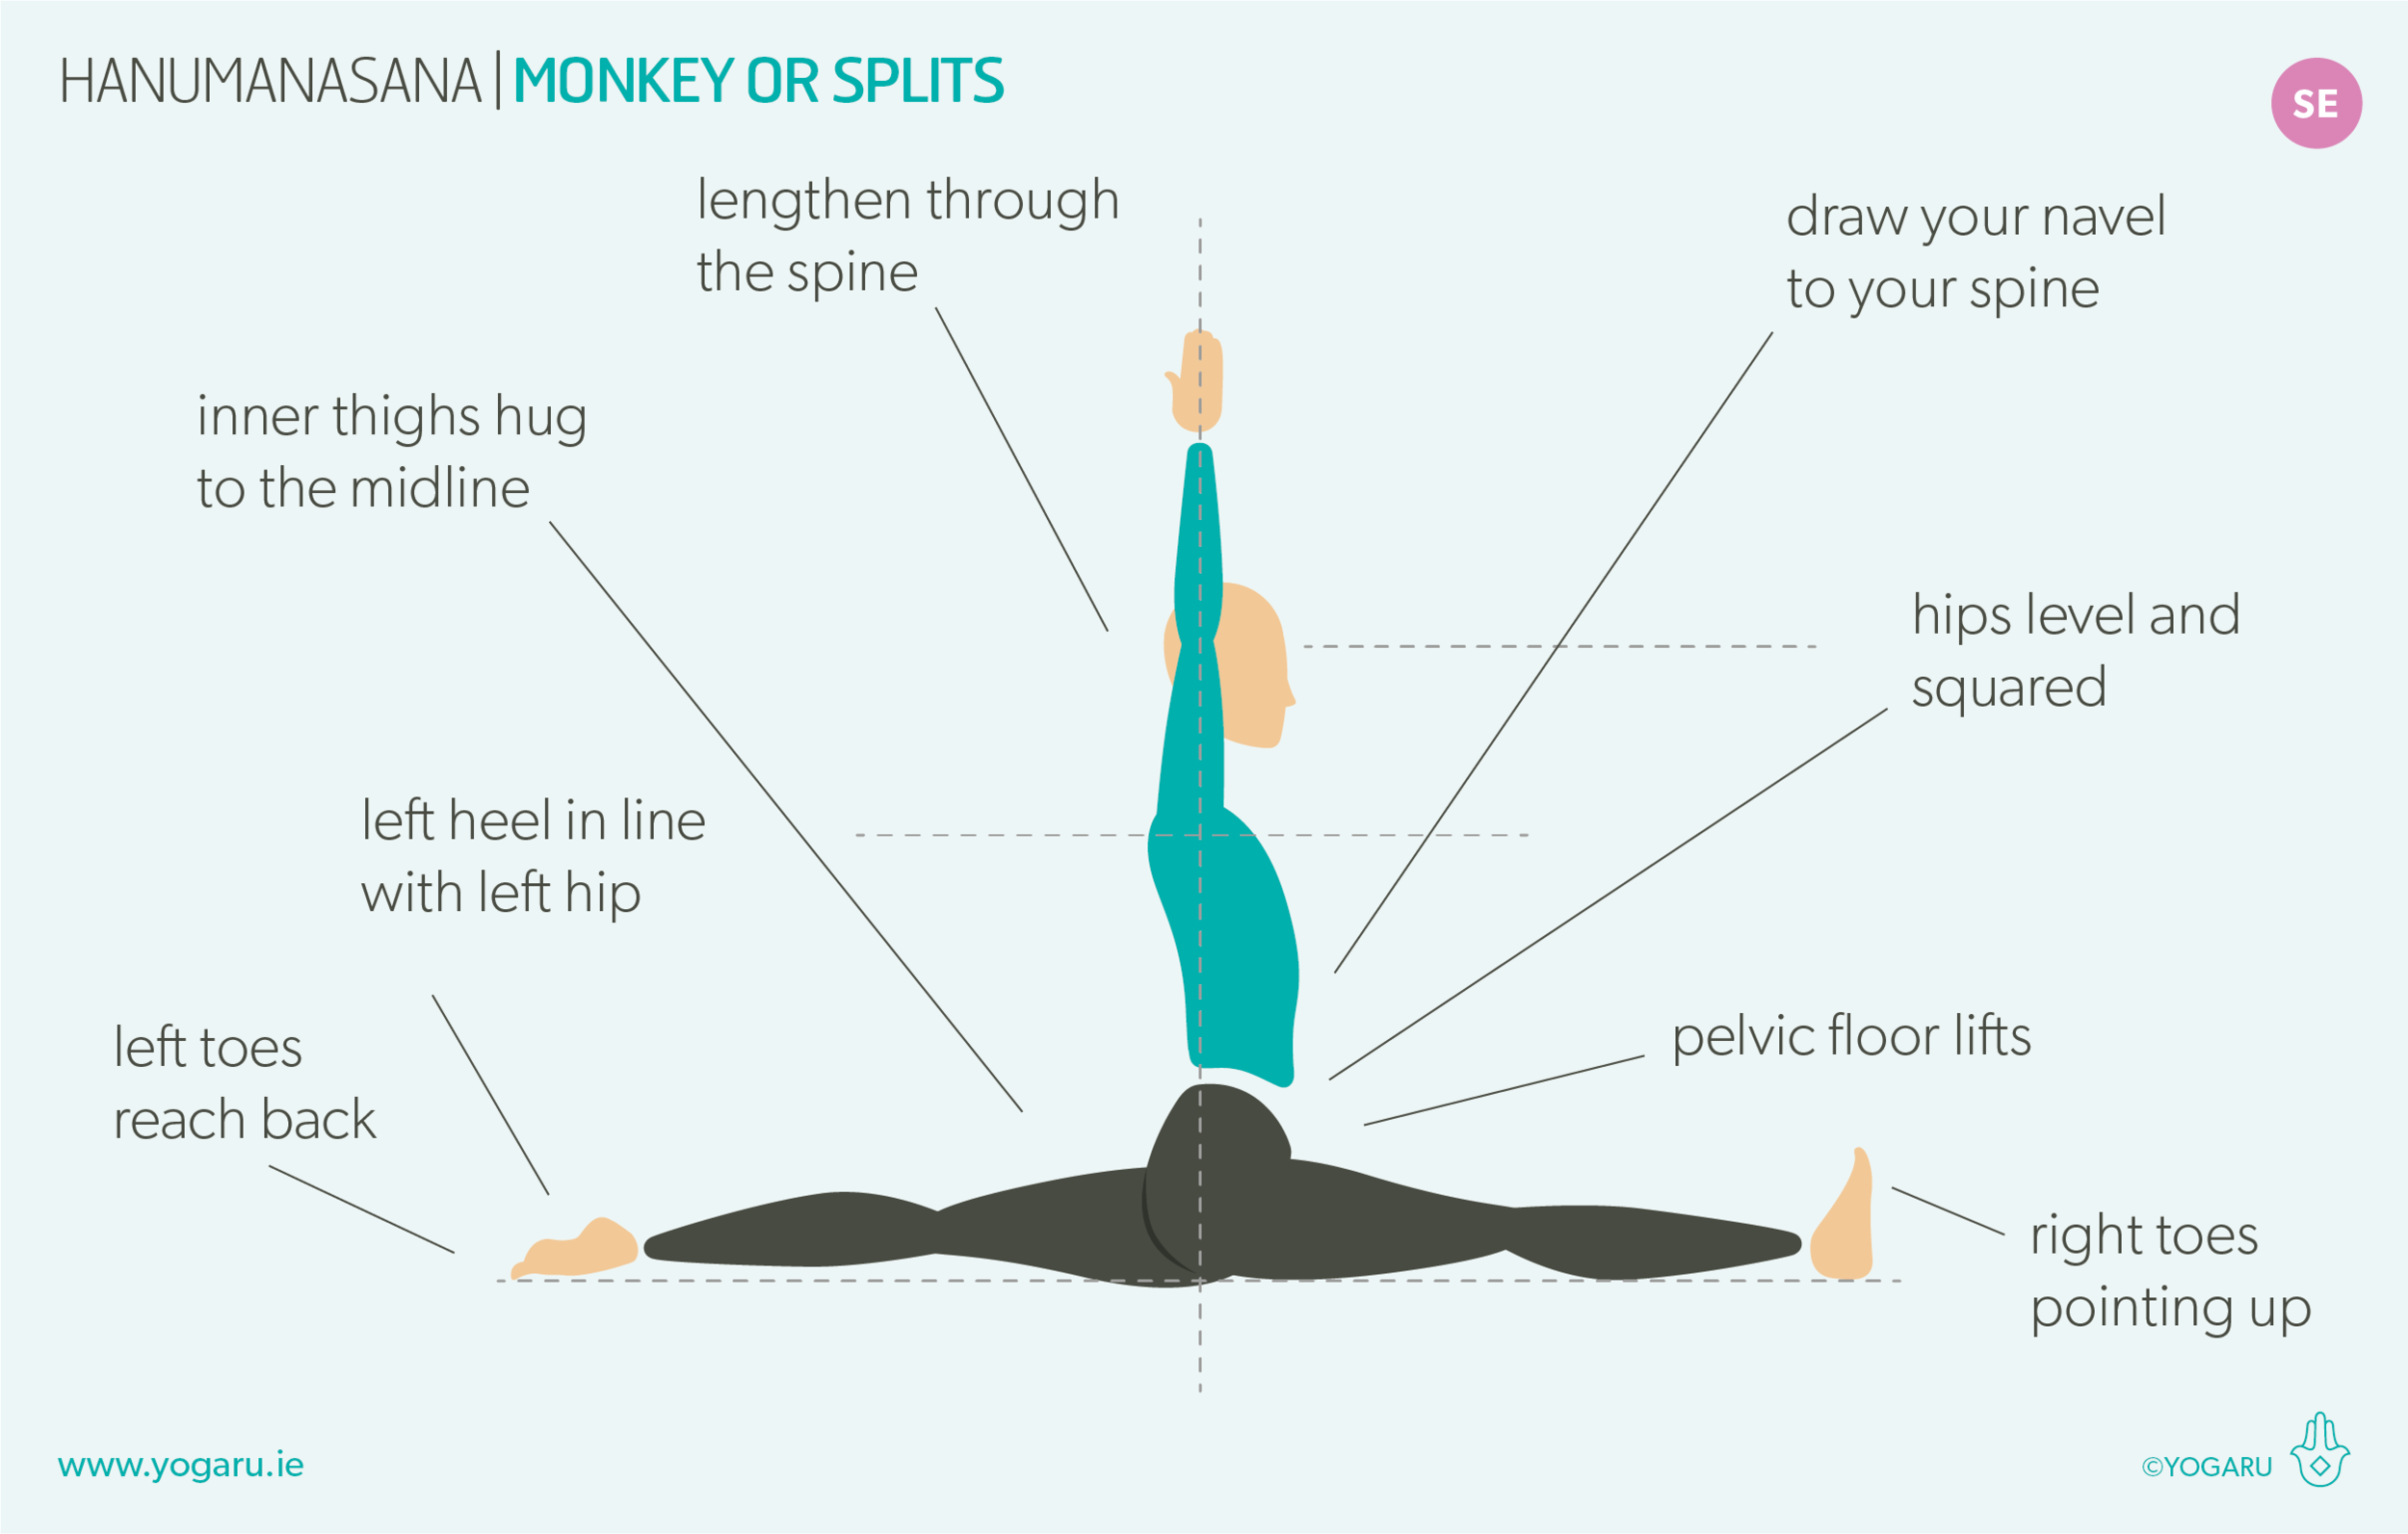
  • From Anjaneyasana, place your hands on bricks, or the ground, either side of your hips, gradually straighten your right leg, slide your heel forward along the ground.

  • At the same time slide your left leg back, reach the top of the foot back along the ground.

  • Keep your hips level and squared as you dip your hips down, working towards your pelvis sitting on the ground.

  • Hug your inner thighs and hips to the midline. Right toes pointing up, left heel in line with your left hip joint.

  • Lengthen through the spine. If your hips are grounded, reach your arms up high, gaze forward.

To save the images for personal use click and hold down the image until the ‘save image’ option appears; on Mac hold down ‘control’ and click the image to get the option box; on PC right click on the image to get the option box. Scroll down in the ‘option box’ and click ‘save image’.
Ruth Delahunty Yogaru

Sun salutations

This sequence is available on YouTube.

SALUTE TO THE SUN
The Sun Salutation, or Surya Namaskar in Sanskrit, is traditionally practised in the morning as a salute to the Hindu god of sun ‘Surya’. It is an energising movement meditation traced back to the spiritual wisdom seekers of the vedic period who worshiped the sun through mantra and prostration. Today's Sun Salutation attributes its roots to the vedic period but is very different to the one they would have practiced 3,500 years ago. The Moon Salutation, or Chandra Namaskar in Sanskrit, was created to practice in the evening as a cooling and calming end to the day. Both can be practised anytime of the day depending on what you are looking for from your practice. They both stretch and strengthen all the muscle groups, increase circulation, build a strong respiratory system, aid the digestive system, boost the immune system, unwind a busy mind and release physical and mental tension.

The repetitive and meditative quality of the movements in The Sun Salutation relaxes the mind and body, reducing stress and anxiety and increasing mental clarity. As you move through each pose you take either an in-breath or an out-breath which helps you link your breath with your movement. When done slowly it establishes a conscious breath that stimulates the vagus nerve and causes a chemical reaction which activates the nerve fibres and sends messages to the brain. The brain processes this information from the vagus nerve and initiates the parasympathetic ‘rest and restore’ response.

There are three main versions of Sun Salutation, or Surynamaskara. Sun Salutation A, B and C (also called Sun Salutation Classic). Sun Salutation C is the best version to start any practice with. You step back from your first Forward Fold/Uttanasana, to Anjaneyasana/Low Lunge, which is kinder on the joints while you give your system a chance to warm up. It also offers a softer decline to the floor through Knees, Chest, Chin, rather than Chaturanga Dandasana/Four Limb Pose. Coming all the way down to the ground offers a gentler backbend with Bhujangasana/Cobra, instead of a full Urdhva Mukha Svanasana/Upward Facing Dog. You can also incorporate a soft bend in the knees for the forward folds, allowing time for the hamstrings to warm up.

EXPLORING SUN SALUTATION IN YOUR PRACTICE
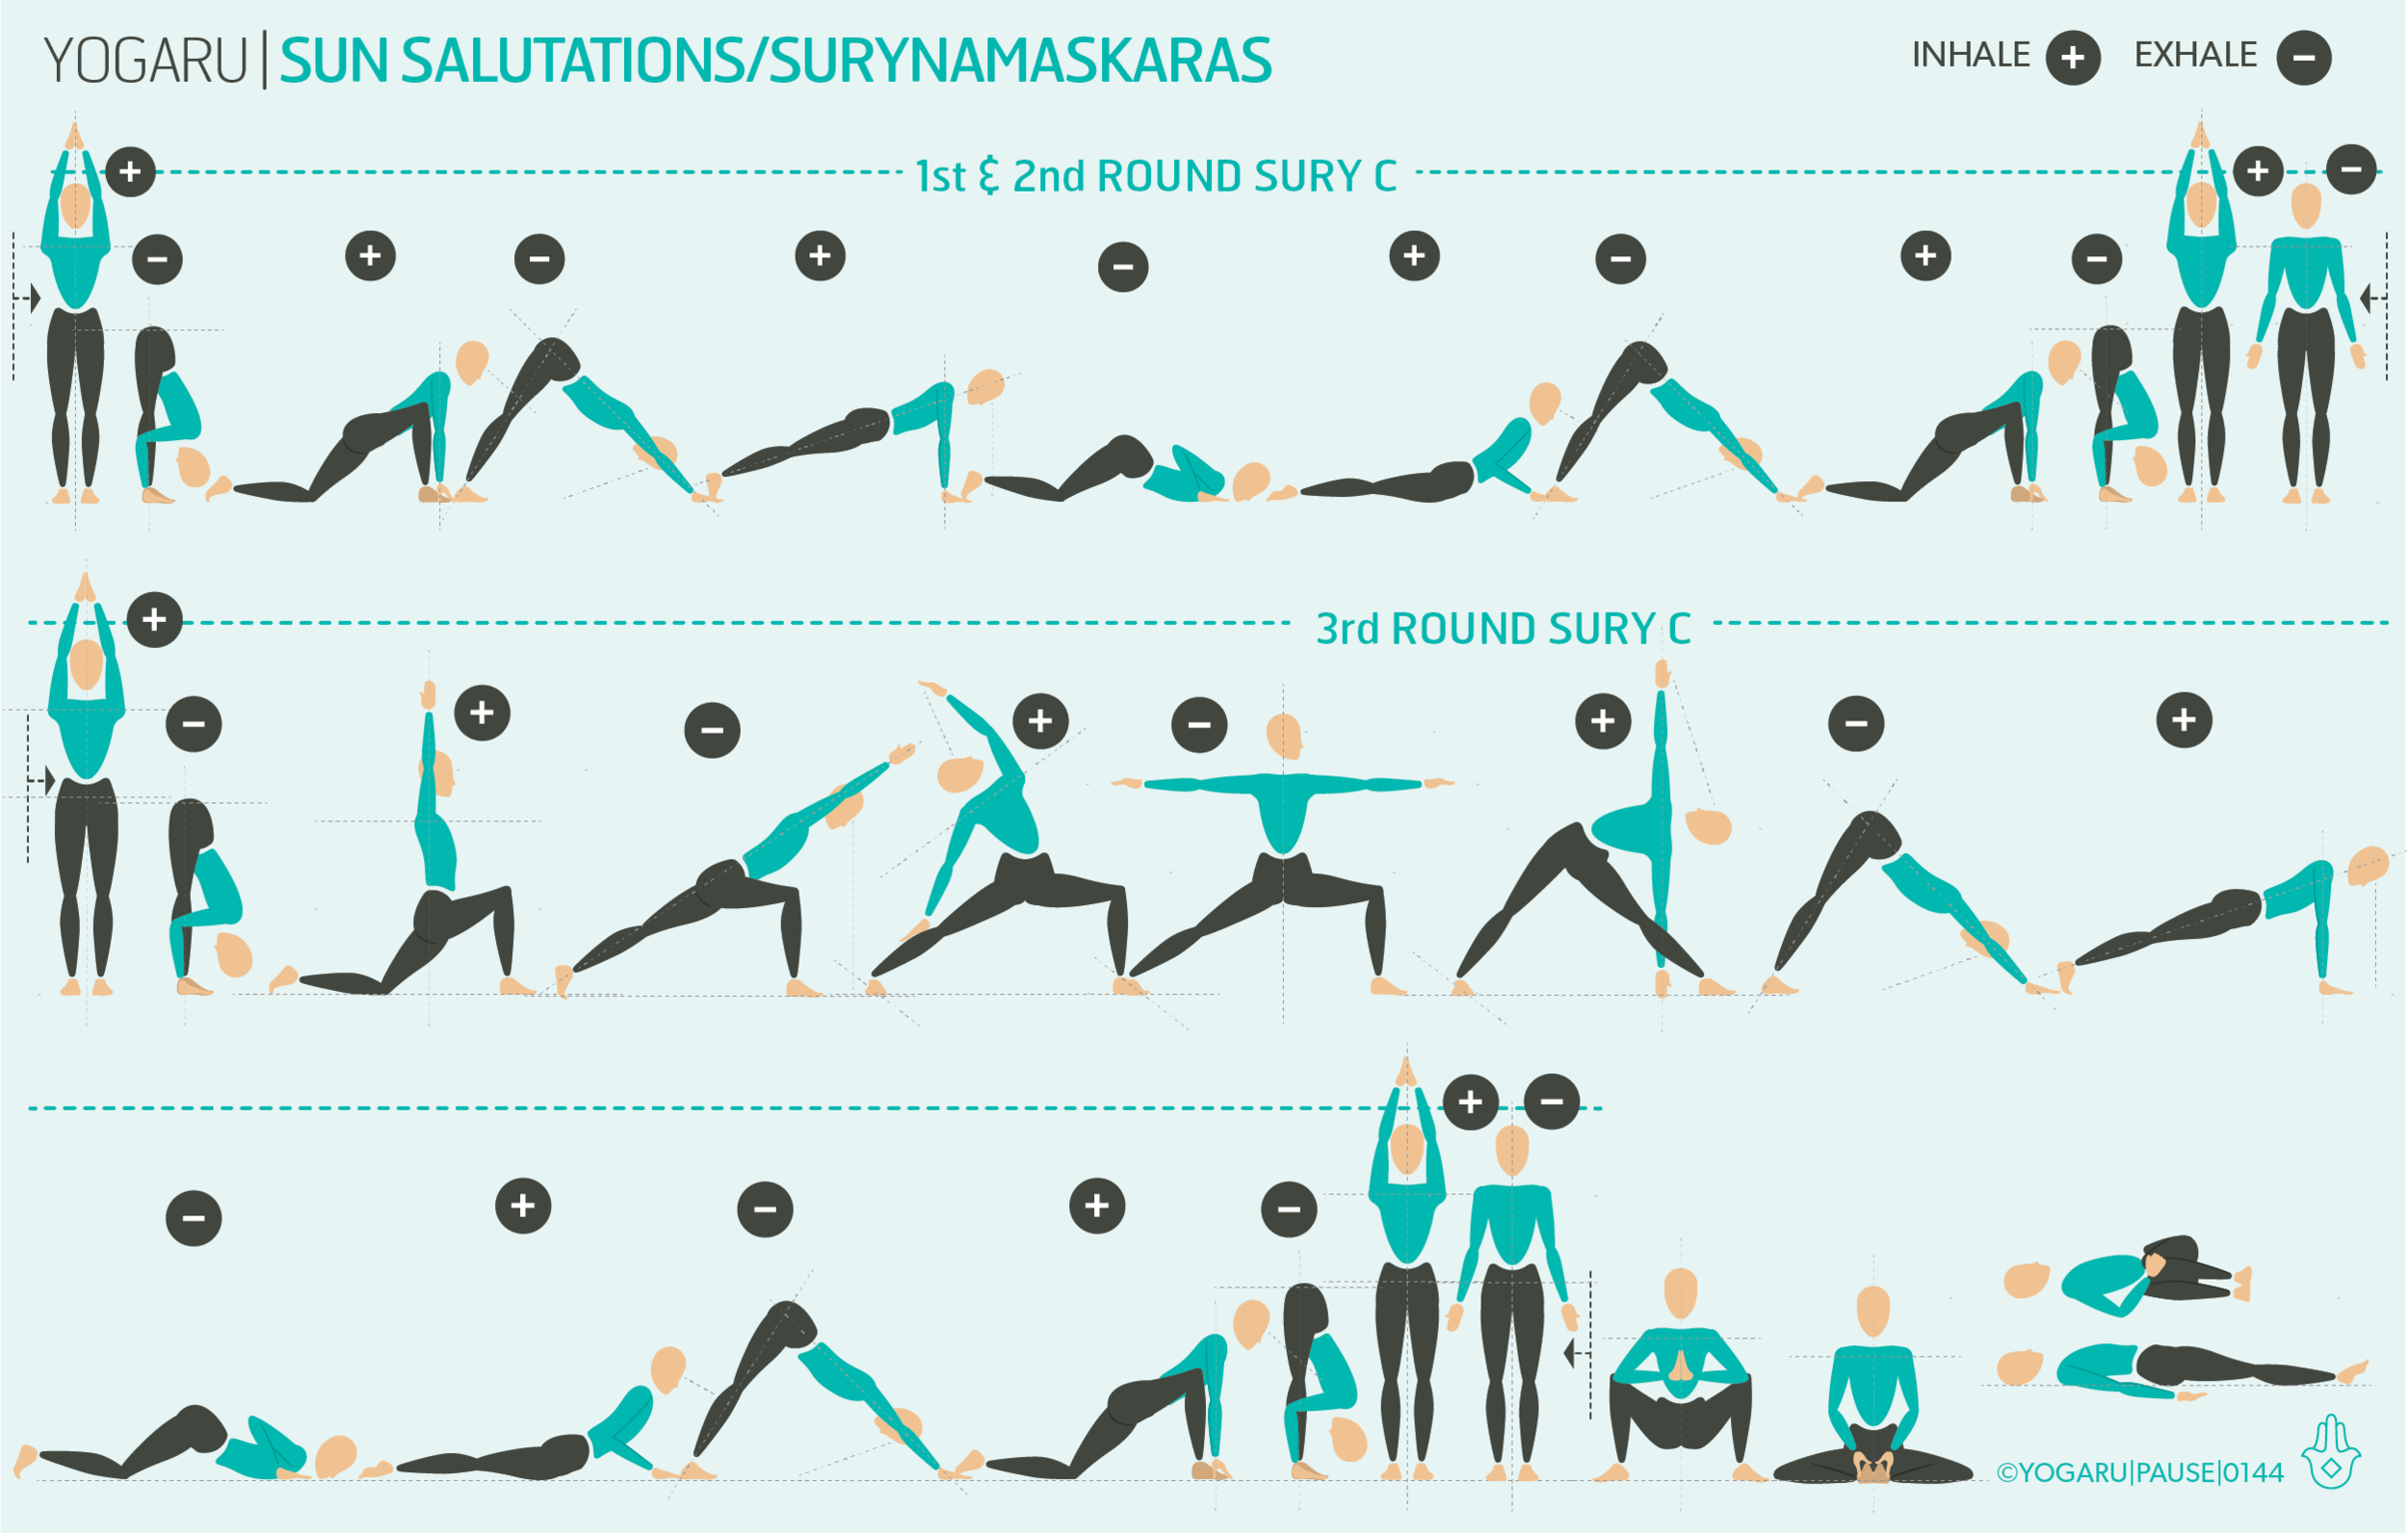
The Sun Salutation is the perfect place to start when building a home practice. It can be repeated as your whole practice or built into your flows as a warm up. For your 1st round of Sun Salutation C pause in each pose to observe your alignment. Use your second round to get used to what the breath is doing in each pose. Don’t worry if you get the breath wrong. It gradually starts to make sense – as a general rule of thumb, when you are folding down you are pressing all the air out of your lungs and when you are rising up you are filling your lungs. The third round builds in intensity by adding a small standing flow in the centre of each Sun Salutation. Finish by coming down to the ground with Malasana/Squat, pause for a few breaths in Baddha Konasana/Bound Angle and take a few minutes for your Savasana/Corpse Pose after a supine windscreen hip of the legs with bent knees.

Below is a step by step guide to Sun Salutation C. Each full Sun Salutation C consists of two rounds of this flow. In the first round step your right foot back after your first forward fold, and step your right foot forward after your second downward facing dog. In the second round step your left foot back and forward.

  • Tandanana/Mountain - stand at the top of your mat with feet hip width apart.

  • Urdhva Hastasana/Upward Salute - Inhale, reach your arms up high.

  • Uttanasana/Forward Fold - Exhale, fold forward.

  • Anjaneyasana/Low Lunge - Inhale, step your right foot back, knee to the ground.

  • Adho Mukha Svanasana/Downward Facing Dog - Exhale, step your left foot back.

  • Phalakasana/Plank - Inhale reach forward to stack shoulders over wrists.

  • Ashtanga Pranam/Knees, Chest, Chin - Exhale, lower knees, chest & chin to the ground.

  • Bhujangasana/Cobra - Inhale, press into your hands, lift chest up & lengthen forward. Lifting with the whole back

  • Adho Mukha Svanasana/Downward Facing Dog - Exhale, press back to Downward Facing Dog.

  • Anjaneyasana/Low Lunge - Inhale, step your right foot forward, left knee down to the ground.

  • Uttanasana/Forward Fold - Exhale step your left foot forward, folding down.

  • Urdhva Hastasana/Upward Salute - Inhale, reach your arms up high.

  • Tandanana/Mountain - Exhale, lower your arms down by your sides.

To save the images for personal use click and hold down the image until the ‘save image’ option appears; on Mac hold down ‘control’ and click the image to get the option box; on PC right click on the image to get the option box. Scroll down in the ‘option box’ and click ‘save image’.

Ruth Delahunty Yogaru
Anatomy 101 - the core

THE CORE OF THE BODY
The abdominal muscles, often referred to as the ‘core’, are a group of muscles located between the ribs and the pelvis. Their job is to support the spine against gravity, contain the organs of the trunk and facilitate movement. The core is also linked to the health of our spine. They work together with the muscles of the lower back to protect the spine and move it in flexion and extension. When the core is weak the back needs to work harder to hold us up. When the core is tight or overworked it pulls the pelvis into a posterior backwards tilt, puts additional strain on the lumbar spine, curls the shoulders forward and rounds the upper back.

THE STRUCTURE OF THE CORE
In working with the core it is important to visualise it as a full 360 degree network of muscles wrapping around your whole trunk. The core has a back, the quadratus lumborum, a base, the pelvic floor, and a top, the diaphragm. The psoas, which is considered ‘the core of the core’, is one of the biggest muscles of the body, and is responsible for hip flexion and movement. It is the only muscle that connects the upper and lower body, and is vital for all movement. For the purpose of this exploration we will stick with the four front abdominal muscles and the quadratus lumborum which connects the back of the hips to the back of the ribs.

THE MOVEMENTS OF THE CORE
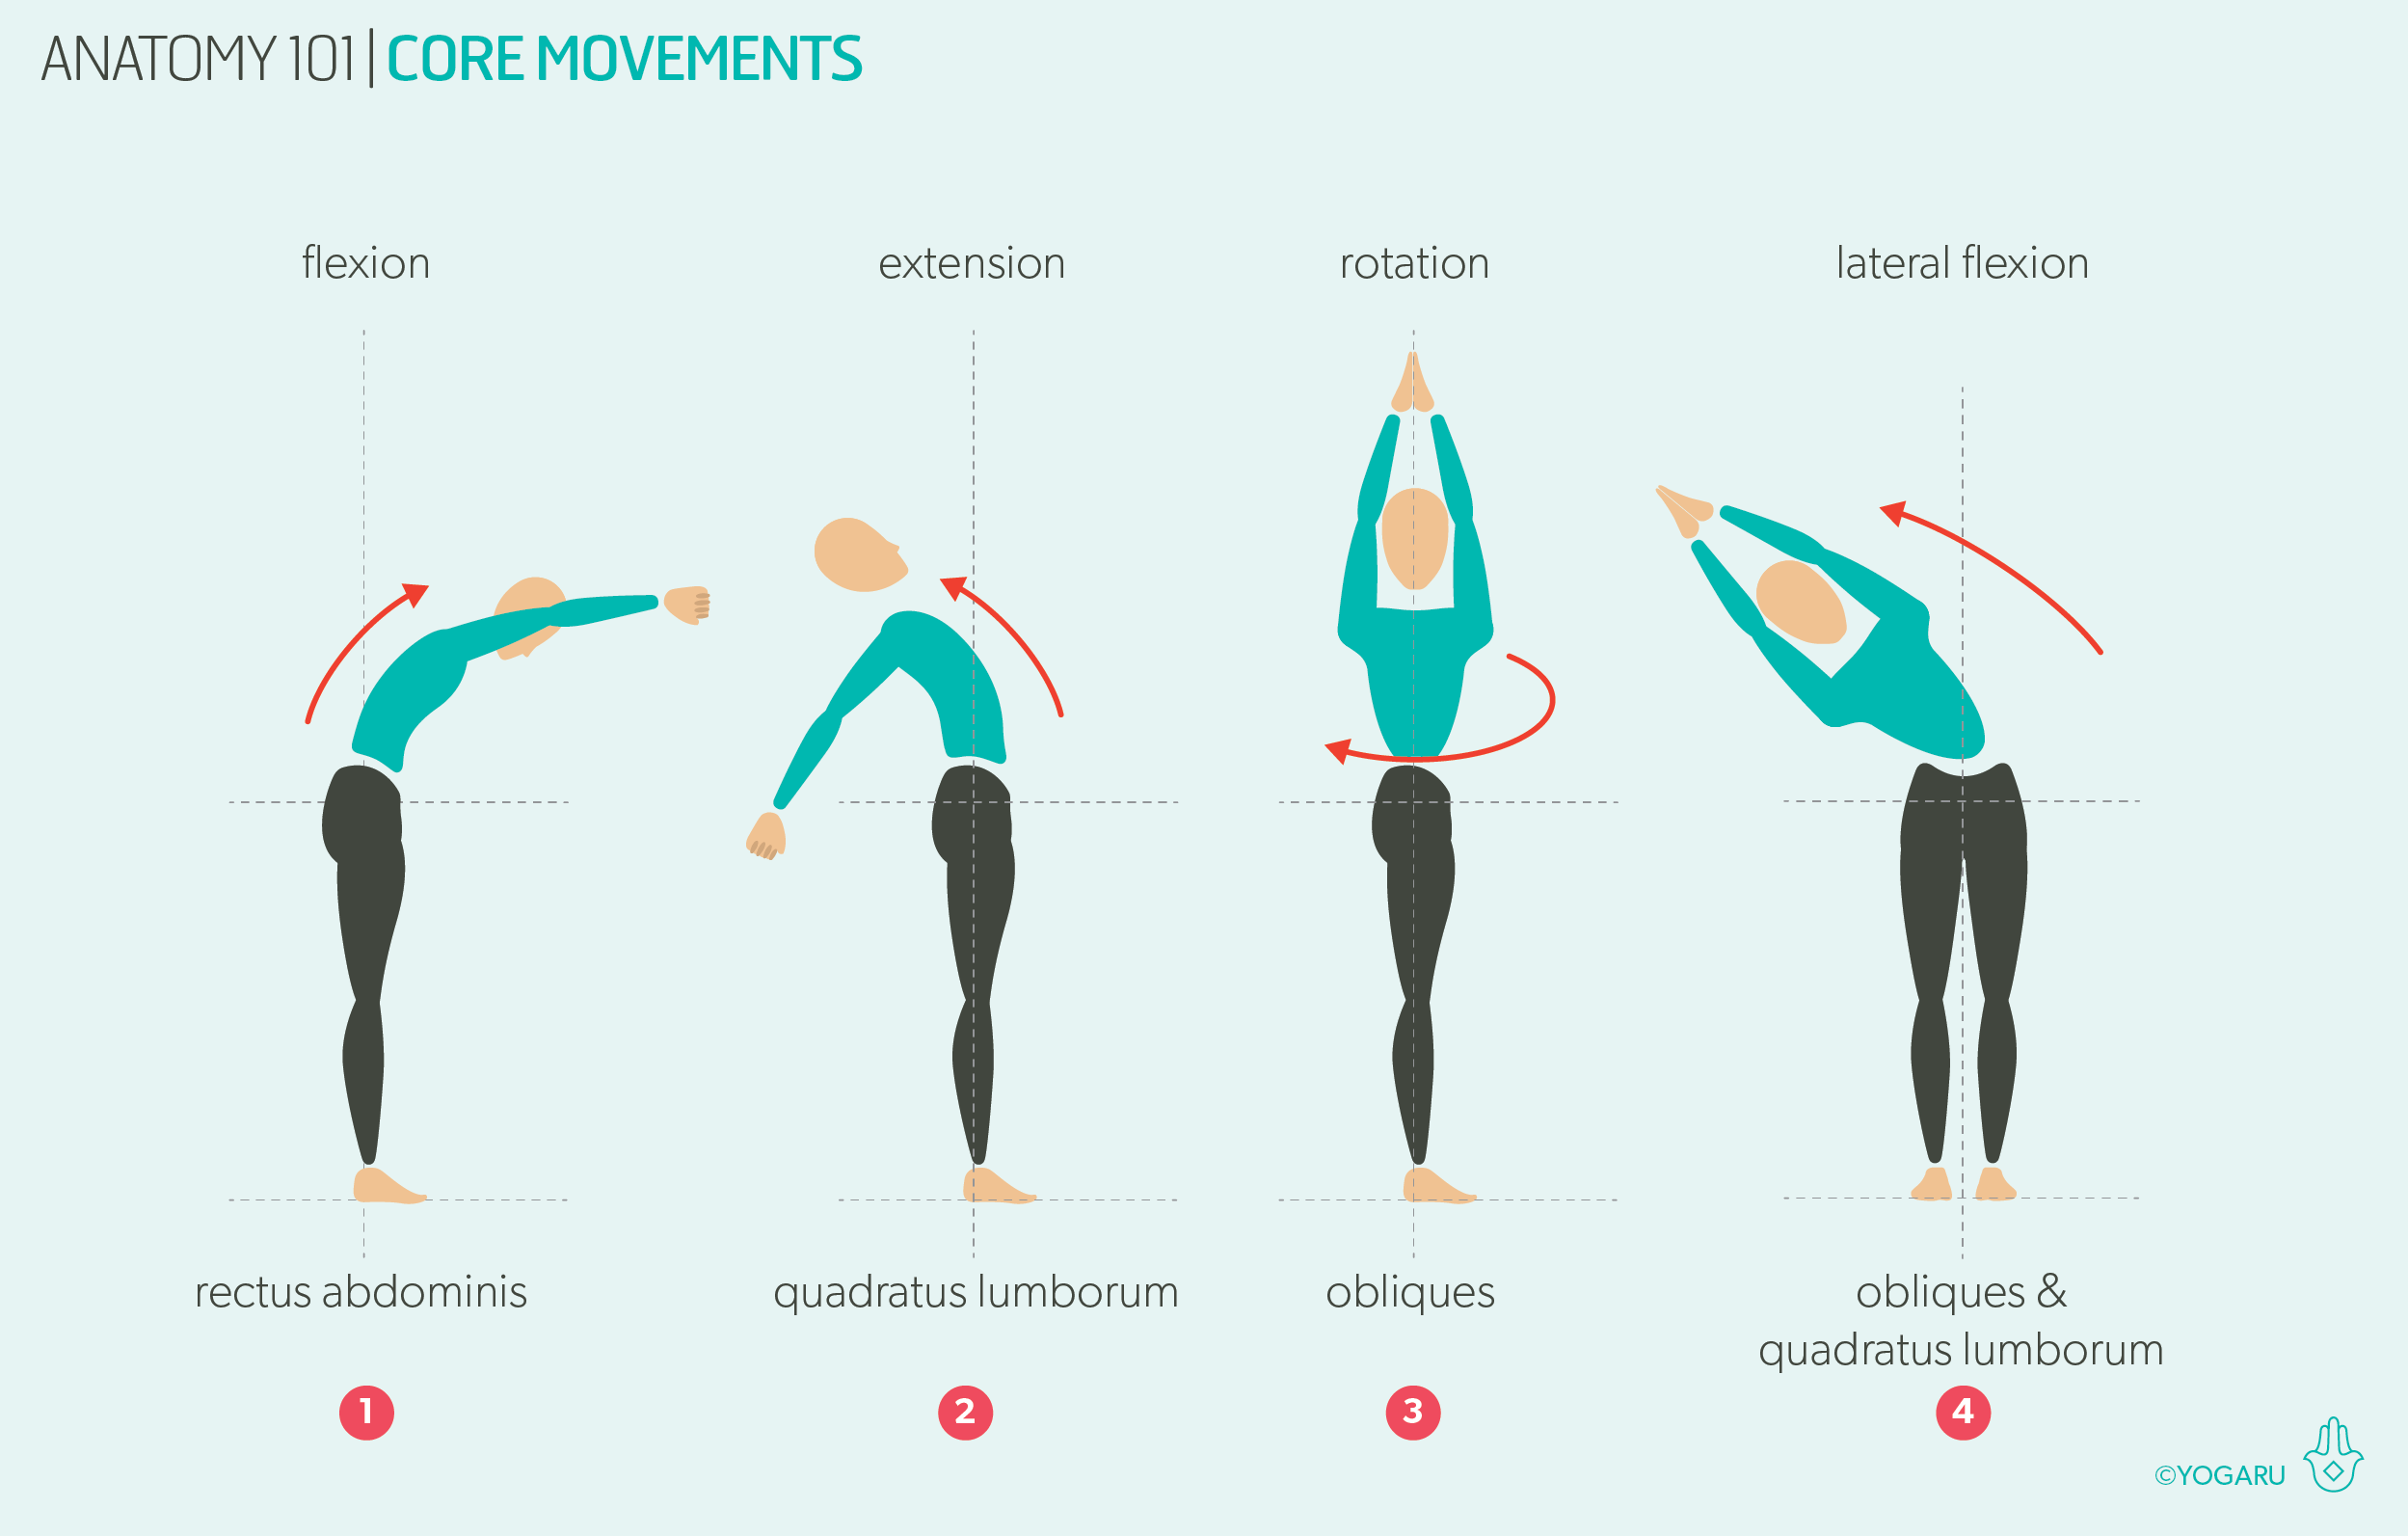
Below there is an illustration of the movements of the core:
Flexion – where the core contracts forward.
Extension – where the core expands back.
Rotation – where the core twists to the right or left side.
Lateral flexion – where the core bends to the right or left side.

THE MUSCLES OF THE CORE
Starting with the deepest muscle:
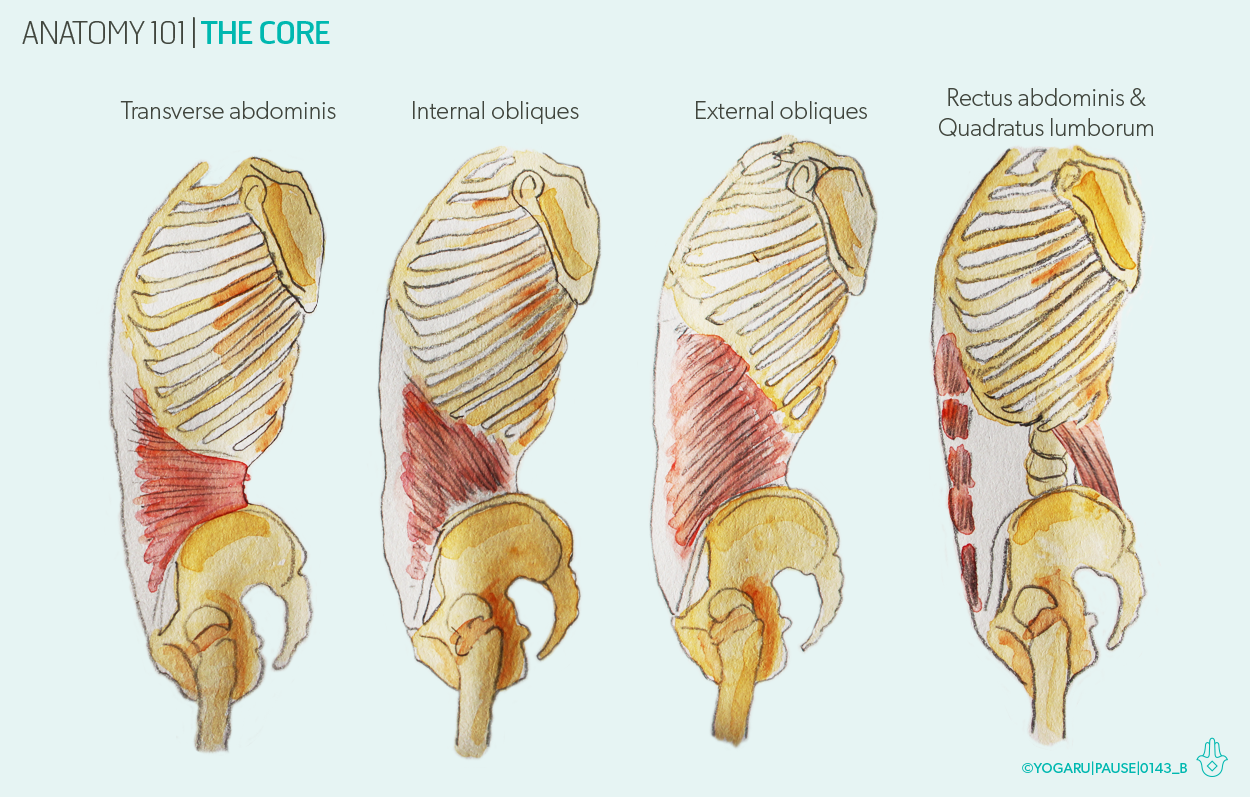
Transverse abdominis are not considered a movement muscle, their action is compression and work like a containment sheaths that wrap around the core like a corset to support the organs, assist in posture and cinch the waist in.
Internal obliques are found either side of the body and run from the hips to the ribs diagonally and are responsible for lateral flexion, rotation and the side curves of the waistline.
External obliques are also found either side of the body and run from the ribs to the hips, crossing diagonally with the internal obliques and are also responsible for lateral flexion, rotation and the side curves of the waistline.
Rectus abdominis are the outermost layer of muscle at the front of the body and run from the pubis to the bottom of the sternum and are responsible for flexion of the spine into forward folds, stabilise the pelvis and shape the front of the body.
Quadratus lumborum is located at the back of the body and runs from the hips to the lower ribs, it does the opposite to the rectus abdominis to extend the spine into backbends when working as a pair and assist in lateral flexion when working individually.

THE OBLIQUES IN ROTATION & LATERAL FLEXION
Rotation (twist) and lateral flexion (sider bends) are a bit more complicated when it comes to which muscles are stretching and contracting. When we twist to the right the right side internal obliques contract and the right side external obliques stretch, while the left side internal obliques stretch and the left side external obliques contract. When we take a side bends to the right the right side internal obliques contract and the right side external obliques contract, while on the left side the left side internal obliques stretch and the left side external obliques stretch.

EXPLORING THE CORE IN YOUR PRACTICE
This sequence brings your full attention to the 360 wrap of your core in action. Remember that muscles work in tandem to each other so when you feel a stretch on one side the other side is strengthening. I have highlighted the five muscle actions of the core - four movements of the core and an additional action of compression. The sequence is designed to build a three dimensional awareness of the core.

ALIGNMENT CUES
This sequence will bring you through the five muscle actions of the core – flexion, extension, rotation, lateral flexion and compression. A selection of asana are numbered to highlight sample poses from each muscle action to give you a better understanding and the opportunity to experience the sensations of the core in action ad you practise. Below are the asanas which are highlighted in the sequence and some cues to help you tap into where you will feel the five muscle actions of the core:

1 – Flexion - draw your navel towards your spine and come into flexion on an exhale. Feel the rectus abdominis muscles at the front of the core contract .
Marjaryasana/Cat with the knees slightly lifted off the ground; Naraviralasana/Sphinx with hips lifted; Phalakasana/Plank Pose with knee to elbow; Tadasana/Mountain with single knee lifted. 

2 – Extension - allow the inhale to expand your front core as the back core contracts. Feel the quadrates lumborum  muscles at the back of the spine contract.
Bitilasana/Cow; reverse table top; Setu Bandha Sarvangasana/Bridge.

3 – Rotation - lengthen on an inhale and come into your twist on an exhale. Feel the diagonal pairs of the obliques muscles on the side of the body contract and stretch.
Parivrtta Ashta Chandrasana/Revolved Eight Crescent Moon; Marichyasana III/Marichi III.

4 – Lateral flexion - lift up out of the spine and lengthen through your whole side bend. Feel the obliques and quadratus lumborum muscles contract on the bending side and stretch on the opposite side.
Parighasana/Gate; Vasisthasana/Side Plank.

5 – Compression - cinch your 360 waist in on an exhale. Feel the muscles of the transverse abdominis contract.
Phalakasana/Plank Pose; Ashva Sanchalanasana/Galloping Horse; reverse Galloping Horse.

To save the images for personal use click and hold down the image until the ‘save image’ option appears; on Mac hold down ‘control’ and click the image to get the option box; on PC right click on the image to get the option box. Scroll down in the ‘option box’ and click ‘save image’.
Ruth Delahunty Yogaru