Uttanasana - Forward Fold

YOGARU_Uttanasana_PB.png

SHIFTING YOUR MINDSET
Uttanasana/Forward Fold is a pose I have had a rocky relationship with. As a runner I have tight hamstrings and contrary to popular belief tight does not necessarily mean strong. I am inclined to overstretch the back of my hips if I get caught up in the ego of the pose. One of the keys to staying injury free in this pose is to be patient and to have no expectation of how far forward you think you can fold. Each practice is different, your Uttanasana/Forward Fold in a morning practice will be completely different to an evening practice. Try not to be attached to destinations in your poses, this one in particular. The journey of your practice is the point of yoga, not the picture perfect pose. When you feel sensation in your pose you are getting all the same benefits as the person who seems to effortlessly touch their toes. Stay in your body and with your experience of your practice. Striving and grasping at poses will lead to frustration and injuries.

THE BENEFITS OF UTTANASANA/FORWARD FOLD
Uttanasana/Forward Fold stretches the hamstrings, glutes and spine along the back of the body, and strengthens the hip flexors at the front of the body. Forward bends are a very therapeutic family of poses. They aid digestion, eases constipation and bloating, eases insomnia, eases menstrual & menopause symptoms, eases fatigue, stress, tension and anxiety and boosts the immune system. They also ease headaches and lower blood pressure. In Uttanasana/Forward Fold the head is below the heart which makes it an official inversion pose too, adding extra benefits like increasing circulation, energy and metabolism.

EXPLORING UTTANASANA/FORWARD FOLD IN YOUR PRACTICE
Moving gently between stretching and strengthening is a preferable way to warm the muscles for this pose rather than going straight into a deep forward fold. The hamstrings are the most commonly overstretched muscles in yoga practitioners. They originate at the sit bones on the base of the pelvis, cross over at the back of the thigh, and attach to either side at the top of the shin bone. Their job is to flex the knee and extend the hip. Uttanasana/Forward Fold deeply stretches the hamstrings.

The sooner you establish the difference between the feeling of a muscle stretching, which is a dull, evenly distributed sensation, and a muscle overstretching, which has a pinching sensation, you will be less likely to cause yourself an overstretch injury. It is also important to note that if you are like the majority of people, yogis and non yogis alike, you will not be anywhere near the human sandwich version of this pose you see in books.

Before you fold, lengthen your spine up and lift out of your pelvis to find as much space as possible to tilt forward from. Exhale as you fold forward to lift the organs up out of the lower abdomen and engage your core muscles to support your lower back. When the pelvis can tilt no further, start to pour your upper body over your legs like you are tipping the contents of your head out. If you struggle to get the pelvis to tilt forward try having your feet hip distance apart, rather than the traditional feet together version of the pose. If you have issues with your lower back keep a slight bend in your knees to release the hamstrings and use your hands on your knees to support you as you tilt forward. At your final destination soften what can soften - your shoulders, your arms, your neck, your face. Have a sense of what parts of the body are on duty and what parts can be relaxed.

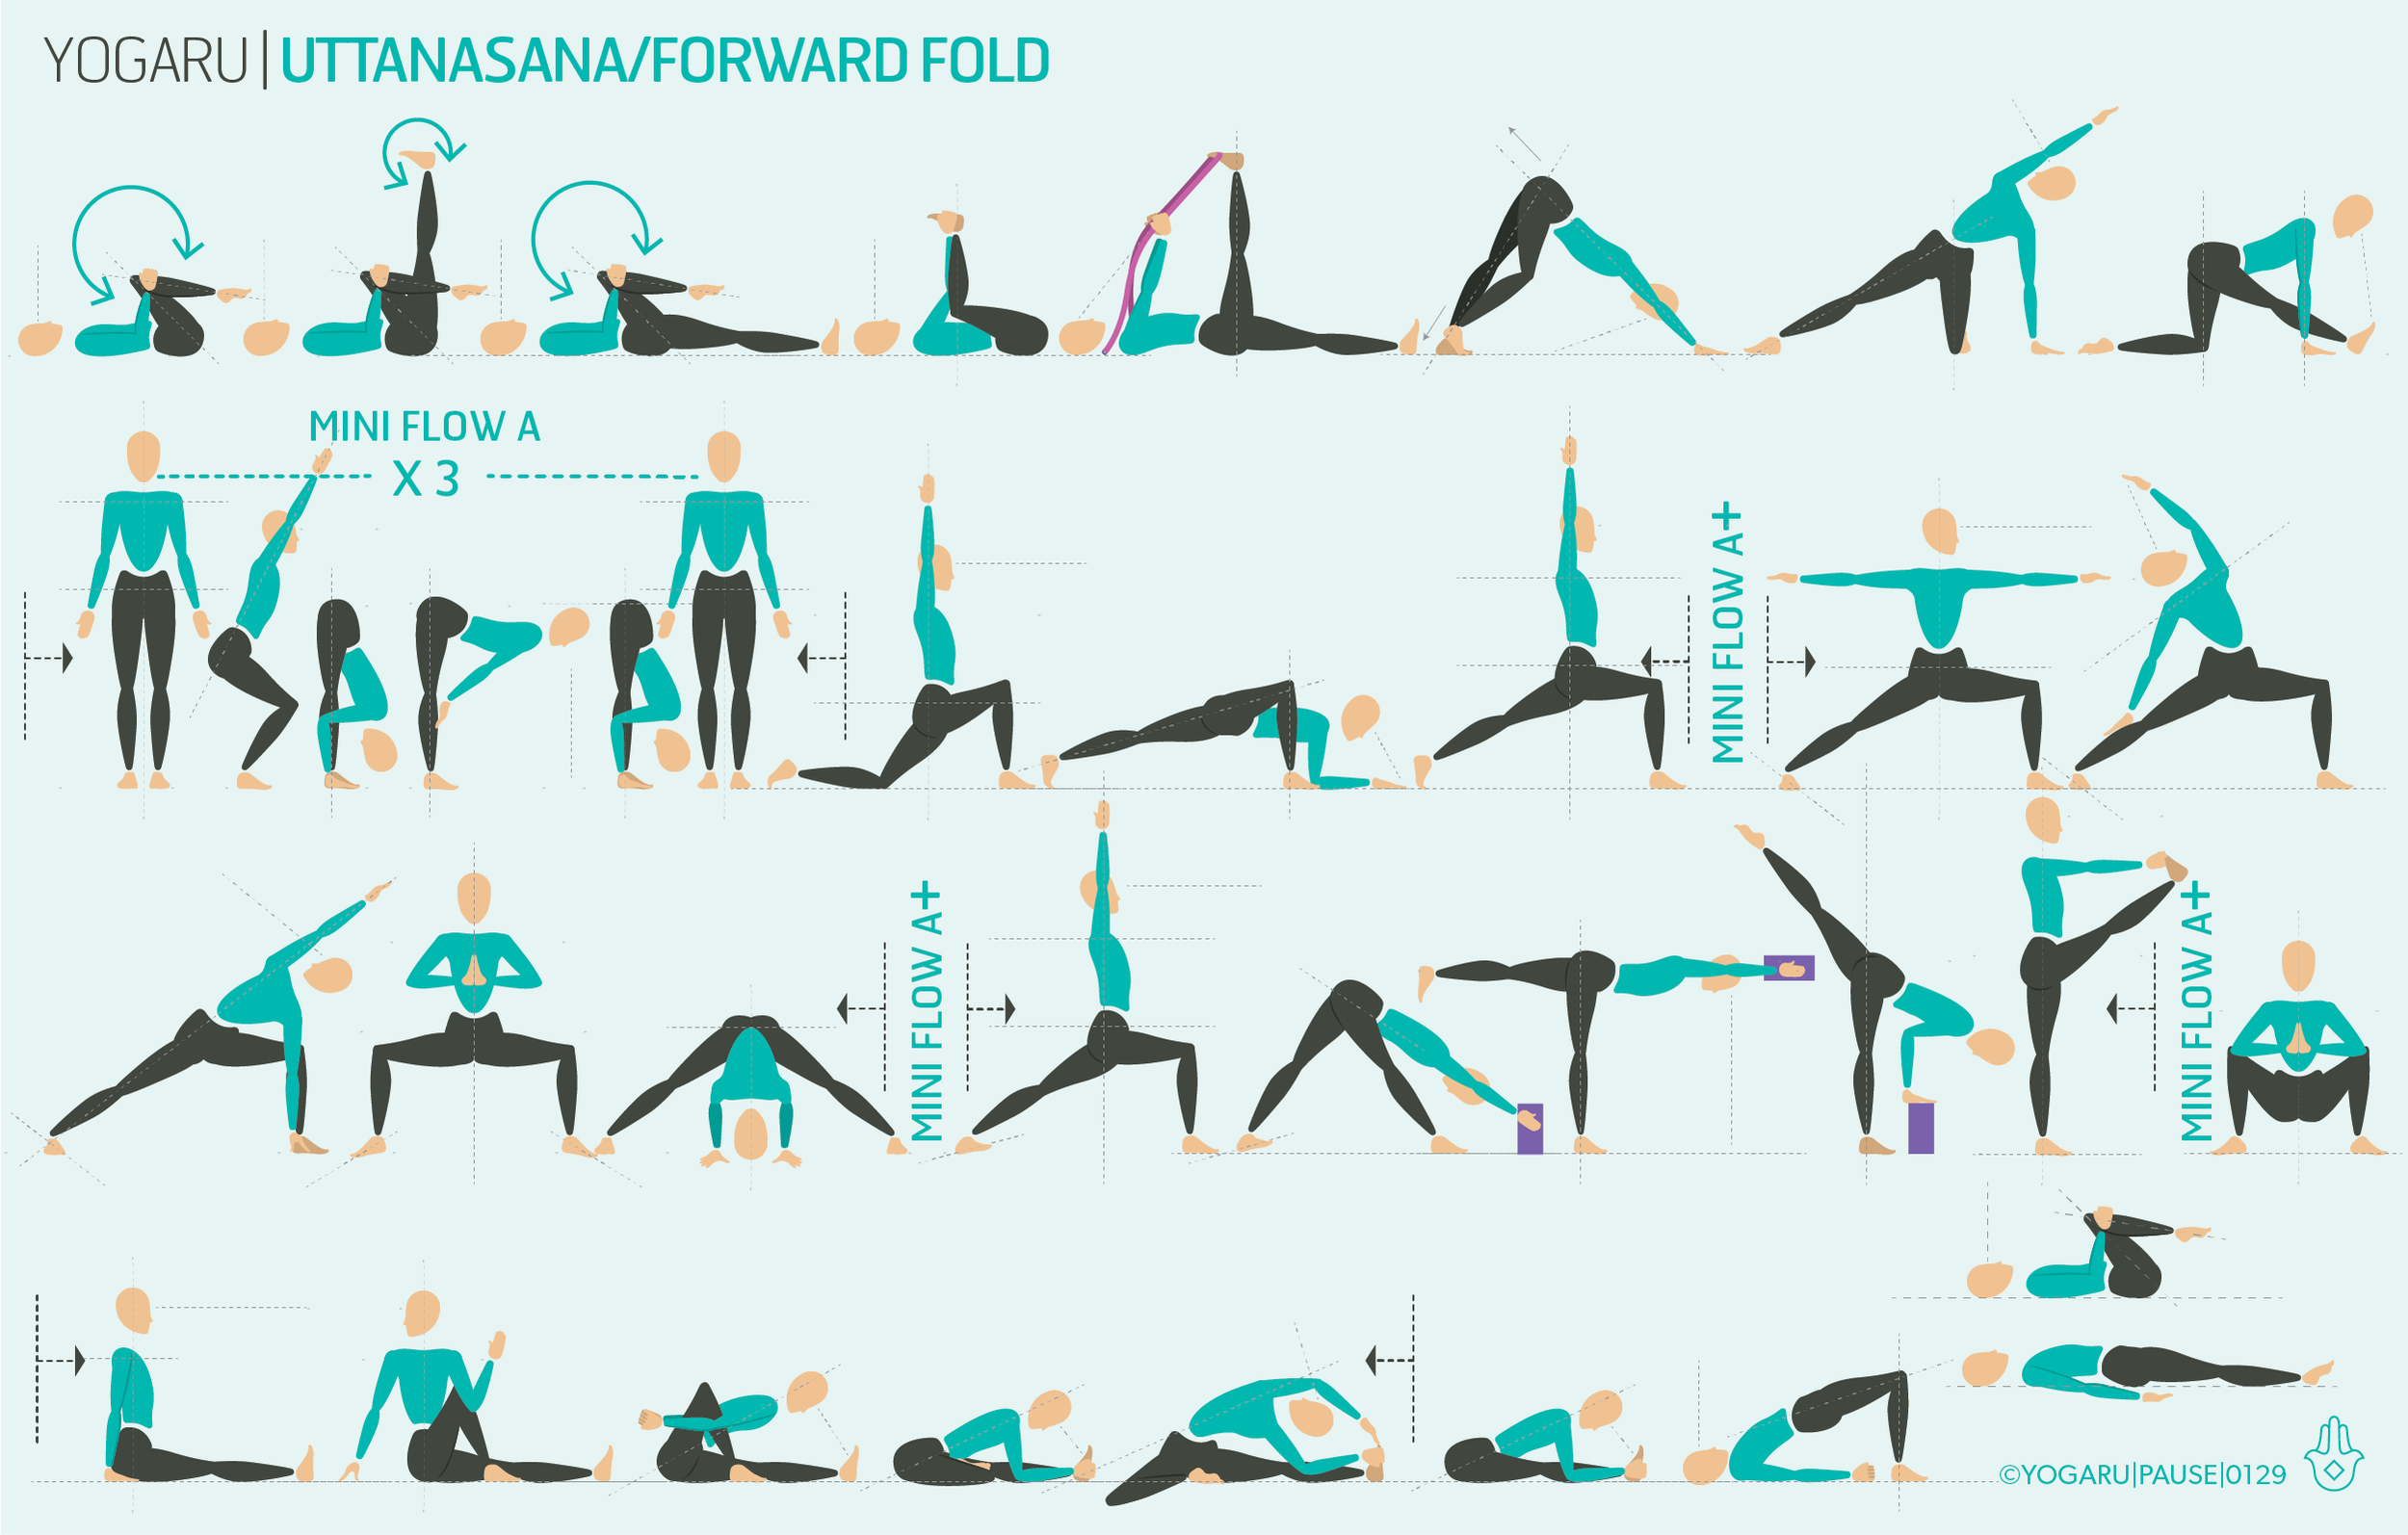
Before your first Uttanasana/Forward Fold you will have started to open the back of your hips with a supine warm up, Supta Padangusthasana/Reclined Hand to Big Toe and Adho Mukha Svanasana/Downward Facing Dog. The Uttanasana/Forward Fold MINI FLOW A features in full on the first row and then your will repeat it after each standing flow indicated by a ‘MINI FLOW A’ before each subsequent standing flow. You will go through four rounds of the Uttanasana/Forward Fold flow throughout the sequence.

You can also check out my Instagram post on Uttanasana/Forward Fold to add a few different versions of the pose with and without props into this sequence. You will definitely notice a difference between your forward folds at the start and end of your practice as the muscles gradually open up for you.

ALIGNMENT CUES
You will come through three rounds of Uttanasana/Forward Fold. Start gently and have no expectation of how deep you will fold forward. See do you notice any change between the first round of Uttanasana/Forward Fold compared to your final round.

Have a read of the tips below and either print out the sequence or save it onto your device:

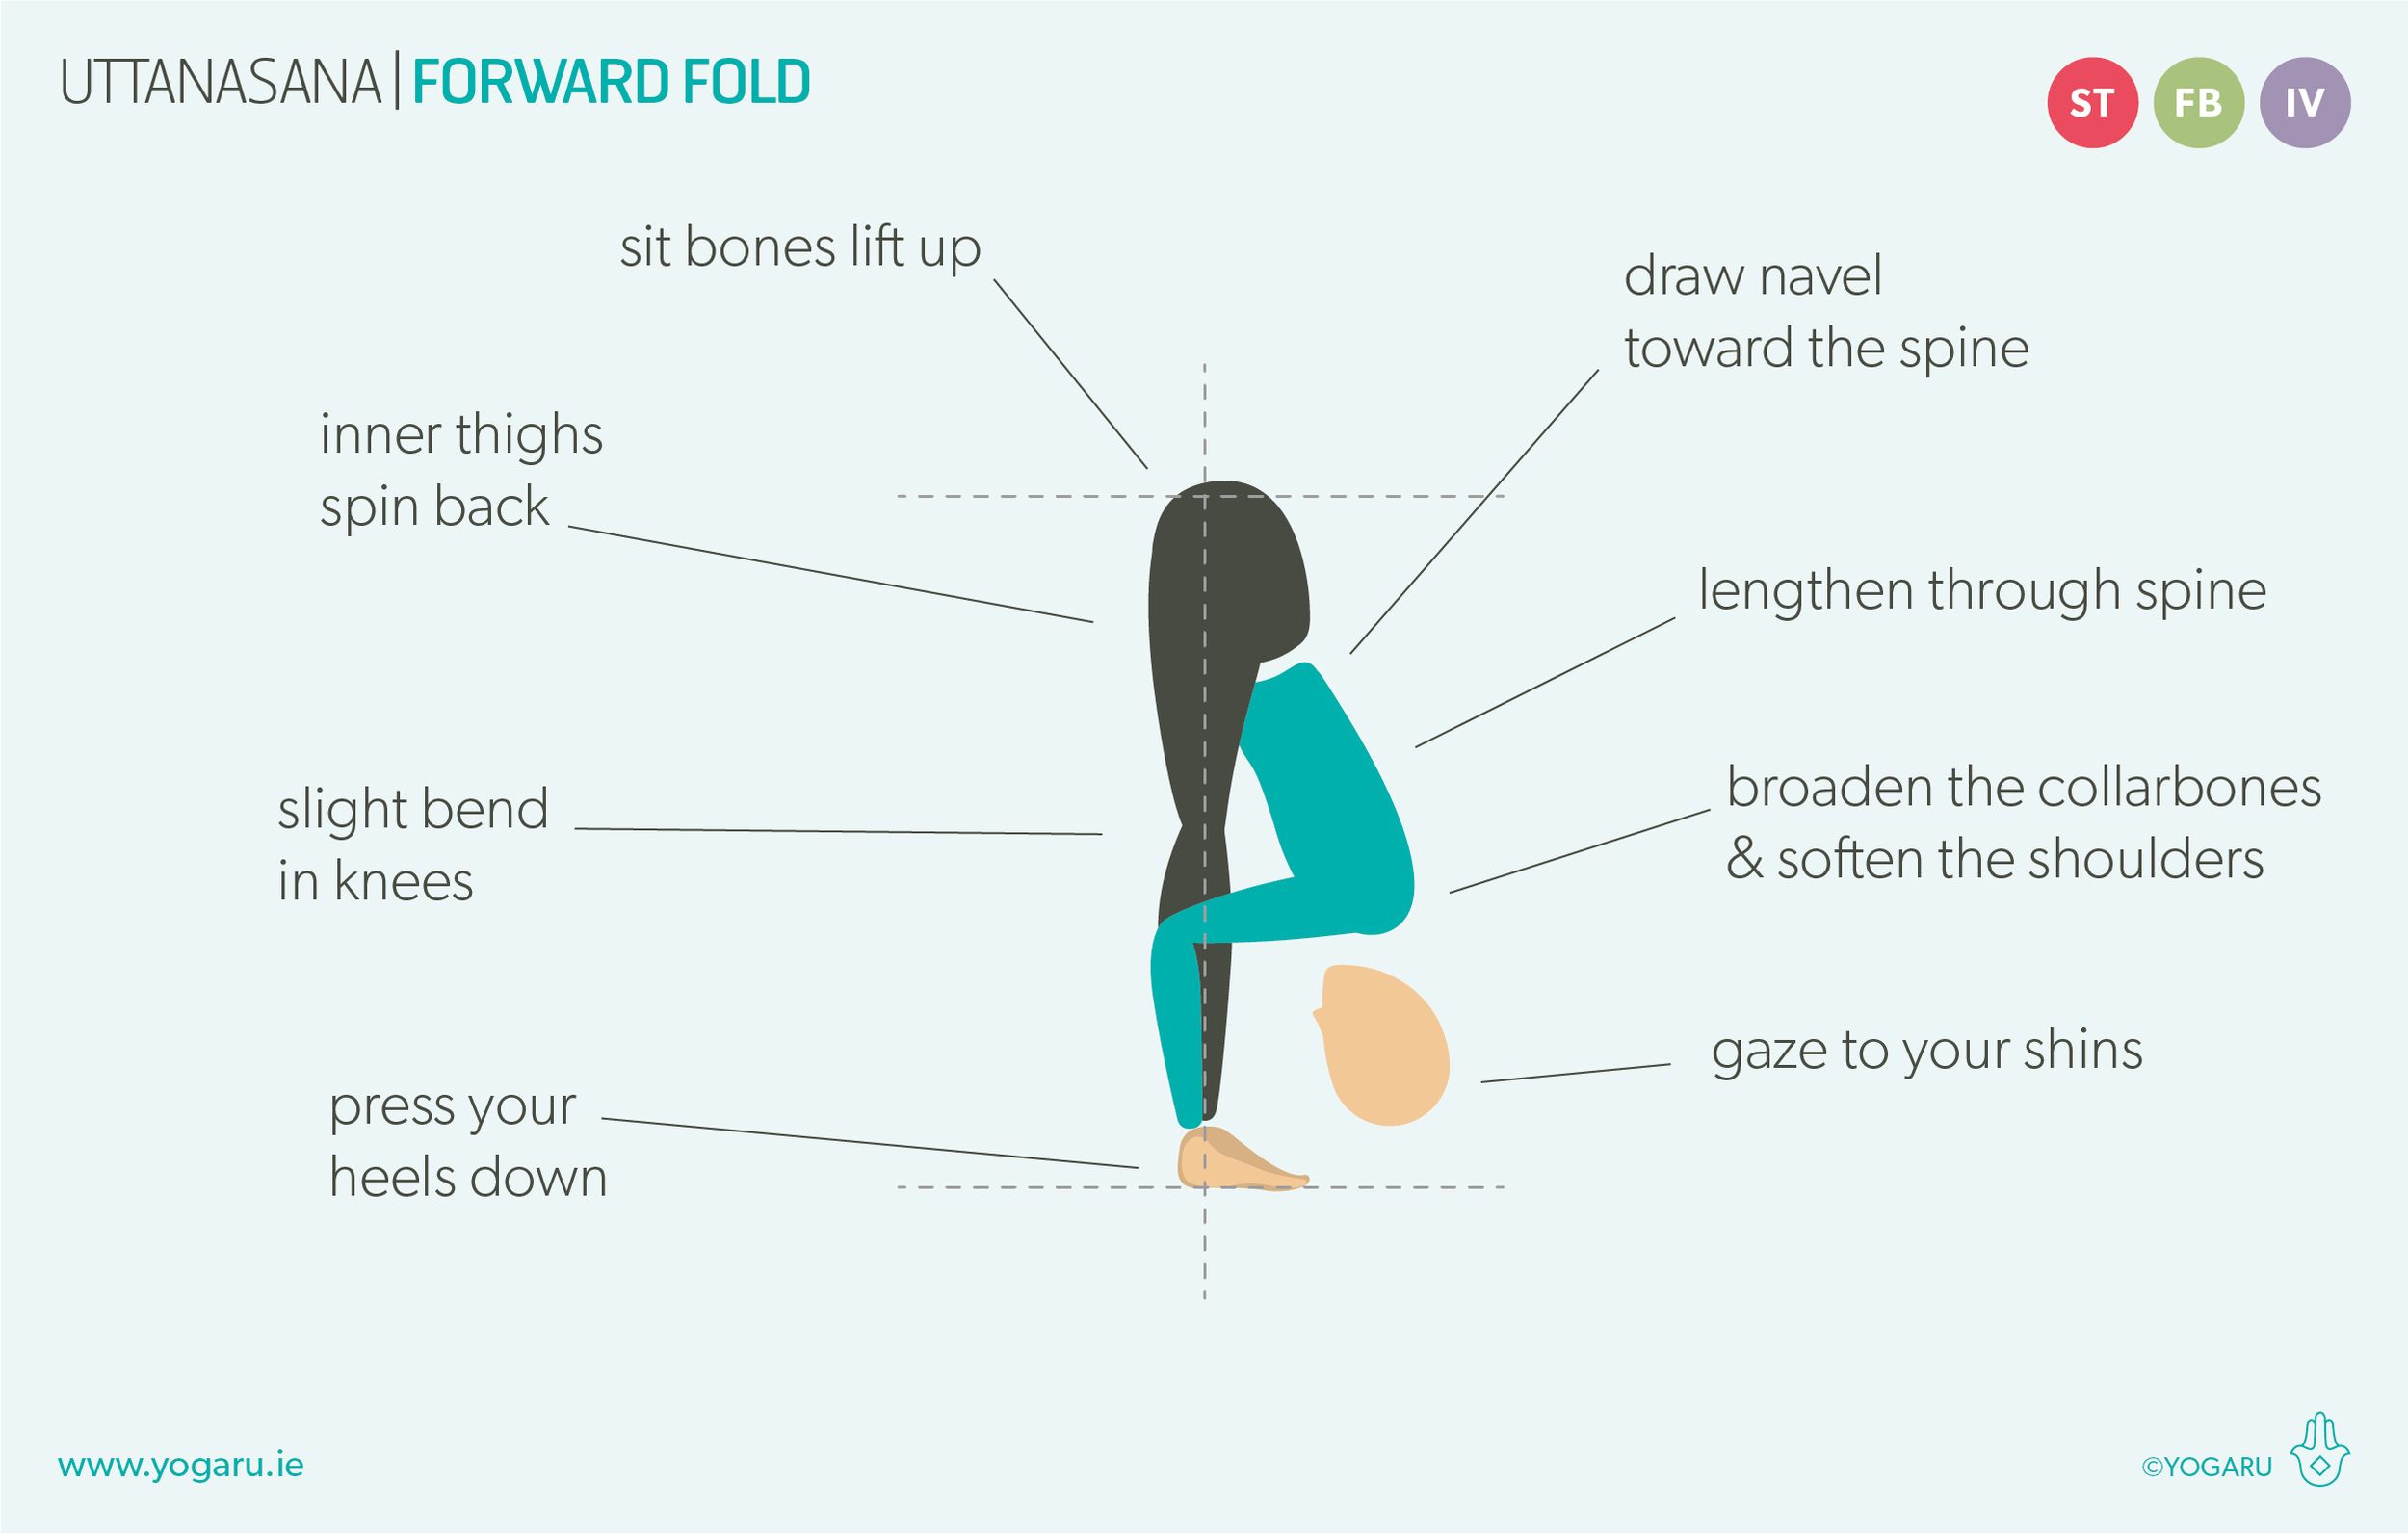
  • From Tadasana, inhale, lengthen up through the spine.

  • Exhale, slowly fold forward from the hip joint as your pelvis tips forward.

  • Hands to your shins, to the ground in front of you, or beside your feet.

  • Press your heels into the ground, lift your sit bones up.

  • Inhale, lengthen through your spine to the tip of your crown, exhale, fold forward a little more.

  • Broaden through the collarbones, gaze to your shins.

Subscribe to my newsletter & get a FREE YOGA BENEFITS INFOGRAPHIC as a thank you!

To save the images for personal use click and hold down the image until the ‘save image’ option appears; on Mac hold down ‘control’ and click the image to get the option box; on PC right click on the image to get the option box. Scroll down in the ‘option box’ and click ‘save image’.

Ruth Delahunty Yogaru

How can my practice help me today?

PAUSE_0128.png

BUILDING A RELATIONSHIP WITH YOUR MAT
In my recent article ‘10 Reasons to build a home practice’ I shared the benefits of stepping on your mat when it suits you, and practicing exactly what you need, as often as you like. In this article I use my own personal practice as a case study to show you how you can tailor your practice to your needs and get the most out of your time on your mat. You will find an accompanying tutorial for this article called ‘Tailoring your practice’ in my YouTube channel. If you’d like to download a fresh ‘Practice self inquiry’ and ‘The benefits of yoga’ go to ‘10 Reasons to build a home practice’.

When I started home practice I noticed the closer I got to my practice the better I became at tailoring to my ever changing needs. With time I learnt which poses to practice to support me with whatever I brought to my mat. My mat has become my comfort blanket that has seen me through over 20 years of life's ups and down and I hope it will continue to support me for many years to come. My relationship to my practice is a give and take relationship. If I don’t show up on my mat I don't get to experience the many benefits of yoga, if I push too hard I increase my chances of injury. I hope to help you establish your relationship to your practice, reap the fruit of your efforts and enjoy every minute.

HOW MY PRACTICE HELPED ME TODAY!
This is my self inquiry which I filled out at the start of this week. I used it to help me get the most of my time on my mat with more directed pose choices. Each day I step on my mat I check through the list to remind me what my focus for my practice was and revised ‘What is the rest of my day like?’ for each day. I usually review it at the start of each week and fill in another inquiry if other needs and issues arise. When I have the inquiry filled out I start to build a picture of which pose families will best suit me each day.

YOGARU_CS_Self inquiry.png

Here is the translation of my self inquiry into ‘pose families benefits’ from the benefits list below. I have highlighted:
Ease headaches - headache relief.
Eases stress & tension - overall muscle tension relief, stress relief, clenching jaw in sleep.
Builds strength - glutes, ankle.
Aids relaxation - mood balanced but teetering some days.

For my sequence I picked warm ups, standing poses, backbends, forward bends, twists, seated, gentle inversions and a restorative Savasana. I also picked a peak pose of Natarajasana/Lord of the Dance which is a standing, backbend pose. It will help open my chest, strengthen my glutes and ankles, and stretch my shoulders and hamstrings. It also deeply stretches the hip flexors which are a family of muscles deeply connected to the sympathetic nervous system (fight & flight response) addressing my underlying stress levels.

I go back to my list again to check that I addressed all my needs. My energy levels are not bad but because I have a busy day ahead I am going to practice gently and leave out arm balances which are a more strenuous family of poses. Seated poses are ticking lots of boxes for me at the moment so I will spend more time than usually in my seated poses and be sure to include some seated forward bends and seated twists to tick two families in one pose. I also remind myself of my two injuries that I need to consider throughout my practice.

YOGARU_CS_Benefits.png

PUTTING IT ALL TOGETHER
Below is the sequence which I created with an overlay of the pose family symbols and muscle group symbols. You will find the symbols guide in your 108 Asana deck or you can go to the asana section. This illustration gives you an ‘at a glance’ reason behind why each poses features in the sequence. Its important to note some of the multiple benefits are retrospective bonuses. There are many benefits to each pose. Poses you pick for one issue from your self inquiry will most likely address other issues too. For example I picked the last pose on the first row to prepare my quads and hip flexors for my peak pose, but you will see from the benefits list it will also help relieve stress and tension because it is a backbend.

PAUSE_0128_A.png

ALIGNMENT CUES
The peak pose for my practice at the moment is Natarajasana/Lord of the Dance. This sequence stretches you in all the right places and strengthens you in all the right places to prepare you for Natarajasana/Lord of the Dance. If this is a pose that you struggle to balance in stand by a wall for support. If you can’t quite reach the back leg you can use a belt to extend your reach.

Have a read of the tips below and either print out the sequence or save it onto your device:

  • From Tadasana, hands on hips, inhale, pour your weight into your left foot, bend your right leg back and lift your heel up towards your right buttocks.

  • Reach your right hand back and hold onto the outside of your right foot, lift your right foot up and back, press your foot into your hand and your hand against your foot, hips level and squared forward, right knee in line with right hip.

  • Extend your sternum forward and up, broaden through the collarbones, shoulders level.

  • Reach your left arm up high, press your thumb and forefinger together, gaze to the fingers of your left hand.

To save the images for personal use on your phone click and hold down the image until the ‘save image’ option appears; on Mac hold down ‘control’ and click the image to get the option box; on PC right click on the image to get the option box. Scroll down in the ‘option box’ and click ‘save image’.

Ruth Delahunty Yogaru

Malasana - Squat

YOGARU_Malasana_PB.png

HIP MOBILITY & STABILITY
Recently I’ve been sitting writing articles more than I usually would and my hips are feeling it. This spurred me on to explore Malasana/Squat as my pose of the month. When I first practiced this sequence I found the repeated rounds of Malasana/Squat tough going but as the week progressed my hips started to feel stronger, more flexible and I was able to hold Malasana/Squat for a longer period of time. I have been practising this sequence for the last two weeks now and my hips are singing with glee. Malasana/Squat has so many hidden physical and mentally benefits and I’m definitely feeling them all.

Malasana/Squat was once the way we all sat before we invented the humble chair and is still the sitting method for many cultures. It is very strengthening on the leg, core and pelvic floor muscles. The ability to squat is important to maintain for everyday mobility. We squat down in our day to day life when we pick something up from the ground or tie our shoes. My son is a keen rugby player and squats for five minutes everyday as a way to keep his hips, knees and ankles strong and injury free. You don’t have to be on your mat to take a squat. Malasana/Squat teaches the body to find the natural curves of the spine again and is perfect to add into your movement breaks if you are sitting for long period and working from home.

THE BENEFITS OF MALASANA/SQUAT
Malasana/Squat stretches the inner groin and hips, strengthens the hip flexors, lower back, knees and ankles. It is a very good pose for keeping the knees and ankles flexible and strong at the same time. It encourages strengthening of the pelvic floor, increases circulation to the abdominal organs, aids digestion and eases constipation. As with backbends and twists it stimulates a healthy gut which has a strong link to our moods and emotional well-being. Stress leads to gut issues and similarly gut issues lead to stress. 95% of serotonin (the happy hormone) is produced in the bowel, stimulating the gut and releasing these happy hormones into the system relieves stress, tension and anxiety.

EXPLORING MALASANA/SQUAT IN YOUR PRACTICE
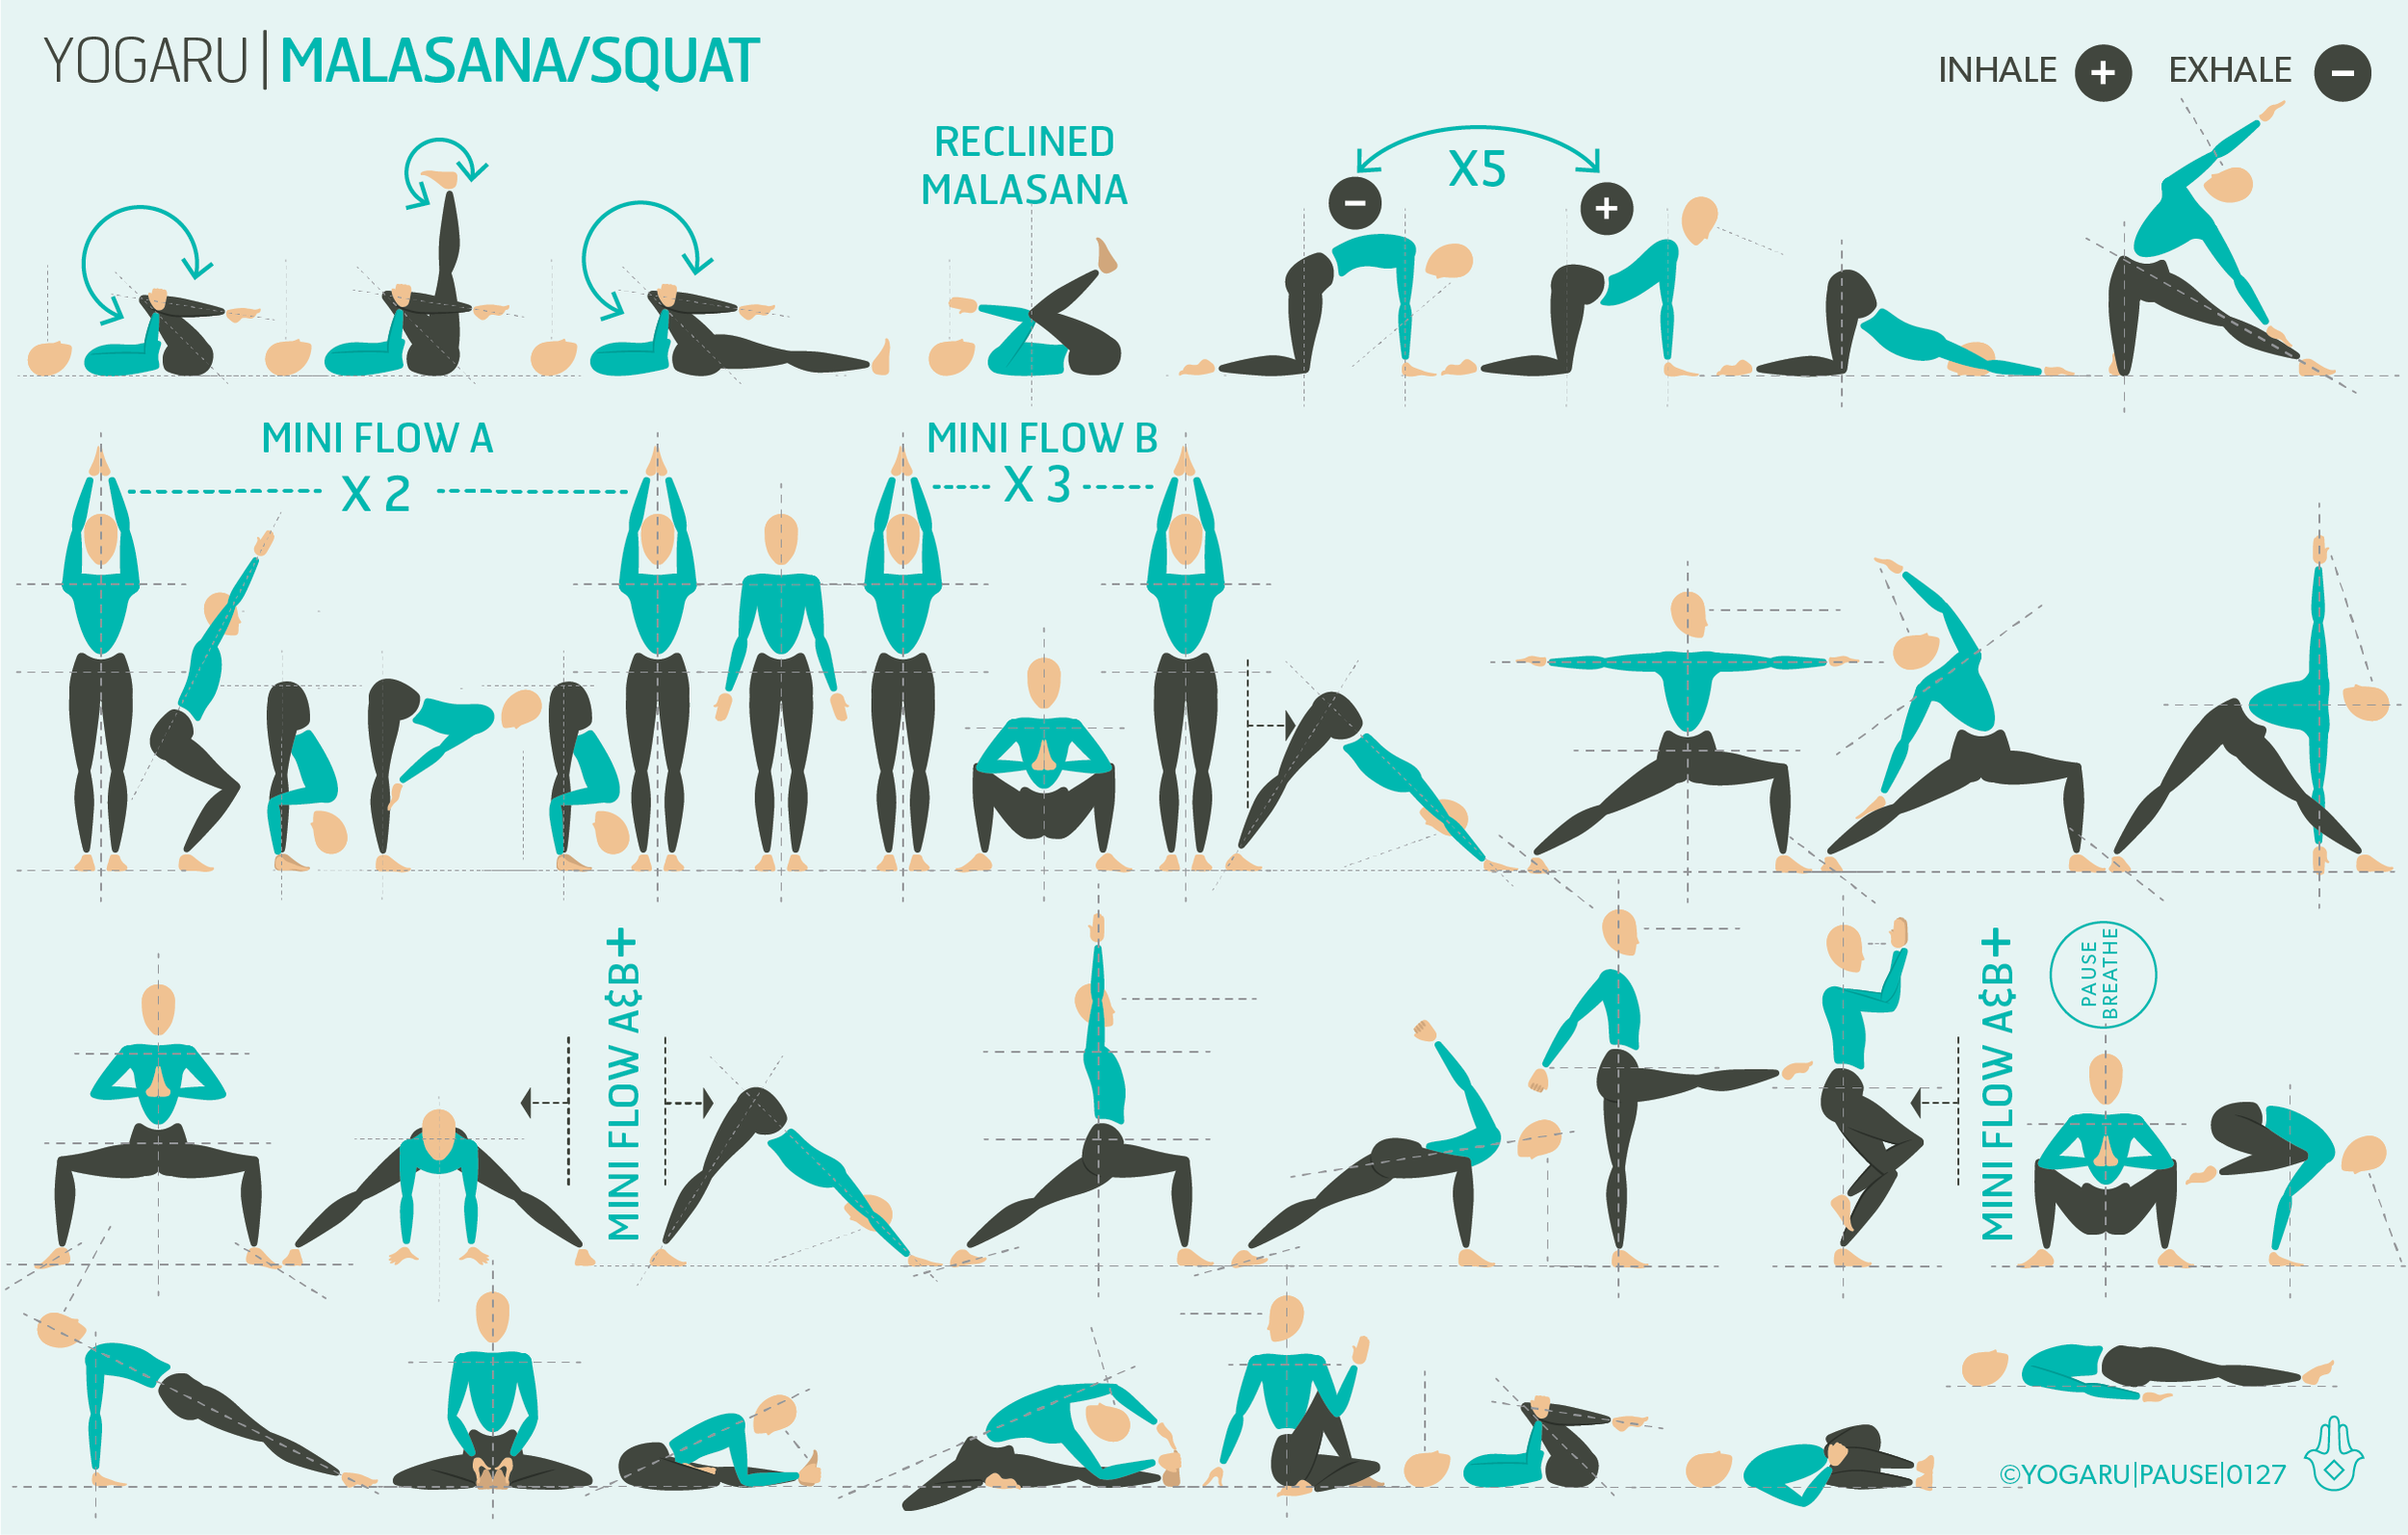
This sequence will gradually prepare your hips for Malasana/Squat. Malasana/Squat mini flow is preceded by a Utkatasana/Chair mini flow. Utkatasana/Chair is a perfect prep pose for Malasana/Squat. It strengthens the glutes and has many of the same muscular actions as Malasana/Squat – hip and knee flexion, spinal extension and grounding down through the three points of the feet. For the first three Malasana/Squat mini flows move in and out of the pose with a steady and lengthened breath. Look for the point in your descent where you want to speed up and try to consciously slow it down. For your final Malasana/Squat before you come to your seated poses, pause for three to five deep breaths and feel the full opening of the pose.

You can also check out my Instagram post on Malasana/Squat to play around with different versions of the pose. If you notice your knees collapse in it is an indication that you might have tight inner groins and weak glutes – squeeze your outer glutes to externally rotate your hips and only go down as far as you can keep your knees in line with your feet. If you notice your lower back rounds forward you might have a weak lower back – place bricks under your hands and press into them to lengthen up through the spine.

PAUSE_0127.png

ALIGNMENT CUES
You will come through three rounds of Malasana/Squat and a final one before you come down to your seated poses. Notice how the first round feels compared to your final round in terms of comfort and depth of the pose. If you practice this pose for a week or two you will start to notice great improvements in your hip mobility.

Have a read of the tips below and either print out the sequence or save it onto your device:

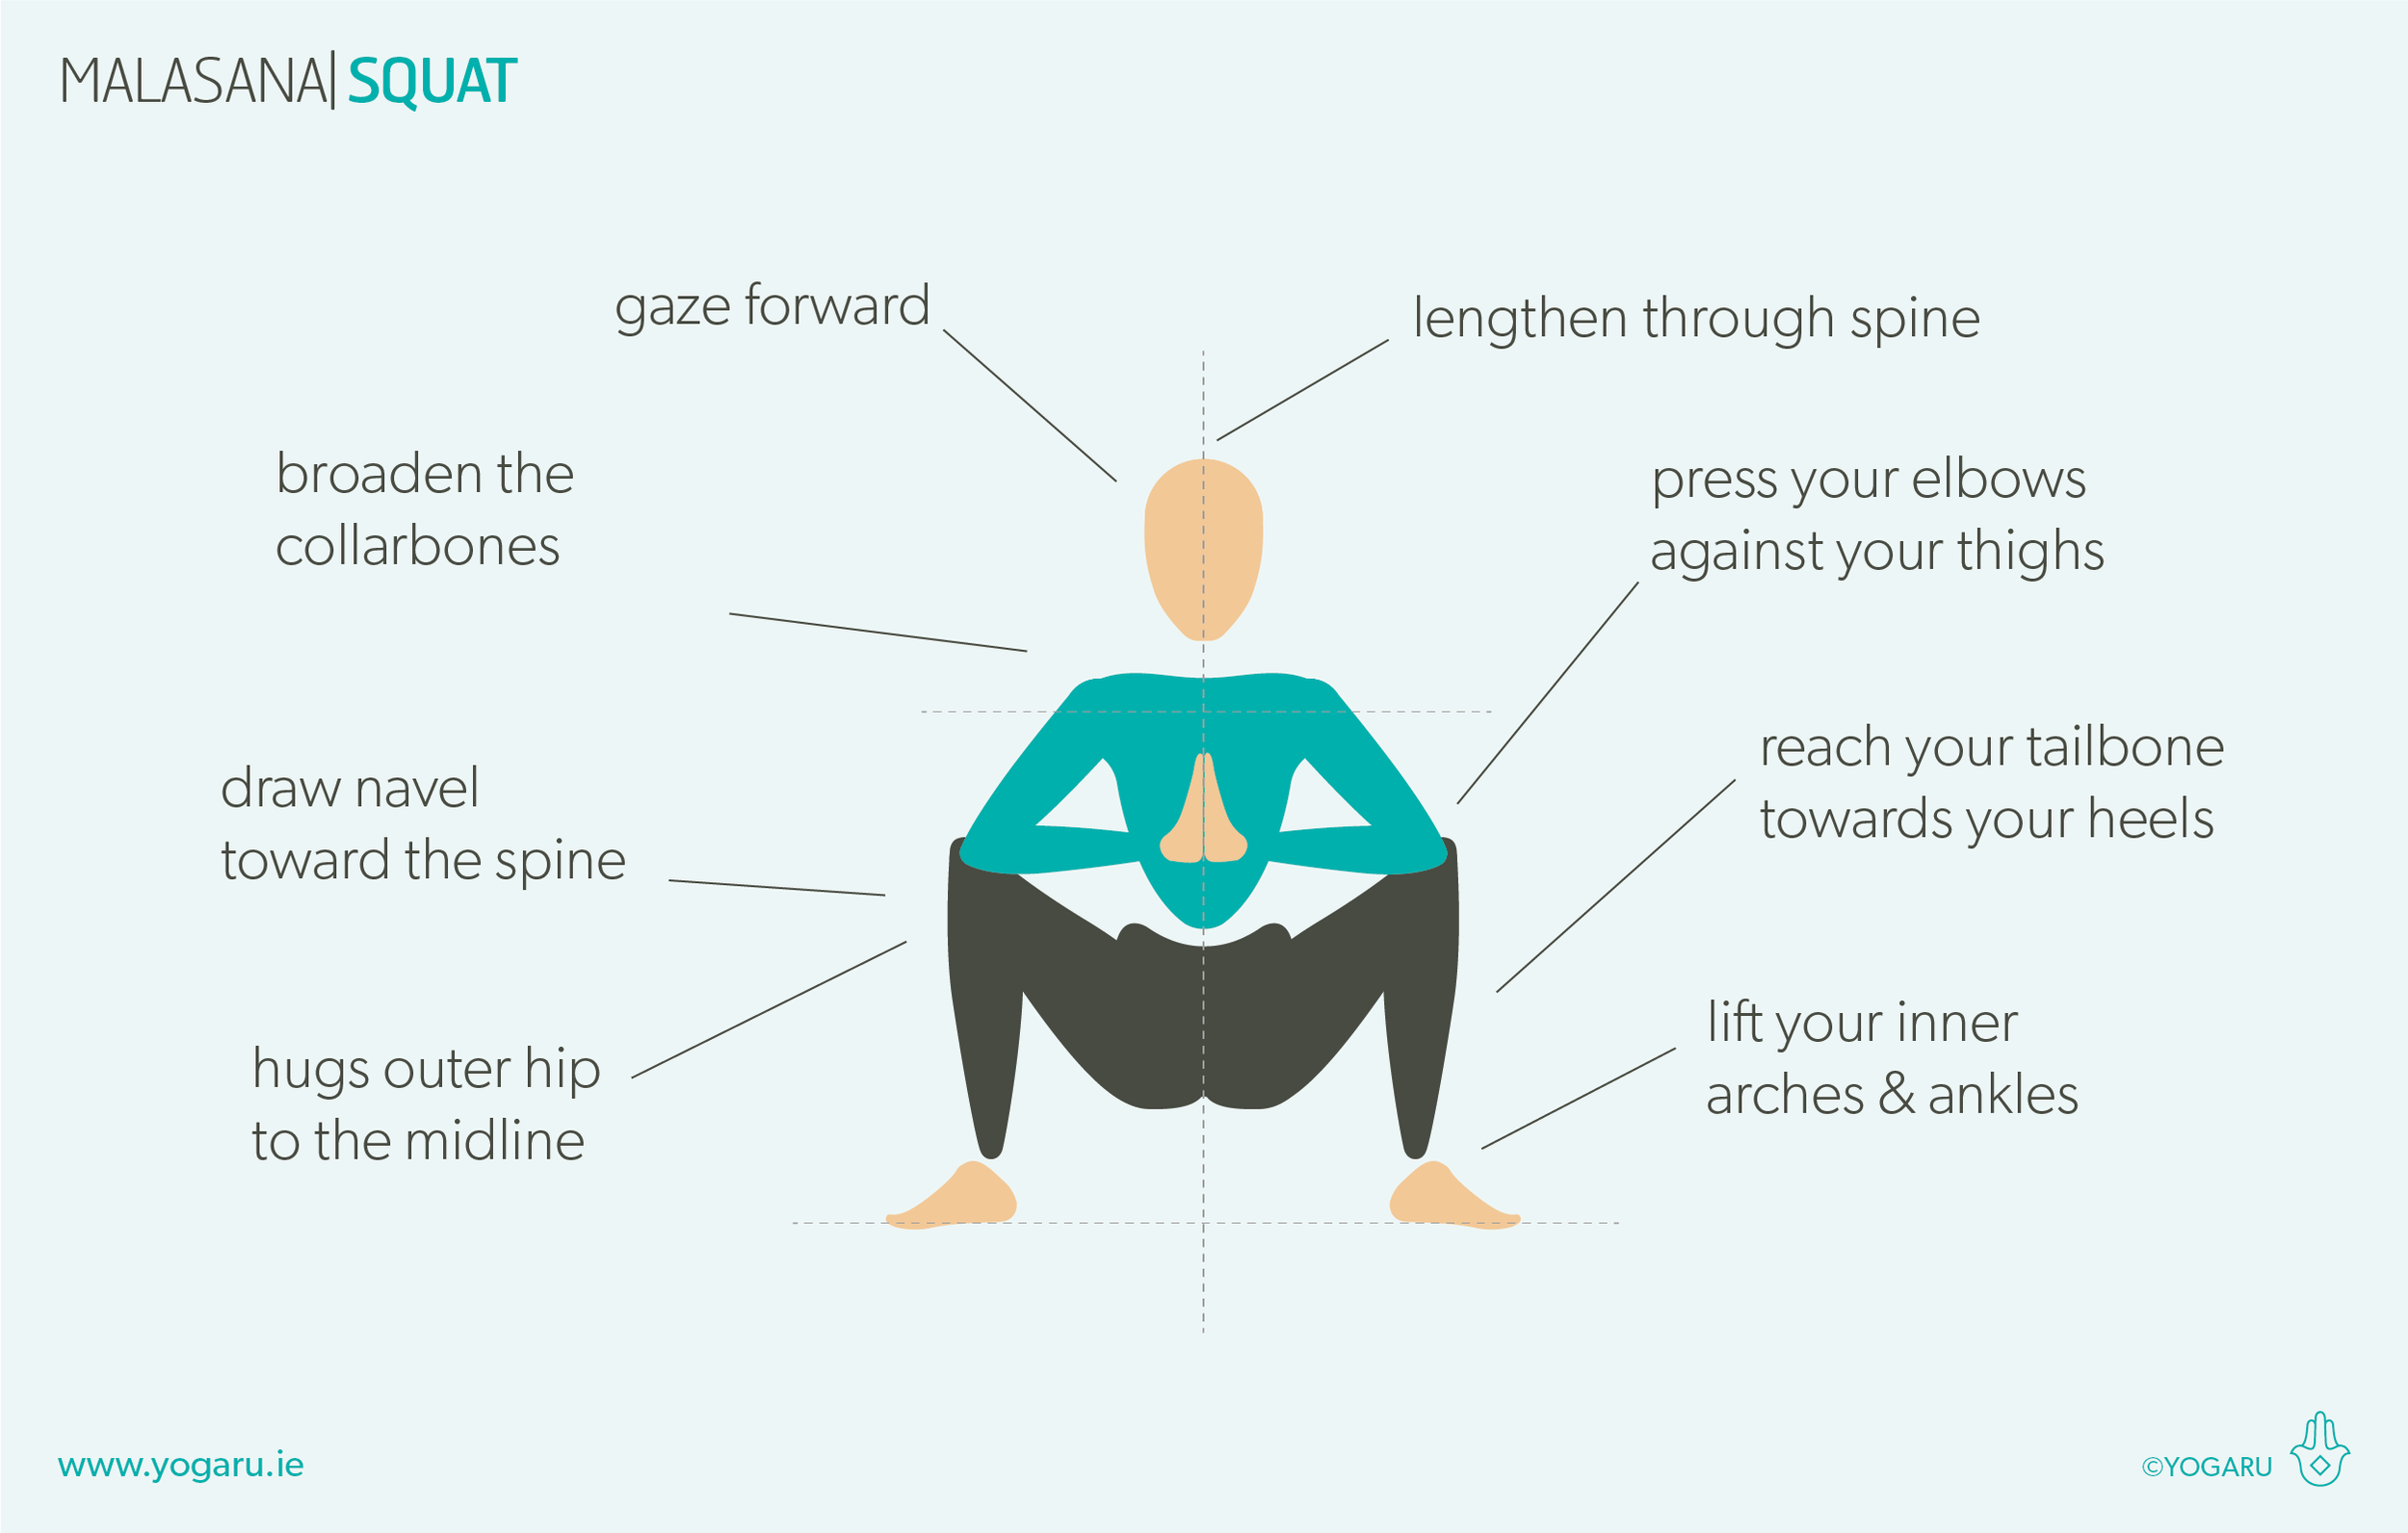
  • From Tadasana/Mountain, inhale, feet wider than hip width, feet slightly turned out, hands in prayer position, exhale, bend your knees and sit down in a deep squat.

  • Press your elbows against your thighs, hug your outer hips to the midline, let your pelvis become heavy down towards the back of your heels. Lift your inner arches and inner ankles.

  • Broaden through the collarbones, draw your navel towards your spine, lift your pelvic floor. Lengthen through your spine to the tip of your crown, gaze forward.

Subscribe to my newsletter & get a FREE YOGA BENEFITS INFOGRAPHIC as a thank you!

To save the images for personal use click and hold down the image until the ‘save image’ option appears; on Mac hold down ‘control’ and click the image to get the option box; on PC right click on the image to get the option box. Scroll down in the ‘option box’ and click ‘save image’.

Ruth Delahunty Yogaru