Restorative with home props

PAUSE_0114.png

This sequence is also available on YouTube

THE BENEFITS OF RESTORATIVE YOGA
Restorative yoga is the king of all yoga in terms of physical and mental wellbeing. It is particularly beneficial if you are feeling tired, stressed, anxious or have recently been ill. One of the main benefits of restorative yoga is that it triggers the rest, restore & digest nervous system response or the parasympathetic nervous system, through the cerebral cortex and the vagus nerve. This creates optimal conditions for the functionality of the organs of the body which supports the immune system, relieves symptoms of stress, anxiety and tension, rebalances hormones, releases muscle tension and aids the healing process.

The process of restorative yoga ‘takes a body that is feeling fragmented and puts it back together again in the kindest way possible’. In restorative we are consciously asking our muscles to release into the pose and gradually they submit. Even in sleep our muscles can be quite active, especially when we are dreaming. Restorative gives the whole body a chance to completely let go of held tension.

PROPS SWAPS
This sequence is for everybody, all you need is a yoga mat and some household prop swaps. Props bring restorative to another level. But you don't have to have a huge array of official yoga props to get started. You can improvise with household items that can do just as good a job. For this sequence I’ve used all household items as prop swaps as listed below:

Bolster - one large thick blanket & two bath size towels. Fold the blanket in four and place the two towels folded in half over the blanket. Roll them up and tie to secure with about four ribbon, strings or elastics.

Book bricks - two thick dictionaries or thick reading books per brick. Stack your two books and tie with string or elastic vertically and horizontally. Make two ‘book bricks’.

Tins prop - two tins & two thick socks. Place a tin in each sock, if the sock is long enough twist the top and fold it back down over the tin to seal it in.

Blankets - most blankets will do as a substitute for yoga blankets. Wool or thick cotton blankets are a better support than soft fleece blankets. Fleece blankets are good for keeping you warm and for a softer support.

EXPLORING THE SEQUENCE
Restorative is an accumulative practice. You might find it takes you a few poses to settle into the practice. The more restorative you practice the easier it will become to start the resting process. This sequence can be repeated as often as you like. You can practice it yourself or you can also practice this sequence with me on YouTube.

The body will cool down quickly so layer up and stay warm. Unlike regular yoga this is a socks on, stay cosy, practice! The poses and props are created to give you complete support. If possible have extra blankets and cushions beside you to add in if you need them. You will be holding the poses for between 3 minutes so scan down from head to toe and ensure every part of your body is happy. If after a few minutes you start to feel discomfort move to find comfort again. You are the boss of your practice!

If you are practicing this yourself you can use your phone to time when you need to move to the next pose, or you can use your instinct if you don’t like the idea of being disturbed with a sound. If you are using the YouTube video I will guide you in and out of the poses and do the timekeeping for you.

ALIGNMENT CUES
Below are the restorative techniques used in this sequence. The props you’ll need are:
1 x bolster - or 2 towels, wrapped around a horizontally rolled pillow and tied to secure.
2 x yoga bricks - or 2 two thick similar sized dictionaries.
2 x yoga blankets - or any wool, thick cotton or fleece blanket with density.

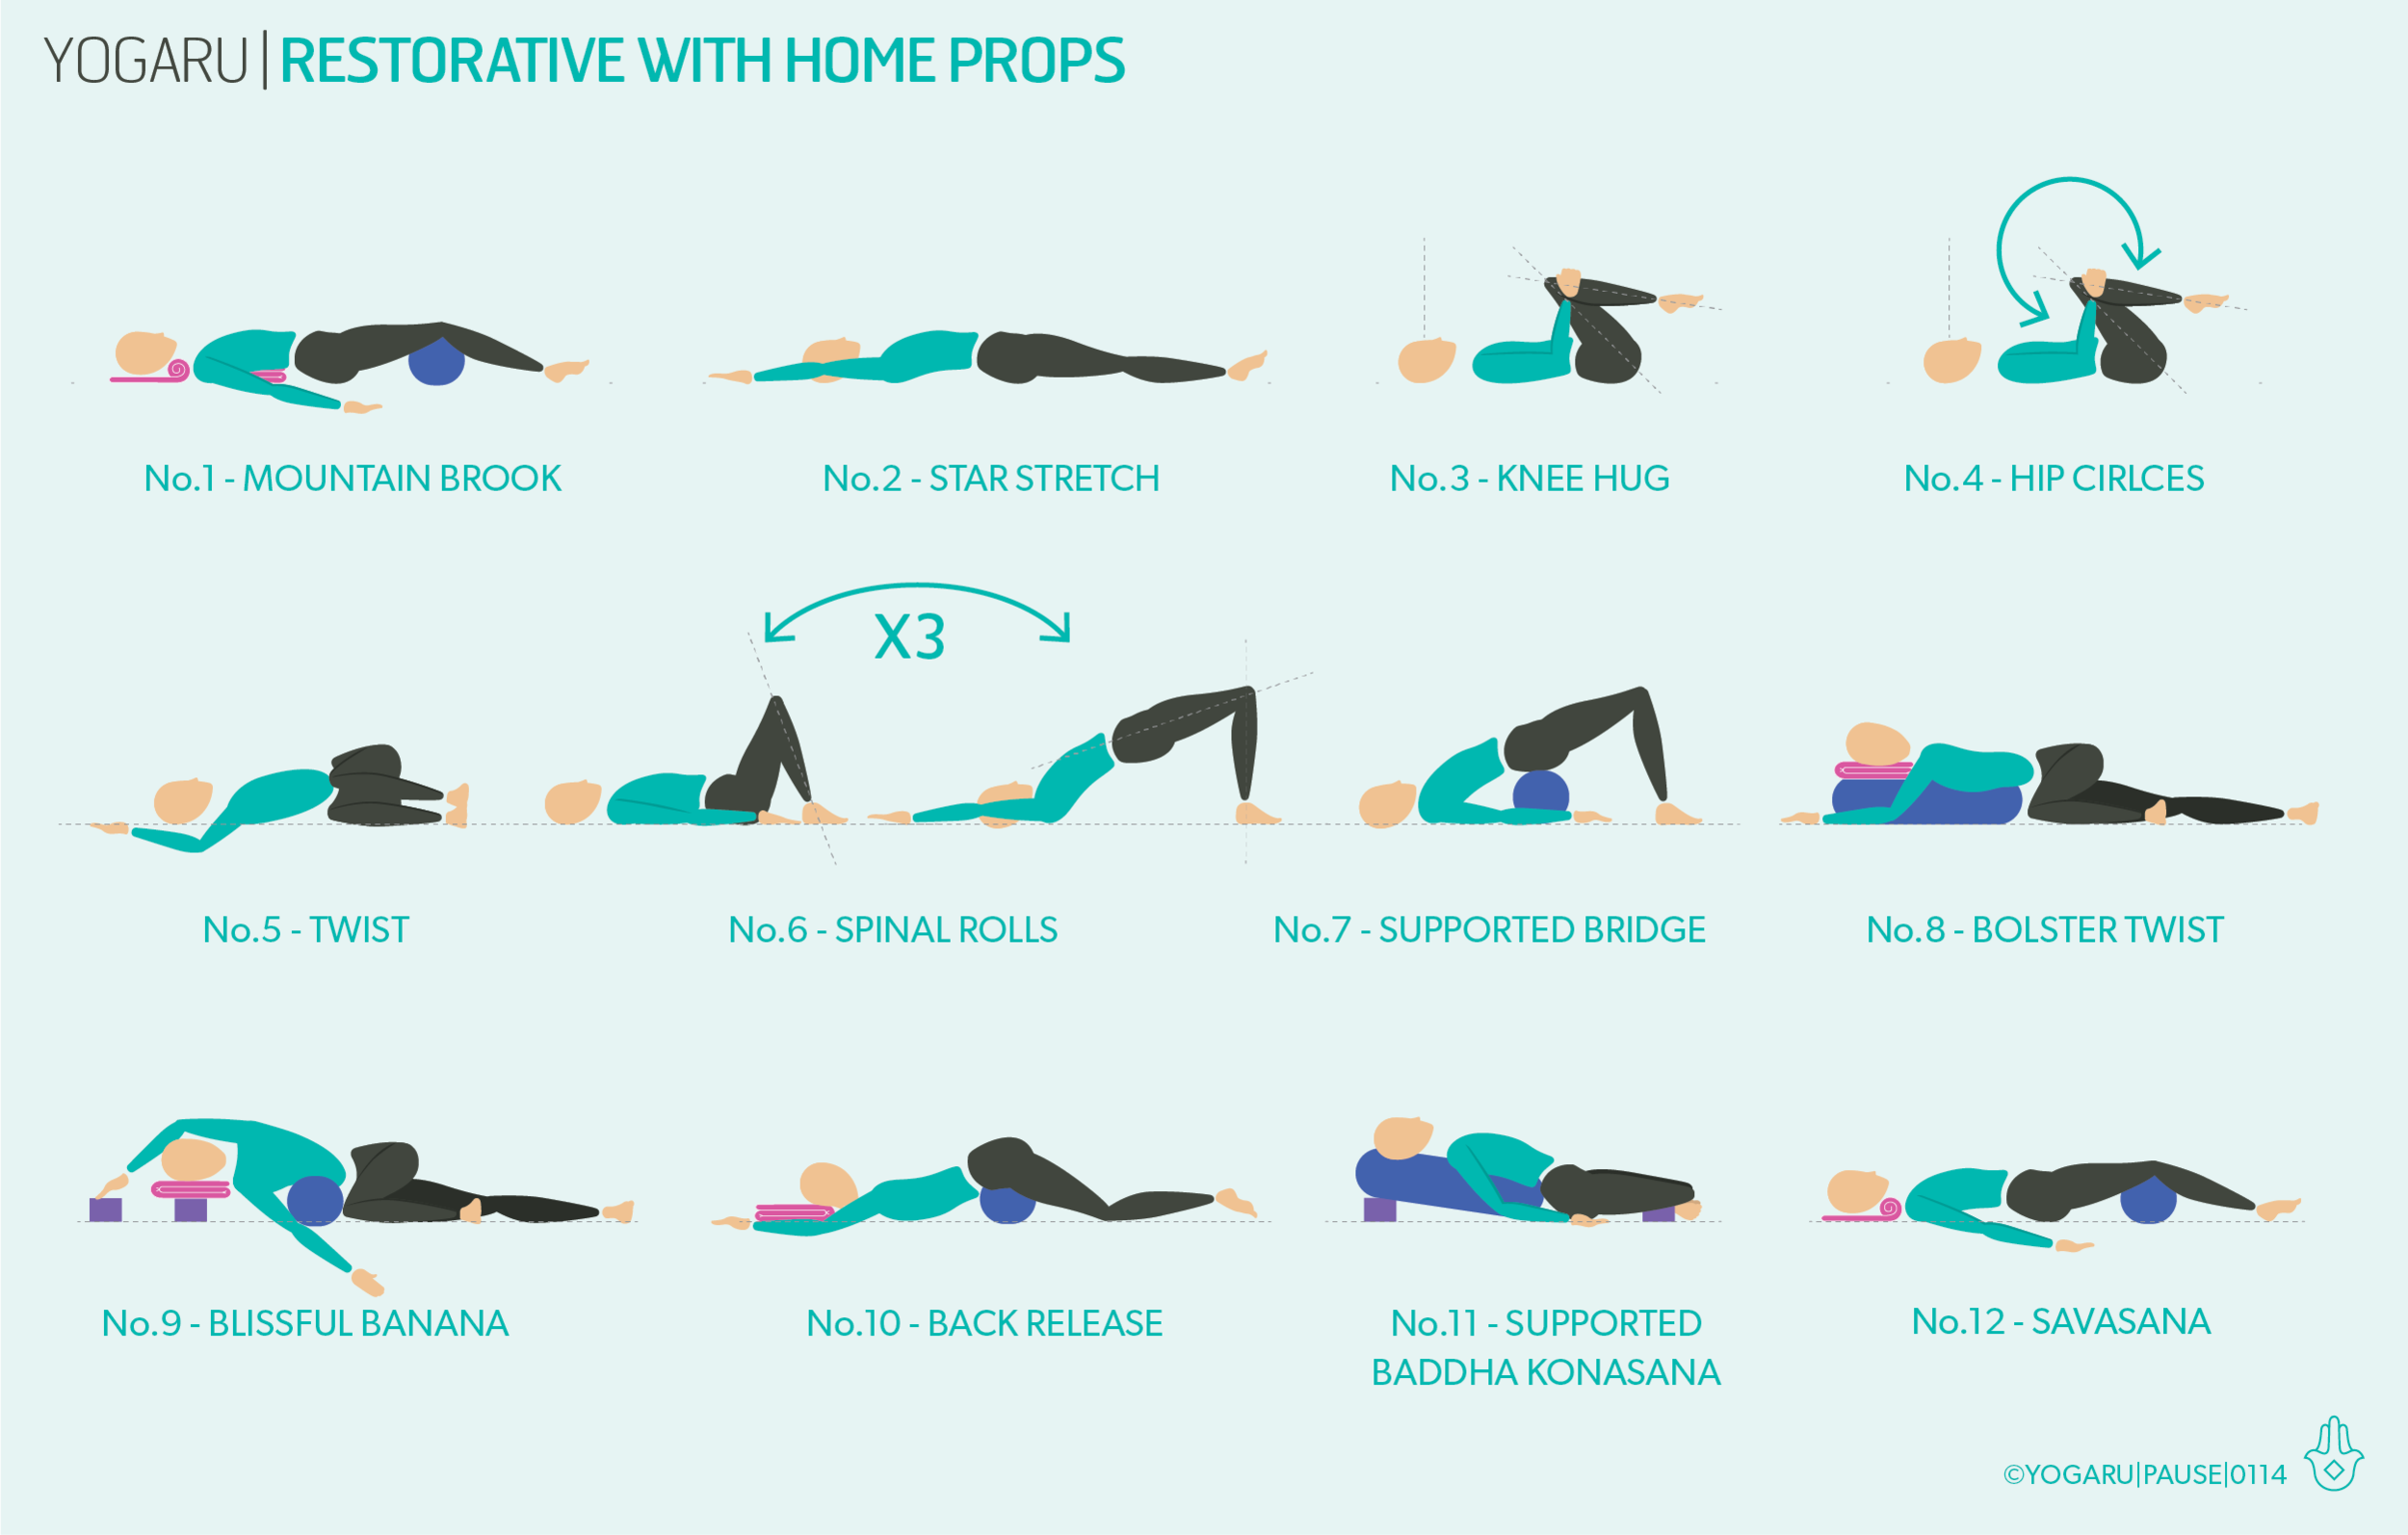
No.1 - Mountain brook
Start lying on your back with a half rolled blanket under your head, nestling the rolled part in the curve of your neck. Place a rolled up blanket under the lower tips of your shoulder blades and a bolster under the creases of your knees. If you have an additional blanket place it on top of you for warmth and for comfort. Legs and arms extended, palms facing up. Feet gently flop out to the sides. Shoulders melt to the floor. Eyeballs become heavy in their sockets, skin on the forehead smooth as silk. Soften the temples and find ease in the tiny lines around the eyes.

No.2-6 - Gentle warm ups
After Mountain Brook, take a series of stretches for the spine. Stretch your arms and legs out in a star shape then hug your knees into your chest. From your knee hug, cup a hand on each knee, take the knees wide with the toes touching. Circle both knees and gently roll around on your lower back, take three to 3-5 circles in both directions. Place your feet back down and gently let your knees drop to the left side of your mat. Extend your right knee away from you. Bring your arms to cactus position, with arms lifted and elbows bent either side of the body. Come back to center and repeat by dropping the knees to the right. Come back to lying with knees bent and arms by the side, take an exhale here, then inhale and lift your hips up and your arms overhead, exhale bring the hips back down and the arms back beside you. Repeat for 3-5 rounds moving with the breath.

No.7 - Supported bridge
From lying, lift your hips up and place the bolster horizontally under your hips. If your homemade bolster is too low add your two book bricks under the bolster. Settle your hips down onto the support of the bolster. Knees bent, feet hip distance apart or feet mat distance and knees together. Arms in cactus position or extended either side of your body, palms facing up.

No.8 - Bolster twist
Place your bolster vertically along the top centre of your mat with a folded blanket at the top. Sit with your right hip up against the end of the bolster. Place your hands on the mat either side of the bolster and with an inhale lengthen through the whole spine and on your exhale gently place your front spine along the length of the bolster. Place your right cheek on the folded blanket and let your arms gently hang either side of the bolster. Repeat on the left side.

No.9 - Blissful banana
Make a pillow with a book brick and a blanket on top of it at the top of the mat, place a tin prop above this at arms reach. Place your bolster horizontally on your mat with a space between your bolster and pillow. Sit with your right hip next to the long edge of the bolster, knees bent. Lengthen your right side along the mat and nestle the bolster into the curve of your waist. Place your head on your pillow, your shoulder in the space between your bolster and pillow and extend your right arm forward. Extend your left arm overhead and place hold onto the tin prop. If the raised arm doesn't suit you, bring your arm down and place it at your right arm. Repeat on the left side.

No.10 - Back release
Place the bolster horizontally along the centre of your mat with a rolled up blanket at the top of your mat. Come onto your front and lie with your belly on the bolster. Bring the arms to cactus position and place your forehead on the rolled up blanket. If this is uncomfortable on your neck you can flatten the blanket and lie on your cheek remembering to swap sides after a few minutes to even out your neck stretch.

No.11 - Supported Buddha konasana
Place your bolster vertically along the top of your mat with a rolled up blanket under the top. Make a head pillow with your second blanket to the top of your bolster. Have ready your book bricks and tin either side of you. Sit with the back of your hips up against the bolster. Bring the soles of your feet together and let your knees drop out to the sides. Prop your knees up with one book brick and tin each side. Gently lie back onto your bolster and place your head on the pillow at the top.

No.12 - Savasana
End your practice with at least 10 minutes of Resting Savasana. Lie on your back, legs stretched out, arms slightly away from your body, palms facing up. Legs slightly apart and feet fall out to the side, soften your shoulder, back of the neck long. Gently close your eyes, let the body become heavy and melt into the support of the ground. Soften the muscles across your forehead, releasing all tension, gaze inwards. Let all the muscles and bones of your body release. Bring your attention to the breath again, as you inhale think ‘this is me now’, and on your exhale tell yourself ‘this is the same me in the outside world’.

To save the images for personal use click and hold down the image until the ‘save image’ option appears; on Mac hold down ‘control’ and click the image to get the option box; on PC right click on the image to get the option box. Scroll down in the ‘option box’ and click ‘save image’.

Ruth Delahunty Yogaru

Just breathe

PAUSE_0113.png

A GOOD BREATH
When you’re feeling overwhelmed by it all, just breathe; when you’re worried about the safety of loved ones, just breathe; and when all the uncertainty about the future is making you anxious, just breathe.

We all need a quick route to the rest and restore nervous system response. The breath is the most accessible and available method to do this. Pausing and breathing works for everyone from a child having a tantrum to an adult having a bad day. It’s a subconscious reaction that we can’t quite ‘switch on’ immediately, but if you trust in the process and give it favourable conditions to work you will get there.

The breath is where the magic is found in yoga. Conscious breathing deeply affects our physical and mental state. It stimulates the vagus nerve through the cerebral cortex which brings the body into the rest, digest & restore nervous system response, or the parasympathetic nervous system, relieving symptoms of chronic stress, fatigue and tension. This creates optimal conditions for the functionality of the organs of the body which strengthens the immune system, increases lung capacity, increases circulation, aids digestion and increases overall well-being. The breath is very detoxifying for the body and is responsible for 70% of the cleansing process. It eliminates toxins by releasing carbon dioxide through the exhale. The physical meets the mental benefits when the oscillation of the breath massages the gut (also known as the second brain) and sends happy signals to the brain.

STAY CALM & BREATH
The breath moves through us like a wave. On an inhale the belly and ribs expand as the diaphragm contracts down, and on an exhale the belly and ribs contract as the diaphragm expands up. Becoming aware of how you are breathing is the first step to making changes. Are you breathing shallow breaths or even holding your breath, are your shoulders and neck tight or are you holding tension in your back? Take a moment to examine a long, deep breath. Notice the quiet moment between the in-breath and the out-breath. Like a change in the waves, there is a moment of pause where everything is still and delicately suspended. In this moment the body is peaceful and the breath rests. Find these pauses between breaths and between poses as you practice this sequence.

COME BACK TO THE BREATH
When breath awareness or consciously breathing is regularly practiced as part of your yoga routine, or in your meditation practice, it will rewire your brain to naturally default to a calmer response to arising situations rather than the ‘fight or flight’ response.

To the onlooker, a yogi flowing through their sequence may seem very relaxed and calm, but there is much unfolding on the mat – the complexity of alignment in each asana, the controlled and safe transitions, maintaining a meditative state of mind, and most importantly, remembering to breathe! It’s no surprise that you might find yourself holding your breath while you are concentrating on your flow or during a challenging asana. Simply remembering to come back to the breath during your practice, and checking in with how you are breathing, will help to build your practice and access all the benefits of a good breath.

EXPLORING YOUR BREATH IN YOUR PRACTICE
Before you try the sequence above, come to a comfortable seated position either cross legged or kneeling with a brick under your hips, and explore Box Breathing from the guide below. At the end of your practice lie on your back, place your hands on your belly and when you are ready explore a few rounds of Viloma Breath using the guide below to get you ready to come into Savasana.

When you are going through the asana let your breath initiate each transition. Keep returning to the breath during your practice. As you pause in each asana, use the breath to melt aways any tension you might encounter. Try to differentiate between the muscles that need to be switched on to hold the pose and the muscles that are not the main players of the pose and can be relaxed.

VILOMA BREATH
Lying on your back with legs out straight or knees bent and your feet on the ground with your hands on your belly. Viloma breath breaks the exhale into three steps and helps to naturally lengthen the exhale without tension. The exhale is particularly beneficial for stress relief. Take a full inhale and exhale, then take a deep inhale, pause at the top and exhale, pause, exhale, pause and exhale the full breath. You can start with an inhale to the count of four and exhale to the count or six if that is comfortable for you.

BOX BREATHING
Box breathing is a technique that can be used in any situation to reset your breath and counteract the fight or flight response, stress, anxiety and insomnia. Come to a comfortable seated position. That might be cross legged in Sukasana or Sidhasana, or if you find it hard to maintain an upright spine cross legged try Virasana with a brick under your hips. Hands on thighs, palm up or palms down. Take a moment to find the natural curves of your spine and the extension through the tip of your crown. Start by closing your eyes and visualising a box. You will use this box to gently guide a full breath using the count of four for each inhale, pause and exhale, pause. Starting at the left corner of your box, inhale for the count of four and travel across the top of the box, pause for the count of four and travel down the right side of the box, inhale across the bottom of the box, pause and travel up the left side of the box back to the start. Continue to draw the box with your breath for ten to twenty rounds or set a timer for 5 to 10 minutes.

ALIGNMENT CUES
There is no peak pose in this sequence. The two principles you will be exploring are opening the chest to unlock the lungs and moving with the breath. Below are some tips and suggestions to help you navigate the sequence.

  • Some poses have a ‘+’ or a ‘-’ symbols indicate an inhale and exhale. These will give you a guide for how to move with the breath with these poses.

  • Try placing bricks under your hands for the rounds of Cat & Cow to help open the chest more.

  • Explore Salabhasana/Locust pose alternatives with these two variations. In Salabhasana/Locust reach your arms forward on the inhale and bring the arms into cactus position on the exhale, repeat for 3-5 rounds. Or reach your arms and legs wide on the inhale and press and palms together overhead and press the legs together on the exhale, repeat for 3-5 rounds.

  • For the main flow experiment with holding bricks as you flow through the mini sequence. Press the bricks together overhead and at your chest for the three middle Utkata Konasana/Goddess poses.

  • In Matsyasana/Fish the brick is placed lengthways at the tips of your shoulder blades. If this is too strong a backbend use a rolled up towel in the same position.

To save the images for personal use click and hold down the image until the ‘save image’ option appears; on Mac hold down ‘control’ and click the image to get the option box; on PC right click on the image to get the option box. Scroll down in the ‘option box’ and click ‘save image’.

Ruth Delahunty Yogaru

The Irish Balance Flow

PAUSE_0112.png

When you embark on a yoga home practice it naturally evolves from guided online classes to learning how to go with the flow and moving instinctively in a way that feels nourishing to you each time you step on your mat. Guest writer Ciara Kelly is an Irish Medical Doctor working in the field of public health and creator of The Irish Balance where she shows us ways to live a happy, healthy, balanced life. Here she shares with us how her practice evolved over the last few years and has become an essential component of life balance for her.

CIARA’S YOGA JOURNEY
I am so excited to be bringing you guys my very own yoga flow – created by me and beautifully brought to life by my good friend Ruth Delahunty. Over the last 6 months, I have been slowly learning to trust myself on my yoga mat – flying solo if you will, without YouTube, which is how I started out! I have been using Ruth’s Asana cards and her website for quite a while now to flow at home. I asked her to help me bring to life a yoga flow I’ve been doing at home for the past few weeks. It’s a short little sequence that I’ve personally found really nourishing and comforting, whether that’s in the morning, before bed, or in the middle of a day off. I wanted to share it with you guys and hopefully inspire you to give yoga a try.

NAVIGATING THE SEQUENCE
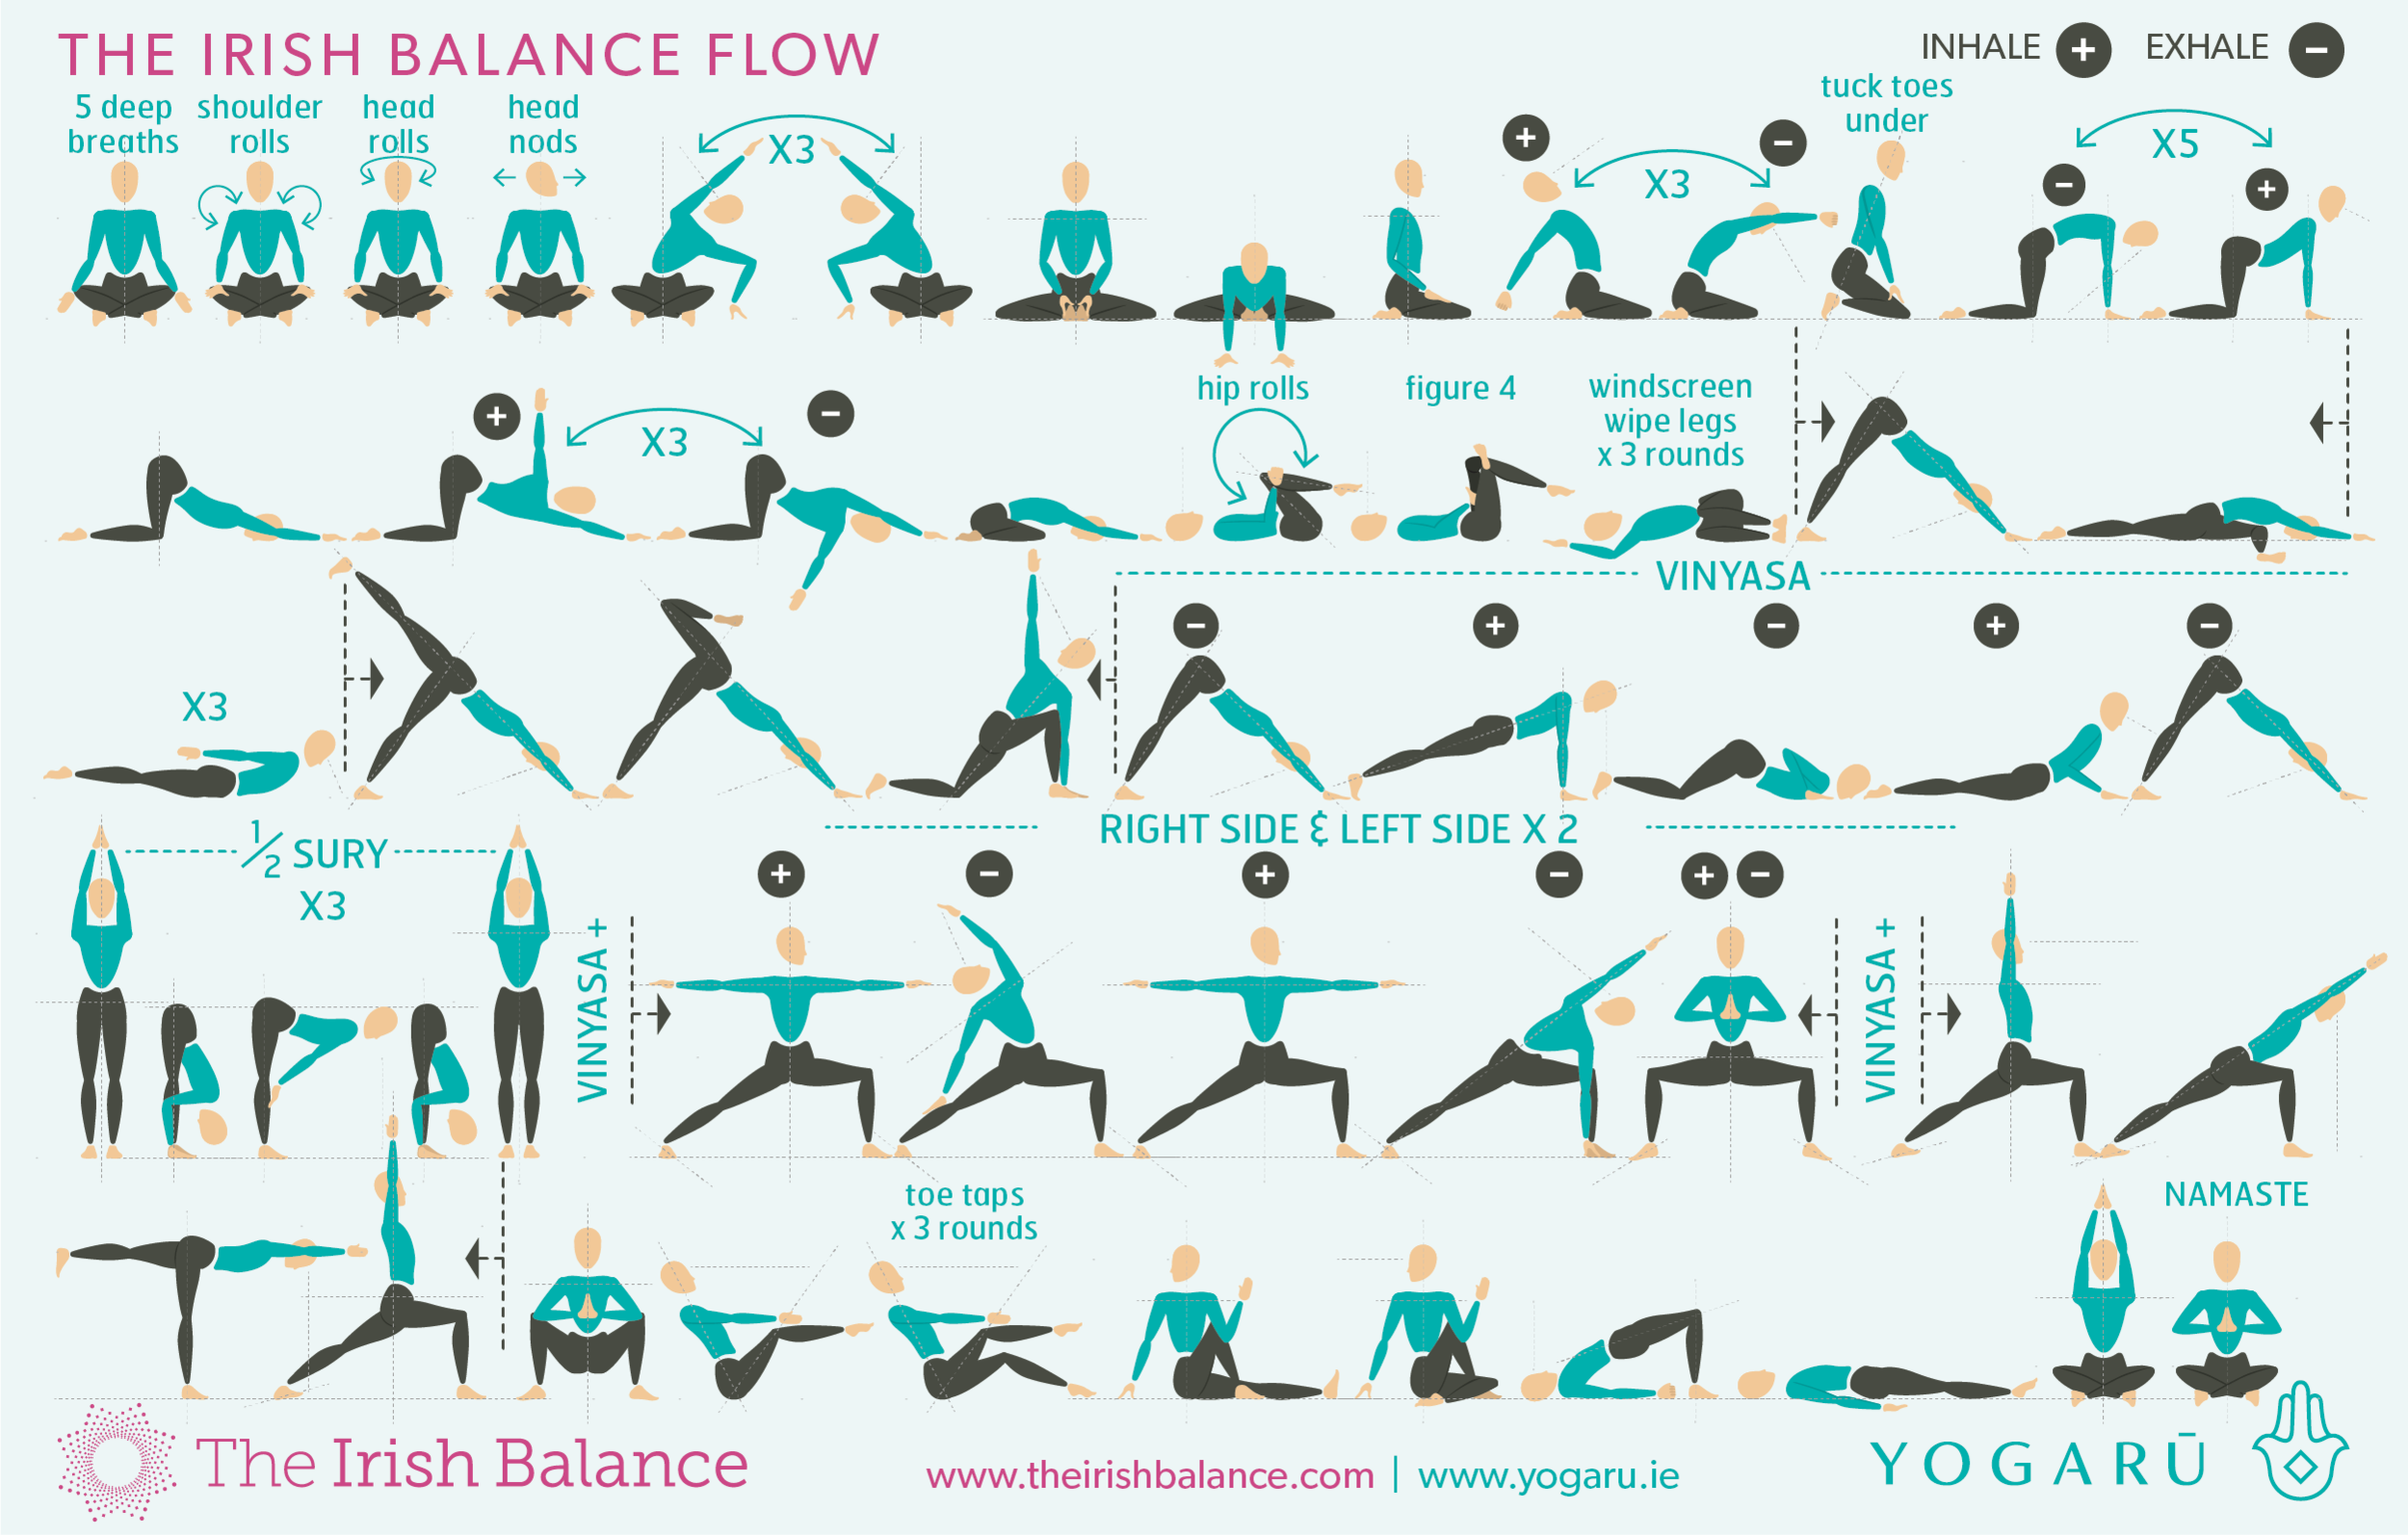
This sequence is built to soothe and move you through this difficult period. Start by spending some time simply following your breath and notice the calming effect this has on your body and mind. Move slowly through the sequence and bring your full attention to what you are doing on your mat. The slower you allow yourself to move the more calming it will feel. Be led by how you feel energetically and emotionally when you step on your mat. If you are feeling tired and overwhelmed, concentrate on just the warm up poses and consider skipping the Vinyasas or one of the standing sequences. Spend plenty of time in childs pose between mini flows. If you are feeling a bit of cabin fever add more Vinyasas into the sequence and repeat one or two of the standing mini flows. Press strongly into your foundation and feel the strength of your whole body as you reach through the tip of your crown. Done with intention even Tadasana/Mountain Pose is an incredibly strong pose.

The arrowed lines in the sequence indicate a mini flow. Start with your right side first then repeat the poses between the arrows on the left side e.g right foot forward, then left foot forward. The ‘+’ and ‘-’ symbols will help you move with your breath, take long deep breaths to expand and nourish your lungs. For the linked poses with a ‘x3’ or ‘x5’, do 3 or 5 rounds of these two poses linking them with the breath. On row three there are five poses linked together with a dotted line, this is called a ‘Vinyasa’. These five poses are repeated before the two standing sequences on row four. You will find most of the poses at Yogaru for alignment cues of the poses you are unsure of.

To save the images for personal use click and hold down the image until the ‘save image’ option appears; on Mac hold down ‘control’ and click the image to get the option box; on PC right click on the image to get the option box. Scroll down in the ‘option box’ and click ‘save image’.


Ciara_Kelly_Portrait.jpg

CIARA KELLY
Ciara is an Irish qualified medical doctor and creator of The Irish Balance. She is passionate about preventive medicine. Particularly how our lifestyles affect our health – the food we eat, physical activity, stress management and sleep. She show us how we can empower ourselves to live happy, healthy lifestyles full of balance.

You can find Ciara at The Irish Balance, her down to earth podcast that debunks many health myths and her popular Instagram for staying up to date in the health and wellness space.