Virabhadrasana III - Warrior III

YOGARU_Virabhadrasana III_PB.png

MAKING PEACE WITH WARRIOR III
After years of getting frustrated by how difficult I found Virabhadrasana III/Warrior III I have finally made peace with it. That’s not to say I have found perfection in the pose, but by breaking down its components I understand better why it is a tricky pose. The main challenge of Virabhadrasana III/Warrior III is that essentially it is a balancing pose where the standing leg is carrying the full weight of the body, and your centre of gravity is challenged by the back leg extending back and the upper body extending forward like a seesaw. You are also reaching back through the heel of that back leg with nothing to press against, which makes it much harder to find strength in the lifted leg. Your back is lifting the weight of the whole upper body, and the standing leg is stretching the back of the hip and the hamstrings. This means the upper body is using the muscles of a backbends, while the lower body is using the muscles of a forward bend. With all this going on the core strength is being recruited in its full circumference – front, sides and back – to stabilise you. All these opposing actions happening at the same time, it's no wonder we find Virabhadrasana III/Warrior III challenging!

THE BENEFITS OF VIRABHADRASANA III/WARRIOR III
Virabhadrasana III/Warrior III is very strengthening for the ankles, legs, shoulders and spine. It gives an opportunity to use the deep muscles of the care to find you balance and work against gravity to keep you reaching in both directions.

EXPLORING VIRABHADRASANA III/WARRIOR III IN YOUR PRACTICE
When you are coming into the pose keep the back foot on the ground for an extra breath before you lift up till you find the power of the muscle. If you are finding it hard to establish your balance bend the standing leg and press your foot into the ground. Lowering your centre of gravity makes it easier to find your balance. If you are finding it very hard to press through the lifted leg bend your knee and look for the strength of your muscles. Work on keeping your hips level and keep the raised leg lower than parallel to the ground if the hip of the back leg lifts up. Play around with flexing and pointing the foot of the raised leg. You’ll notice with the toes flexed you rely more on the quads to lift the leg and when pointed the hamstrings come into play.

PAUSE_0057.png

ALIGNMENT CUES
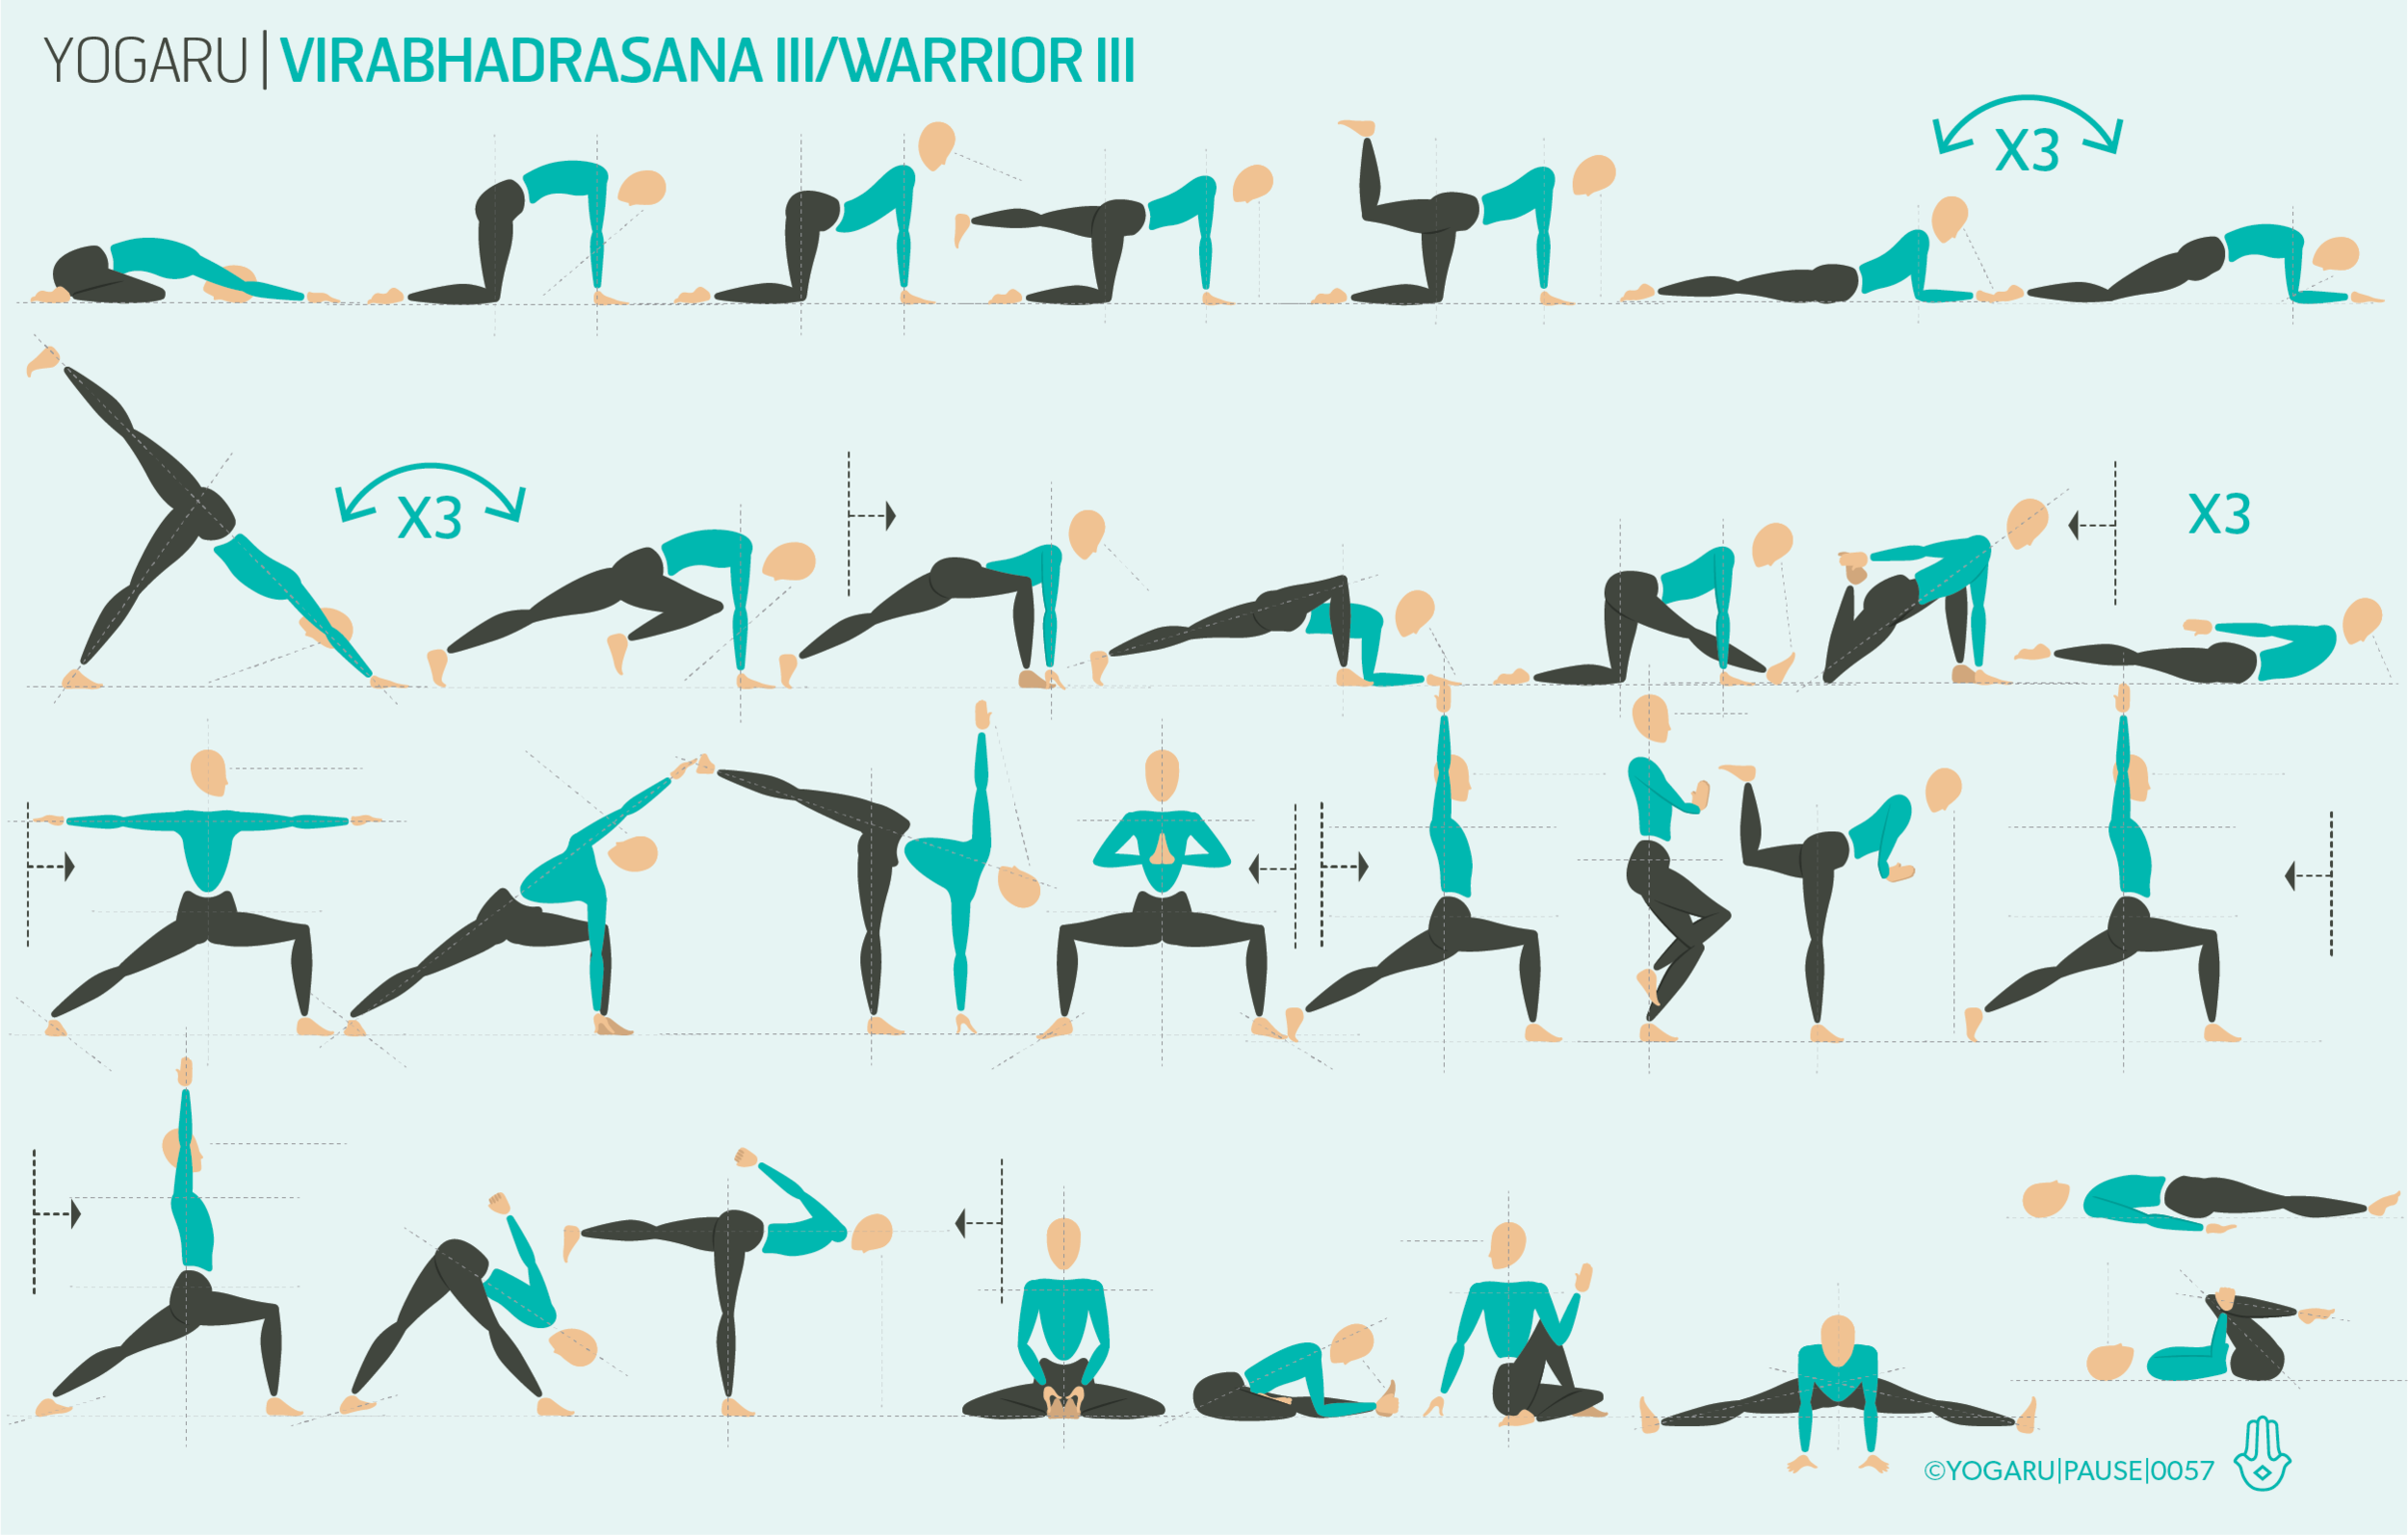
The above sequence strengthens your hamstrings, quads, glutes and core first and then gently stretches them in preparation for you peak pose.

Print out the below tips, along with the sequence, and take some extra time in your Warrior III:

  • From Ashta Chandrasana/Eight Crescent Moon or Virabhadrasana I/Warrior I, place your hands on your hips, inhale, lean forward and step your left leg forward a little.

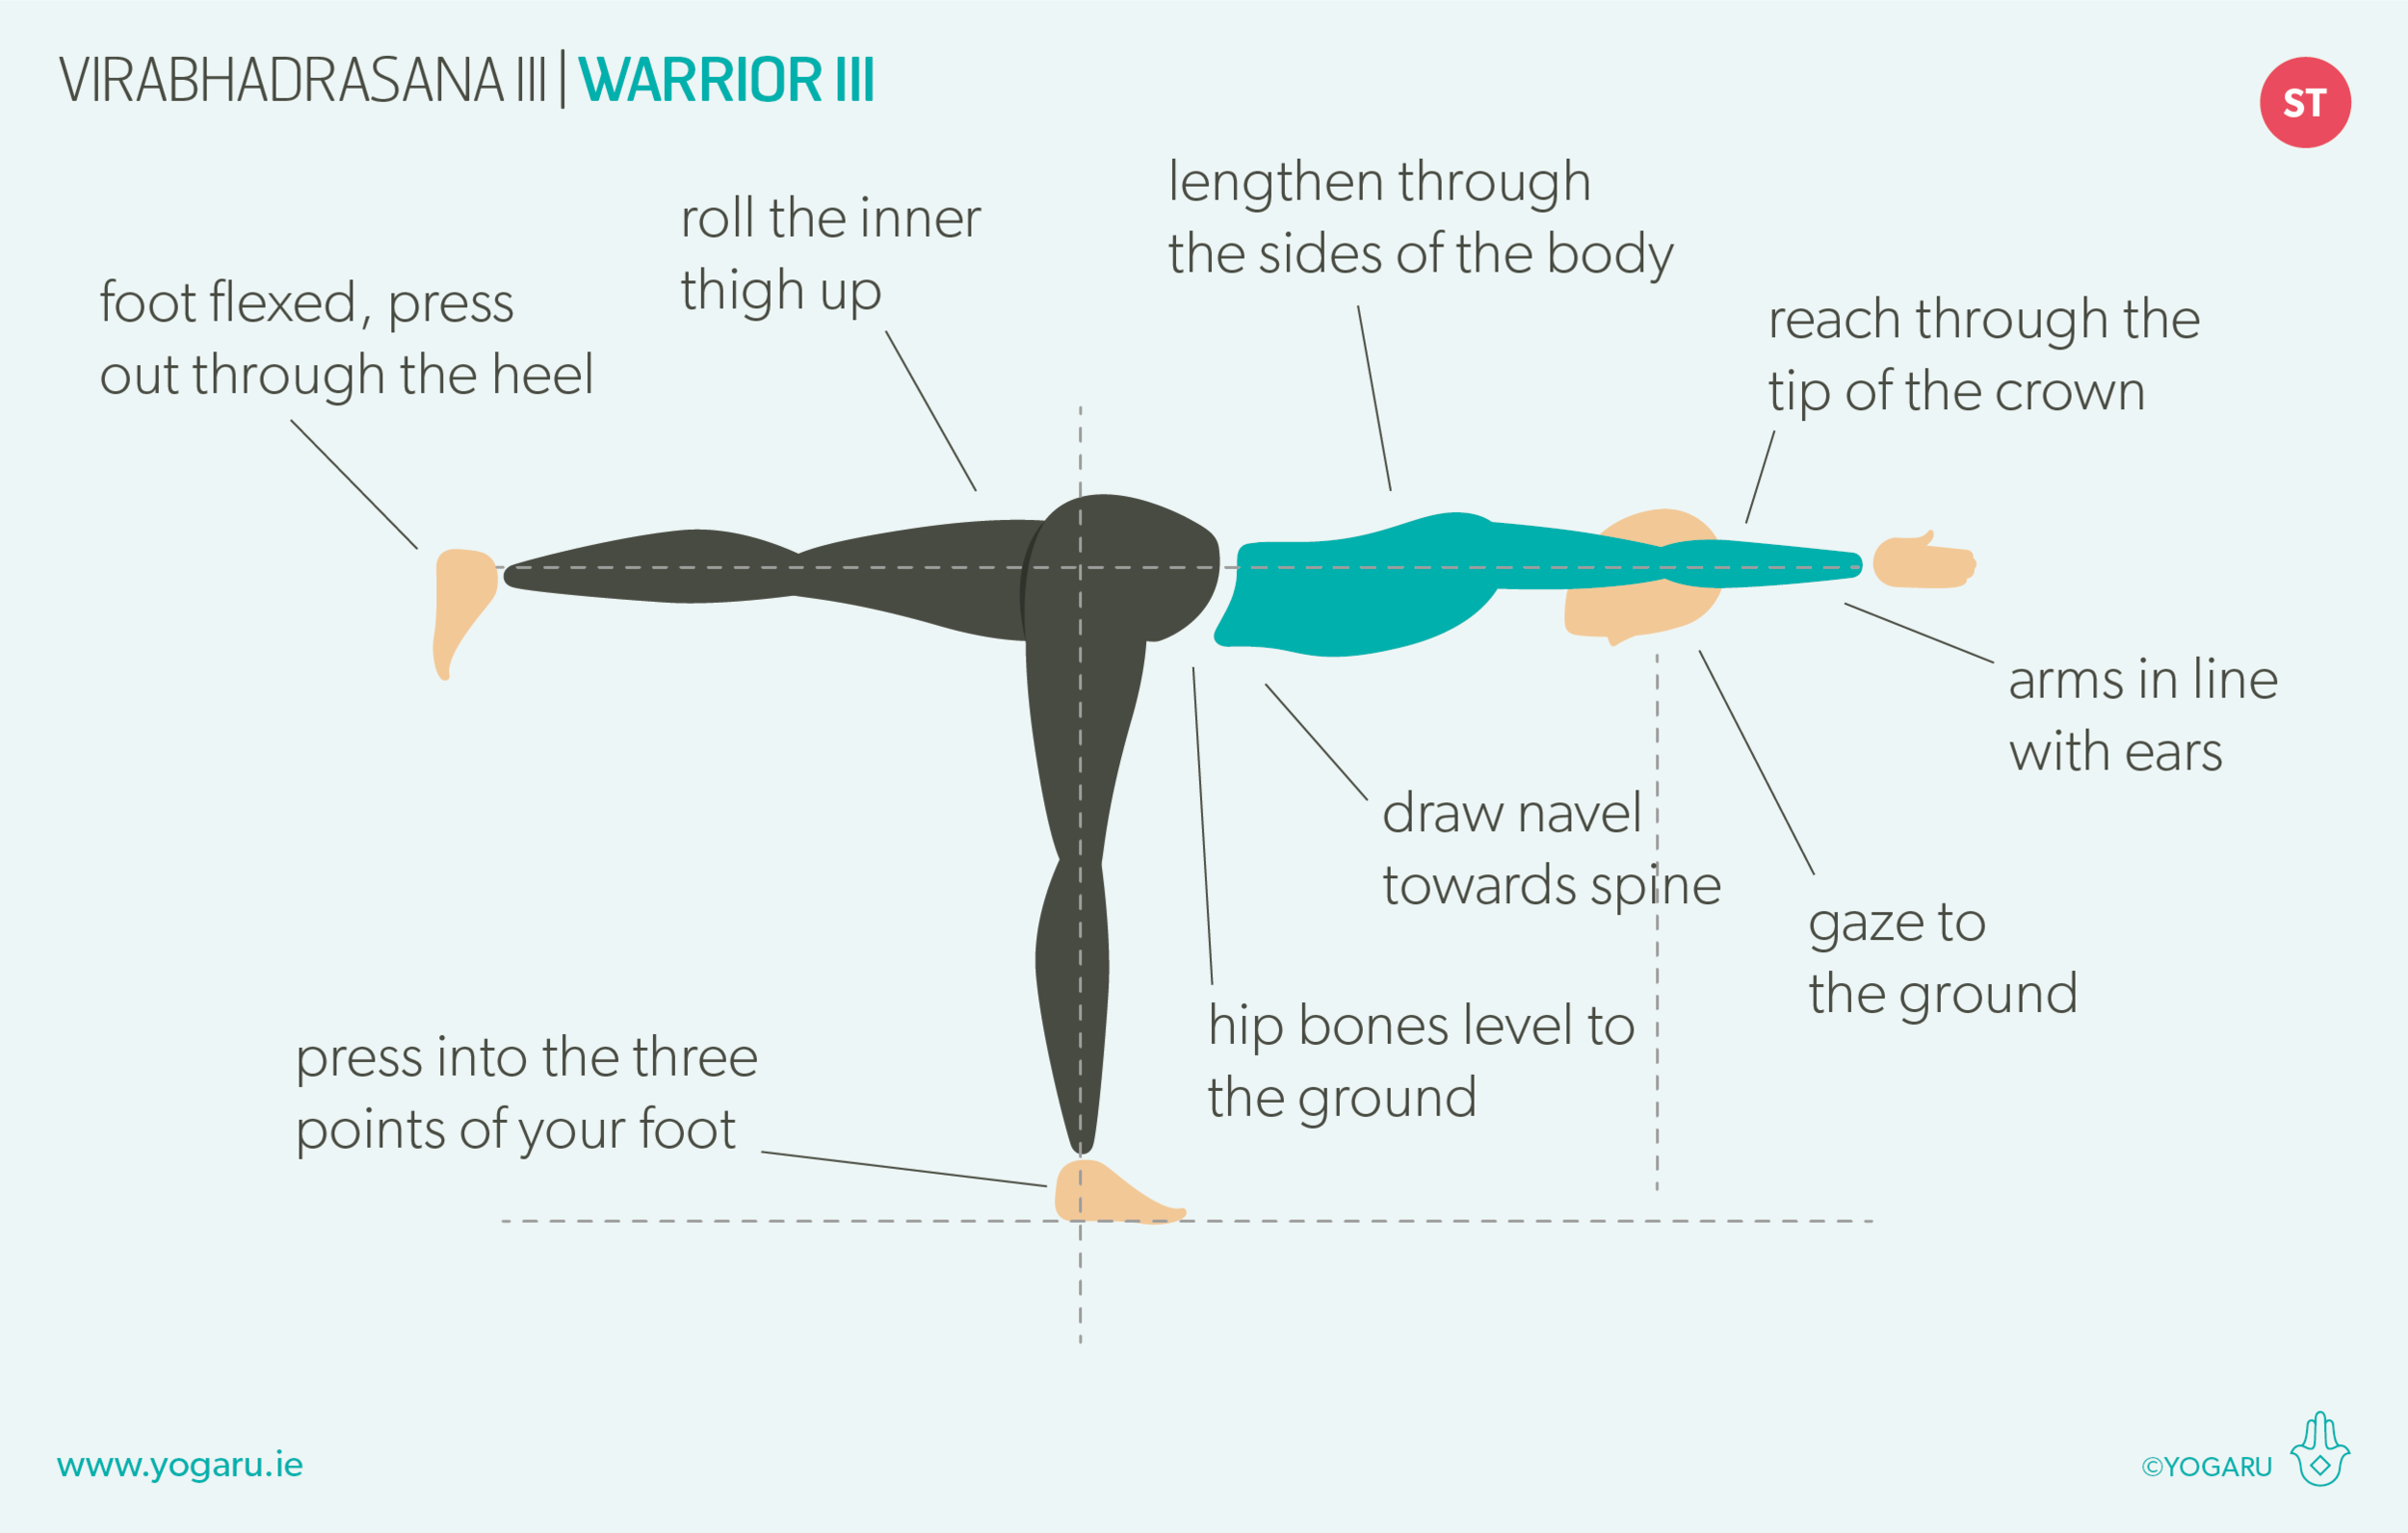
  • Exhale, hinge forward from the hip joint, lift your left leg parallel to the ground behind you, hips level to the ground. Roll the inner thigh of your left leg up, flex your foot and press out through the heel.

  • Reach your arms back or reach your arms forward in line with your ears, lengthen through your spine and the sides of the body, gaze to the ground, or to your fingertips if your arms are forward.

Enjoy establishing a new relationship to Warrior III with no self judgement and perfectionism.

To save the images for personal use click and hold down the image until the ‘save image’ option appears; on Mac hold down ‘control’ and click the image to get the option box; on PC right click on the image to get the option box. Scroll down in the ‘option box’ and click ‘save image’.

Ruth Delahunty Yogaru

Rooting down

PAUSE_0056.png

GROUNDING
This week has been all about exploring the concept of rooting down and finding a solid foundation, in preparation for our next Living your Yoga workshop on Yoga for Grounding, with Aisling Conn Saturday 3rd Feb, The Yoga Room. Aisling takes the reins for the asana and my job is to prepare the take home booklet on methods for grounding through asana, pranayama, essential oils and nutrition to help you navigate life off the mat. So naturally my class plan this week reflected what I’ve been researching and sequencing into my home practice. Have a read of Con Sheehans article on Grounding Practices for an introduction to what grounding is all about.

FINDING YOUR FOUNDATION
Rooting down and having a solid foundation will help you establish a strong and stable grounding to develop your asana, and work on optimal alignment for your unique body. Bringing your attention to the points of contact with the ground connects you to the earth, and helps to quieten a busy mind, build focus, and bring us back to the body. Like a tree we plant strong and secure roots to grow from. In our practice we train our mind to deal with situations so that off the mat we become better at recognising and dealing with them. Laying a track for the mind to navigate smoothly these are called positive samskaras. We learn how to find our grounding on the mat so that off the mat we might naturally find our way back to this secure, supported and balanced state.

STANDING POSES
Standing poses are very grounding. They build focus and concentration, increases circulation, and improve coordination and proprioception. To explore the concept of grounding in your practice start by standing in Tadasana/Mountain and bring your awareness to the point of contact with the ground. Press into the big toe mound, the little toe mound and the centre of the back of your heel. When you do this you’ll notice your three arches of your feet and your inner ankle lifting.This action is called Pada Bandha (foot energy lock) and brings energy up your legs and wakes up the entire body. When you encounter a pose that challenges your balance imagine roots growing from the soles of your feet, weaving around, hooking into the soil and supporting you. Feel the weight of the body bound into this support and a rebound of energy coming back up from the ground. For more on the anatomy of the foot and how to work with Pada Bandha have a read of Anatomy 101 find your feet.

EXPLORING ROOTING DOWN IN YOUR PRACTICE
As you run through the above sequence keep coming back to your points of contact with the ground. Name what is in contact with the ground to yourself, to help direct your attention there. Start the practice by stretching out the soles of the feet and backs of the heel with a version of Supta Padangustasana/Reclined Hand to Big Toe. Using a yoga strap or a belt around the balls of your foot, keep yours knees inline with each other and concentrate on pressing your heel away from you and your toes towards you. In Ashva Sanchalanasana/Galloping Horse remember we are working with grounding so avoid leaning too far forward and losing contact with the back foot. In Virabhadrasana III/Warrior III bring the focus of the pose to the standing leg. You might notice your lifted leg become stronger and lighter when you find the strength and stability of the standing leg.

ALIGNMENT CUES
The peak pose for this sequence is Virabhadrasana III/Warrior III. Read through these alignment cues to find your Warrior III.

  • From Virabhadrasana I, place your hands on your hips, inhale, lean forward and step your left leg forward a little.

  • Exhale, hinge forward from the hip joint, lift your left leg parallel to the ground behind you, hips level to the ground. Roll the inner thigh of your left leg up, flex your foot and press out through the heel.

  • Reach your arms back or reach your arms forward in line with your ears. Lengthen through your spine and the sides of the body, gaze to the ground or to your fingertips if your arms are forward.

Print the above sequence and work through it slowly. Pause longer in each pose than you usually would will help to achieve deep grounding.

To learn more about grounding practices join Ruth Delahunty & Aisling Conn in The Yoga Room on 3rd February, 2pm, for meditation, asana practice, relaxation and take home material on top tips for grounding.

To save the images for personal use click and hold down the image until the ‘save image’ option appears; on Mac hold down ‘control’ and click the image to get the option box; on PC right click on the image to get the option box. Scroll down in the ‘option box’ and click ‘save image’.

Ruth Delahunty Yogaru

Lengthen up through the side body

PAUSE_0055.png

STILLING THE MIND THROUGH MOVEMENT
One of the ways yoga benefits us in our everyday lives is how it trains the mind to be in the present moment. Through movement, and body awareness in each asana, the body is in the present moment – it’s not in the past or planning the future, it’s in the here and now. By concentrating on the physical body as we move we still the mind, give it a single focal point, and help to bring it to the present moment too. Surya Namaskara/Sun Salutations are very good for settling your attention into your practice at the start of your practice. You quickly find yourself in a meditative flow, as you move through one pose to the next, when your mind is focused on the movement and the breath. The brain works like a muscle, when you train it to settle and become still it finds it easier to reach this serene space off the mat too when needed.

YOGA AND THE SPINE
Yoga is all about the spine. It is the midline that splits left and right body and is involved in all poses. The spine is the gateway to the nervous system which quietens the mind, reduces stress, anxiety and tension – leading to a stronger immune system and bringing with it better health. Recently in my home practice I’ve been working with lengthening up the spine through side bends and lifting the upper body up out of the deep pelvic bowl. This helps to open up the space between the vertebrae, which can get quite compressed with extended periods of sitting. We have a lateral side bend of 20o in the lumbar spine (lower), 20o in the thoracic (upper) and 35o in the cervical (neck) – giving a total potential bend for 75o. Throughout this sequence focus your attention on lengthening the spine and concentrate your bends in the lower and upper spine – letting your neck follow the curve of the upper spine without much flexion. In poses where you are reaching your arm overheads along your ear, reach your arm up high rather than up and over your head. This will isolate the action in the side bend and minimise the shoulder stretch.

BE PRESENT
Winter time can be hard on the spine. We are less active and spend a lot more time indoors in the evenings. Print out the above sequence and as you flow through the practice be present with the body as it moves and hold poses. Follow the journey of the stretch. Say to yourself in your mind ‘I am reaching from my toes all the way to my fingertips, I am breathing in, I am breathing out’.

EXPLORING LENGTHENING UP THROUGH THE SIDE BODY IN YOUR PRACTICE
Before each pose take an inhale and lengthen through the spine. Notice how this helps give you space to move a little more freely into the pose. Press into your foundation to find your reach of the spine. When you have a good contact with the ground it is easier to grow and lengthen from.

ALIGNMENT CUES
The peak pose for the sequence is Parivrtta Janu Sirsasana/revolved Head to Knee. Read through these alignment cues to find you version of the pose.

  • From Dandasana, open your legs out wide, bend your right knee and place your foot on the inner thigh of your left leg, press out through your left heel, right knee grounded.

  • Place your right hand on your right hip. Hinge to your left from the left waist. Place your left forearm on the ground inside your left leg, palm facing up, or hold onto the inside of you left foot.

  • Inhale, lift your right arm up high, palm facing left, exhale, reach your right arm up and over your right ear. Reach towards your left foot or hold onto the outside edge of your left foot. Bottom waist rolls forwards, top waist rolls back, gaze up.

To save the images for personal use click and hold down the image until the ‘save image’ option appears; on Mac hold down ‘control’ and click the image to get the option box; on PC right click on the image to get the option box. Scroll down in the ‘option box’ and click ‘save image’.

Ruth Delahunty Yogaru