Pose breakdowns

Garudasana - Eagle

LONGEVITY OF STANDING STABILITY
Garudasana/Eagle is a standing balancing pose which builds focus and concentration and gives a lovely stretch across the back of the shoulders. Single legged standing poses are important poses to continue to add into your practice to build ‘balance’ stamina. Fall risk and feeling a little less sturdy on our feet is part of the ageing process. This pose, and similar poses like Vrksasana/Tree and Viradhadrasana III/Warrior III, train the brain to work out the changing centre of gravity and enlist the deep stabilising muscles of the hips, core and spine to maintain standing position. Because of the angle of the hip socket, the position of the legs of adduction, and internal rotation in Garudasana/Eagle is not an easy shape for most people to take. It can expose tightness in the outer glutes, and the muscles that attach to the IT band. This makes it difficult to cross the legs sufficiently to get the wrap of the lower leg, which can put pressure on the knee joint.

THE BENEFITS OF GARUDASANA/EAGLE
Garudasana/Eagle stretches the shoulder, calves, the outer hips, the piriformis and the tensor fasciae latae. While at the same time these outer hip muscles, and the deep stabilising muscles of the hip, are contracting to help maintain balance. As with all the standing balancing poses there are more muscles strengthening than stretching – the inner groins, core; and the glutes, hip flexors, hamstrings and ankles of the standing leg. It is also a great pose to help you strengthen the spine by keeping yourself upright as you bend forward to facilitate the leg wrap.

EXPLORING GARUDASANA/EAGLE IN YOUR PRACTICE
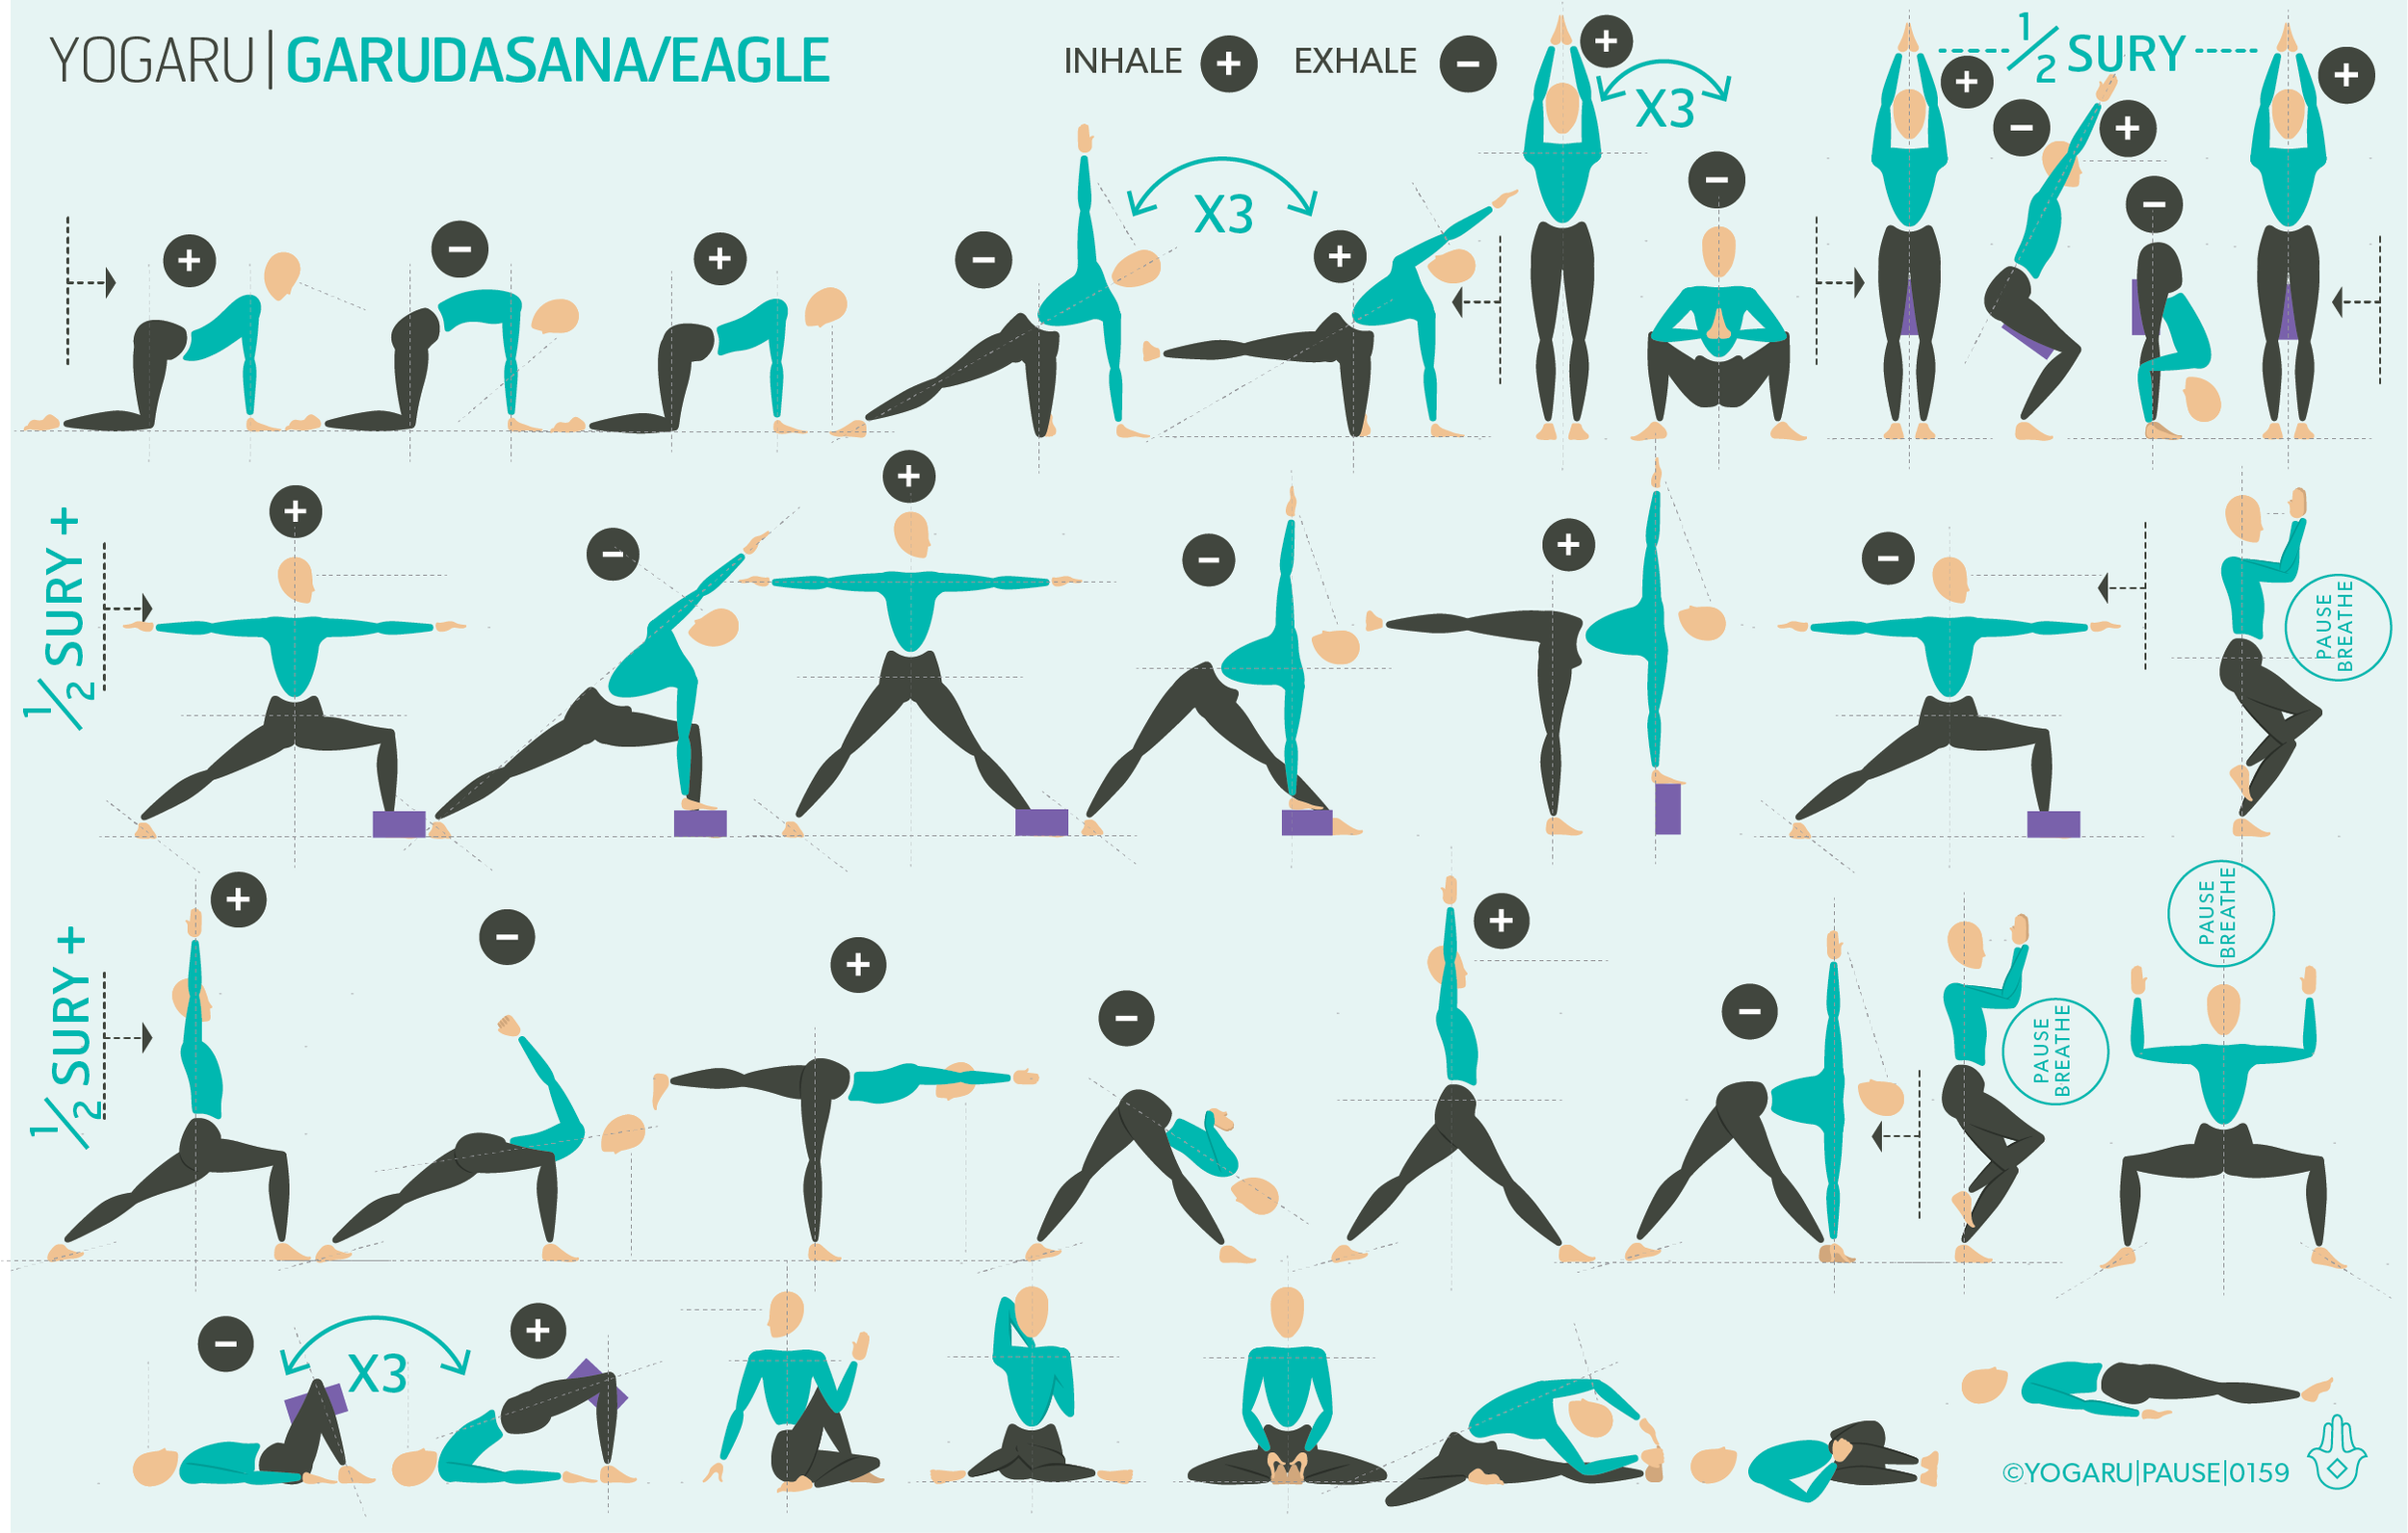
Garudasana/Eagle is quite a human knot! There are lots of versions of the pose if either your hips or shoulders are not happy to tie themselves up into this particular pretzel shape. If the full leg wrap does not suit your hips, place a block on the outside of your standing leg and place your wrapping leg foot on the block instead of around the calf of the standing leg. If your shoulders restrict you from placing the palms of the hands together, place the back of the hands together or take it back another step and hug your arms around your shoulders which will give you the same opening to the back of the shoulders.

Strengthening the inner groins in adduction is not as prevalent an action in yoga poses. In this sequence you can find the strength of the inner groin by squeezing a brick between the thighs in the warm up half sun salutation on the first row which you will repeat at the start of each standing mini flow. In the second row place a brick on the inside of the front leg and press your thigh against your arm to find this same inner groin activation. In the third row continue to tap into this strength by hugging to the midline and using this action to stabilise the hips in some of these more challenging poses. Utkata Konasna/Goddess is the perfect counter pose for Garudasana/Eagle. It brings the hips into external rotation and abduction, which is the opposite to how they sit in Garudasana/Eagle, and is a more natural and secure position for the femur bone to sit in the hip socket. When you add cactus arms to Utkata Konasna/Goddess it gives the perfect unravelling counter pose for Garudasana/Eagle.

ALIGNMENT CUES
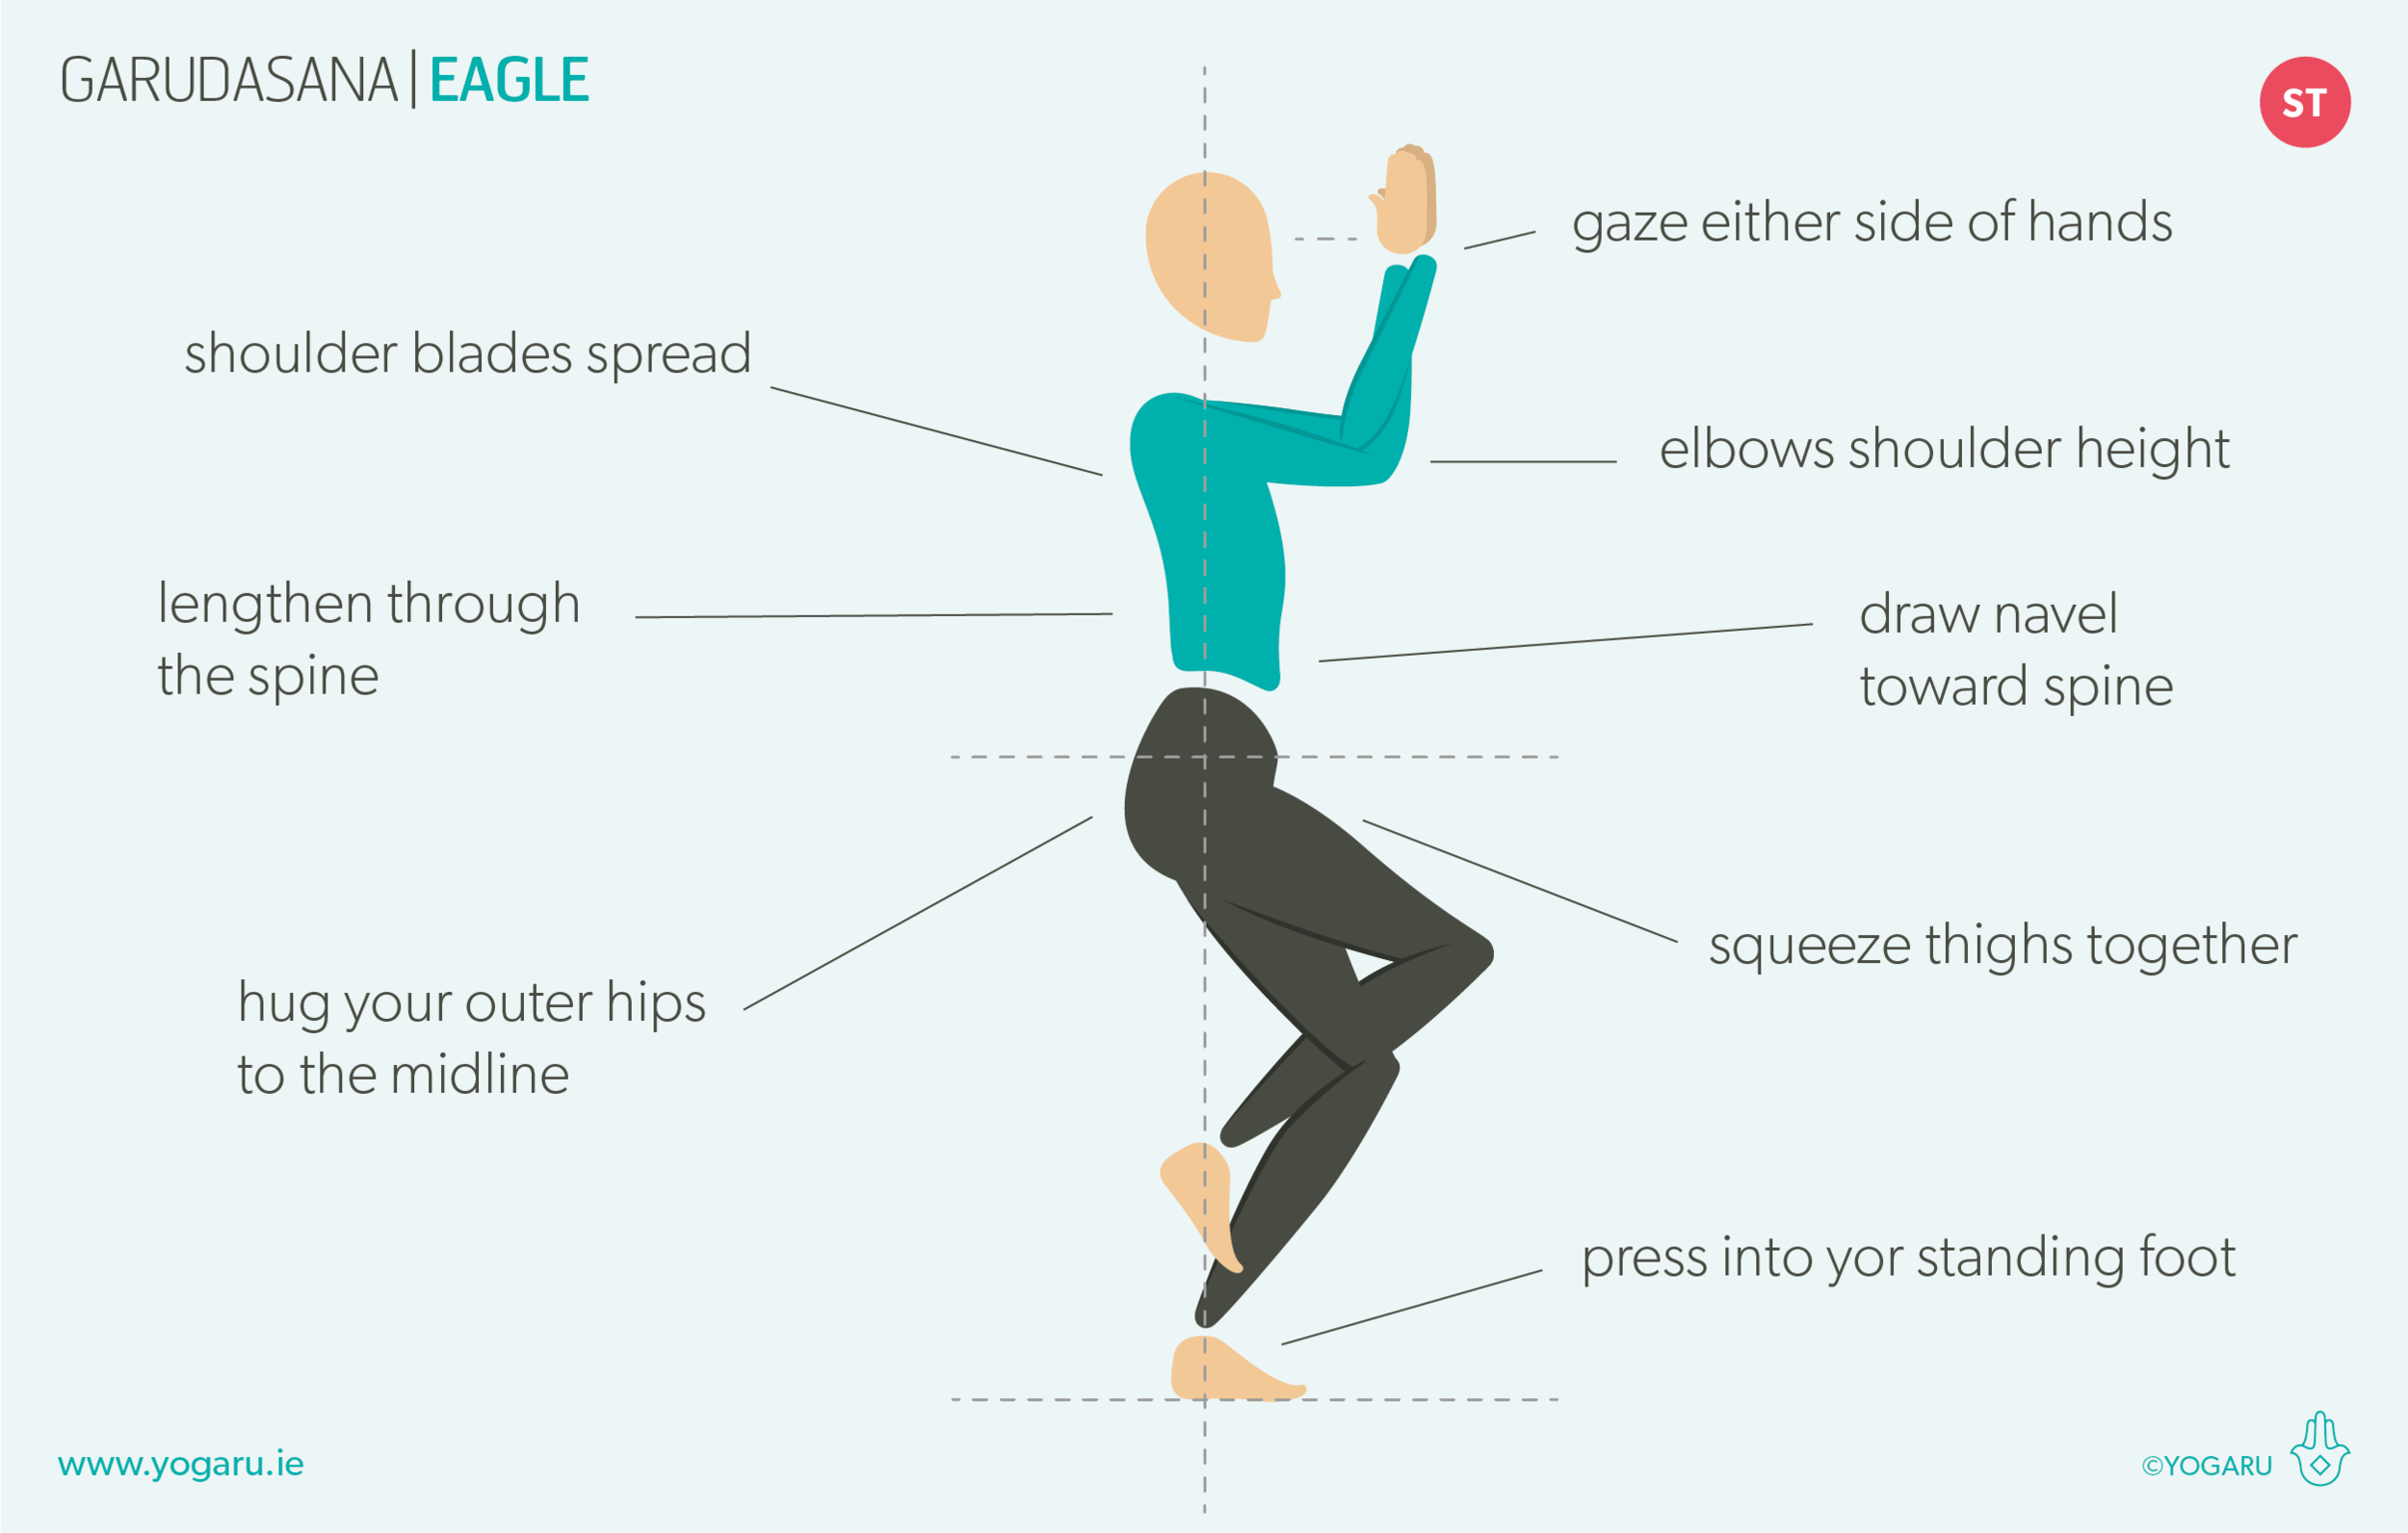
For this sequence remember to hug the outer hips to the midline in Garudasana/Eagle and squeeze to the midline.

Have a read of the tips below and either print out the sequence or save it onto your device:

  • From Tadasana, bend your left knee, cross your right leg over your left thigh, place your right toes beside your left foot, or hook your right toes around your left calf.

  • Bend your elbows, cross your left elbow over your right elbow.

  • Press the back of the hands together, or wrap your left hand around your right hand and press your palms together.

  • Lift your upper arms up, elbows lengthen forward, fingers reaching up, shoulder blades spread.

  • Keep your left knee bent, lengthen the spine, broaden through the collarbones, squeeze your upper thighs together, gaze either side of your hands.

To save the images for personal use click and hold down the image until the ‘save image’ option appears; on Mac hold down ‘control’ and click the image to get the option box; on PC right click on the image to get the option box. Scroll down in the ‘option box’ and click ‘save image’.

Ruth Delahunty Yogaru

Anjaneyasana - Low Lunge

THE PSOAS MUSCLE
Anjaneyasana/Low Lunge is a lovely heart opening pose to add into your practice if you have been sitting for long periods of time and are feeling tightness in the hip flexors. When we sit we shorten the front muscles of the hips called the hip flexors or more specifically the psoas muscle. This muscle connects the upper and lower body, its job is mainly to lift the leg to walk and in movement. It is also strongly connected to the ‘fight or flight’ nervous system response as it prepares the body to fight back or take flight. When it is tight from something as simple as sitting, or repeated flexion from sports like cycling, it sends ‘fight or flight’ signals to the nervous system and causes this physical tension to become mental tension too. Lengthening out the psoas in poses like Anjaneyasana/Low Lunge helps to break this cycle and relieve this built up physical and mental tension.

Anjaneyasana/Low Lunge is also a very good pose to prepare the body for its sister pose Ashta Chandrasana/Crescent Pose. Anjaneyasana/Low Lunge is the same pose with the back knee down rather than lifted. This gives you the opportunity to explore the stretching and strengthening components of the pose without the effort of the standing and balancing.

THE BENEFITS OF ANJANEYASANA/LOW LUNGE
Anjaneyasana/Low Lunge stretches the inner groin, quad and the hip flexor of the back leg, and the glute of the front leg; and the strengthens the spine, shoulders, hip flexor and quads of the front leg; and glutes and hamstrings of the back leg. You may feel a slight stretch in the hamstring of the front leg but as the leg is bent it will mainly be the glutes stretching. Similar to Ashta Chandrasana/Crescent Moon it also builds focus, heat, stamina, strength, increases circulation, metabolism, improves posture, spinal health and coordination. There are two ways to approach Anjaneyasana/Low Lunge. The first approach, and my preferred option, stretches the front hip area of the back leg by keeping the pelvis stacked, squeezing the buttocks muscle and concentrating on lifting the pointy hip bones up. The second approach stretches the inner groin of the back leg by bending the front knee beyond the front ankle and dipping the pelvis down. In this version it is important to lengthen through the spine and ensure you distribute the backbend equally to avoid overarching into the lower back. Regardless of which version you take, it is important to support the descent of the hips with the muscles of the hips. Allowing gravity to take over in this extended position can compromise the connective tissue of the tendons at the top of the muscles. You can support your hip muscles by pressing your front foot into the ground and scissoring it back towards your back knee, you hug your outer hips to the midline and zip the seam of your core up from your public bone to your sternum.

EXPLORING ANJANEYASANA/LOW LUNGE IN YOUR PRACTICE
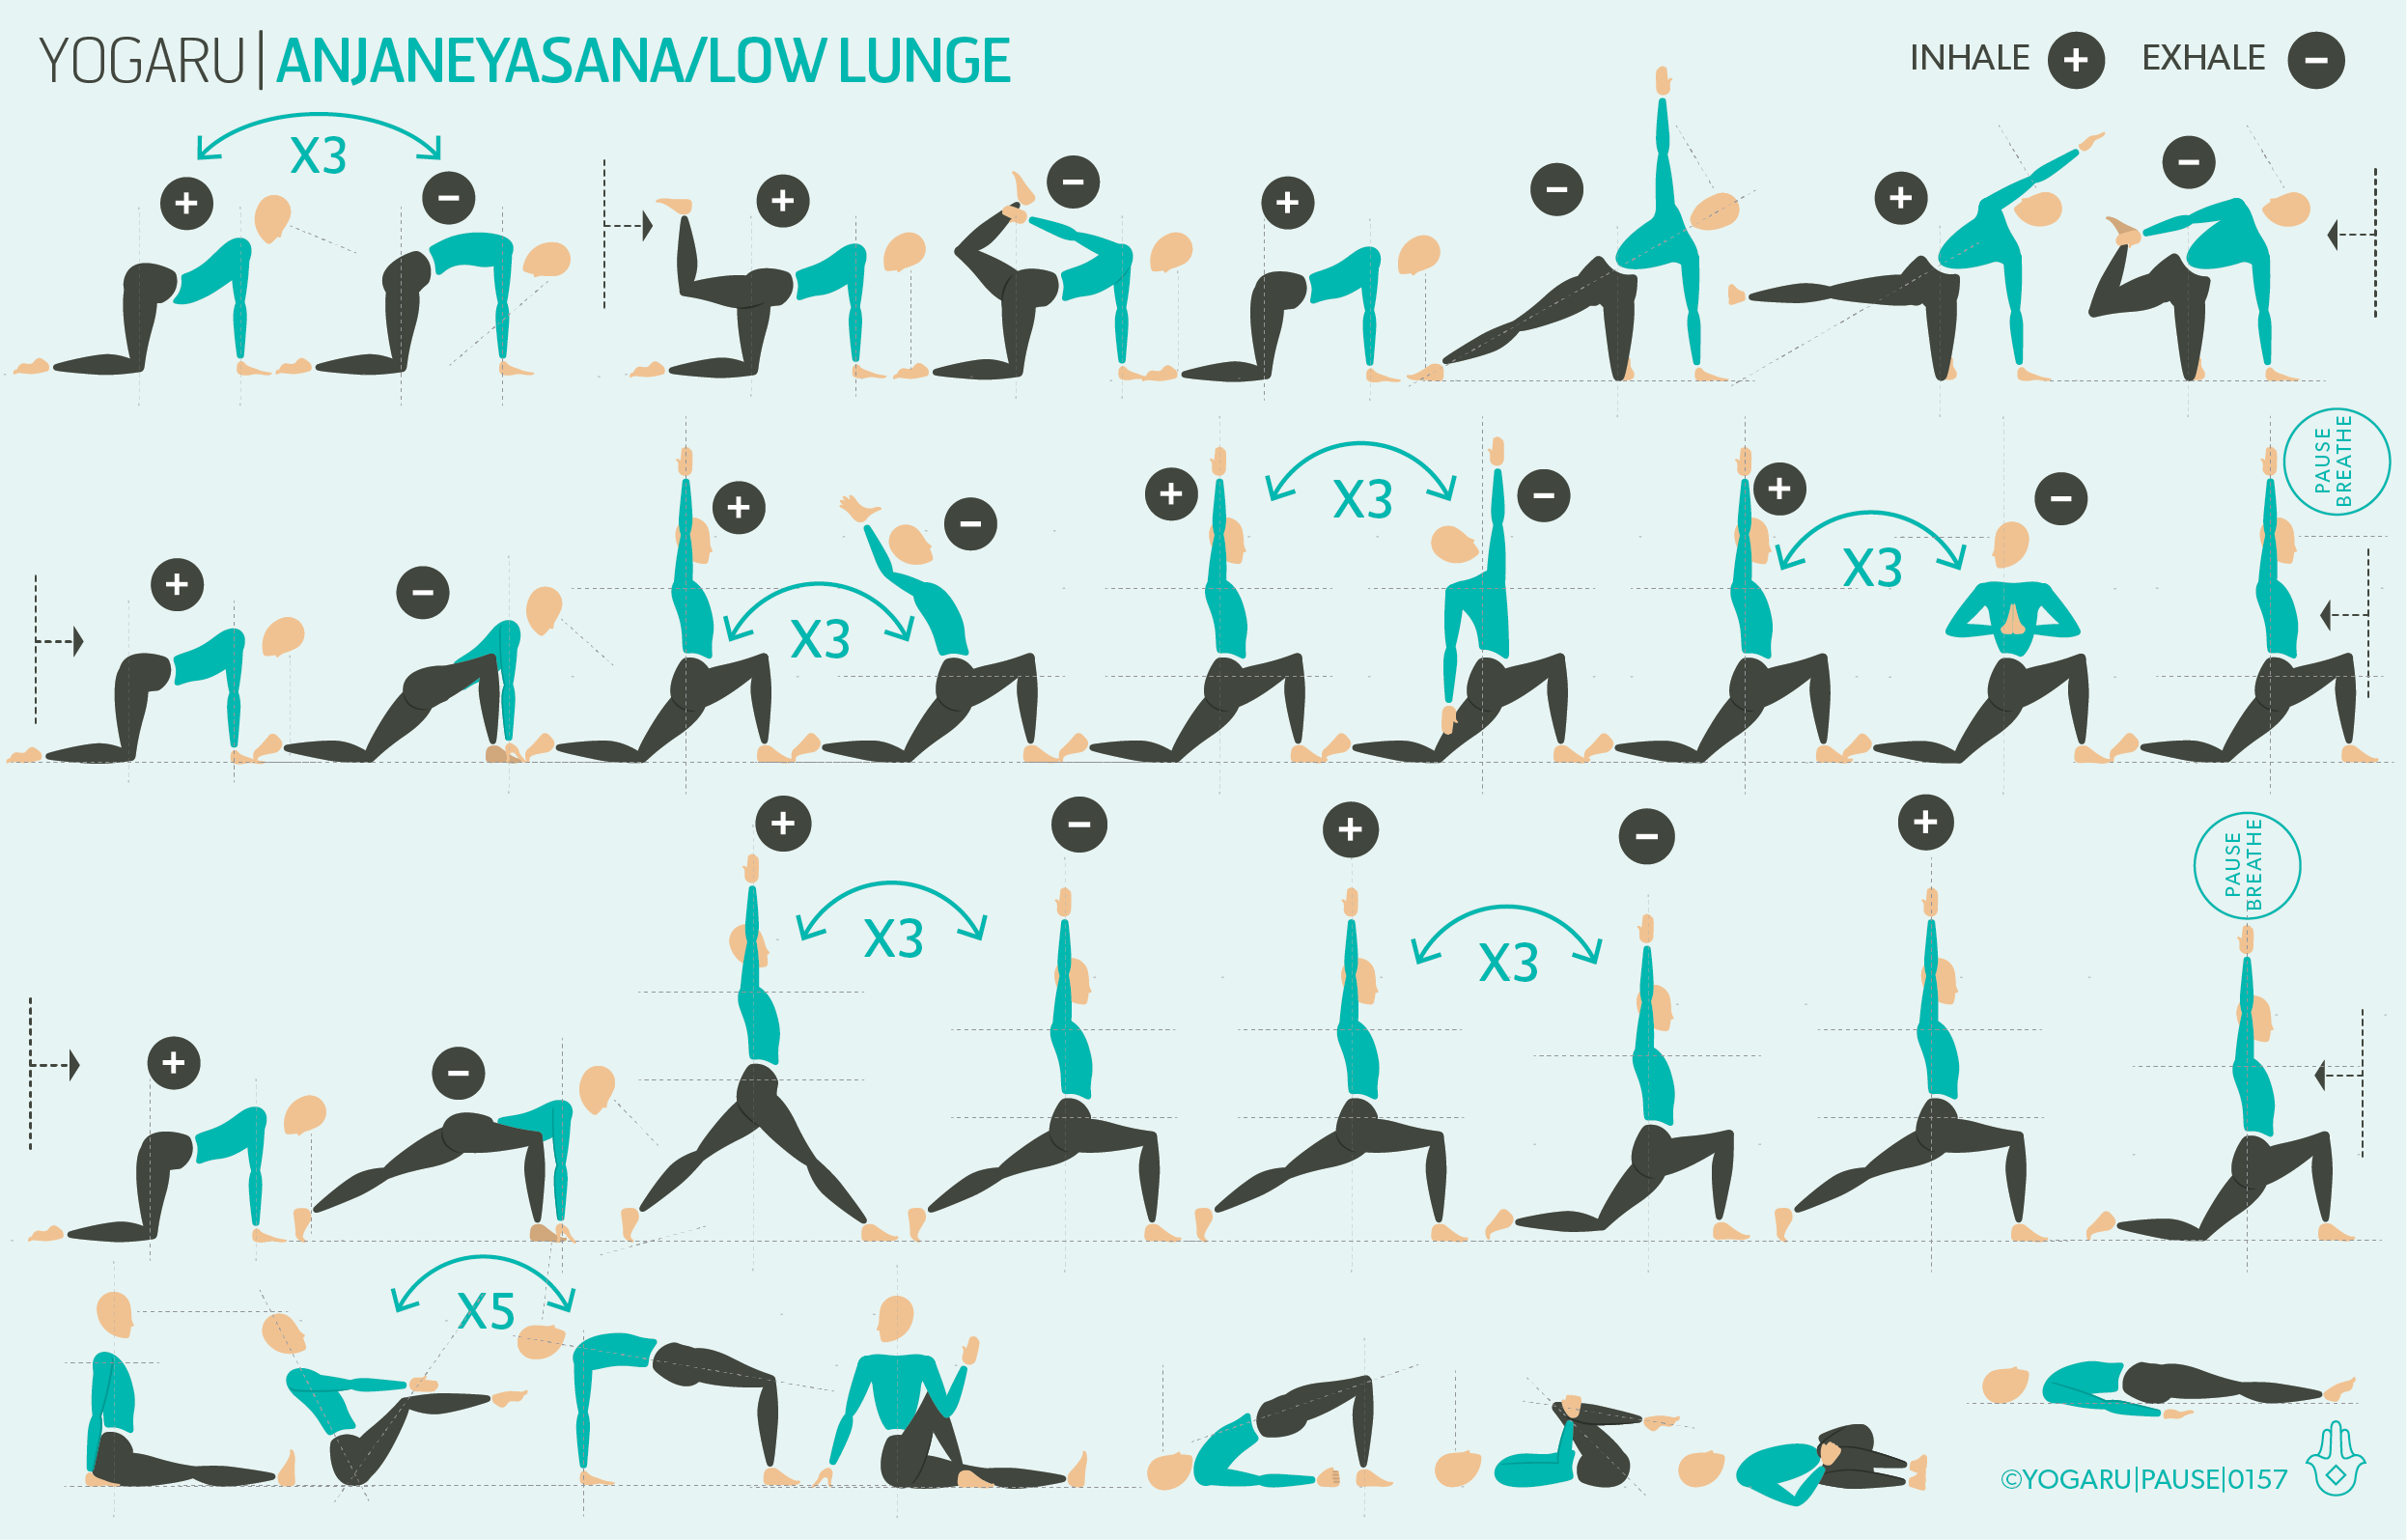
This sequence starts by building a blueprint for Anjaneyasana/Low Lunge with a warm up that opens the front of the hips and strengthens the spine with some poses where we hold the back leg. Adding some extended arms to the poses too to build shoulder strength. When you reach your first Anjaneyasana/Low Lunge, pause here before you start into the three mini flows, and try out the two different options of the peak pose as described above and notice where you feel a stretch and what you feel strengthening in each. At the end of each standing flow you have an opportunity to take the peak pose and pause for a few breaths, notice do you feel more at ease in the pose as you progress through the practice.

ALIGNMENT CUES
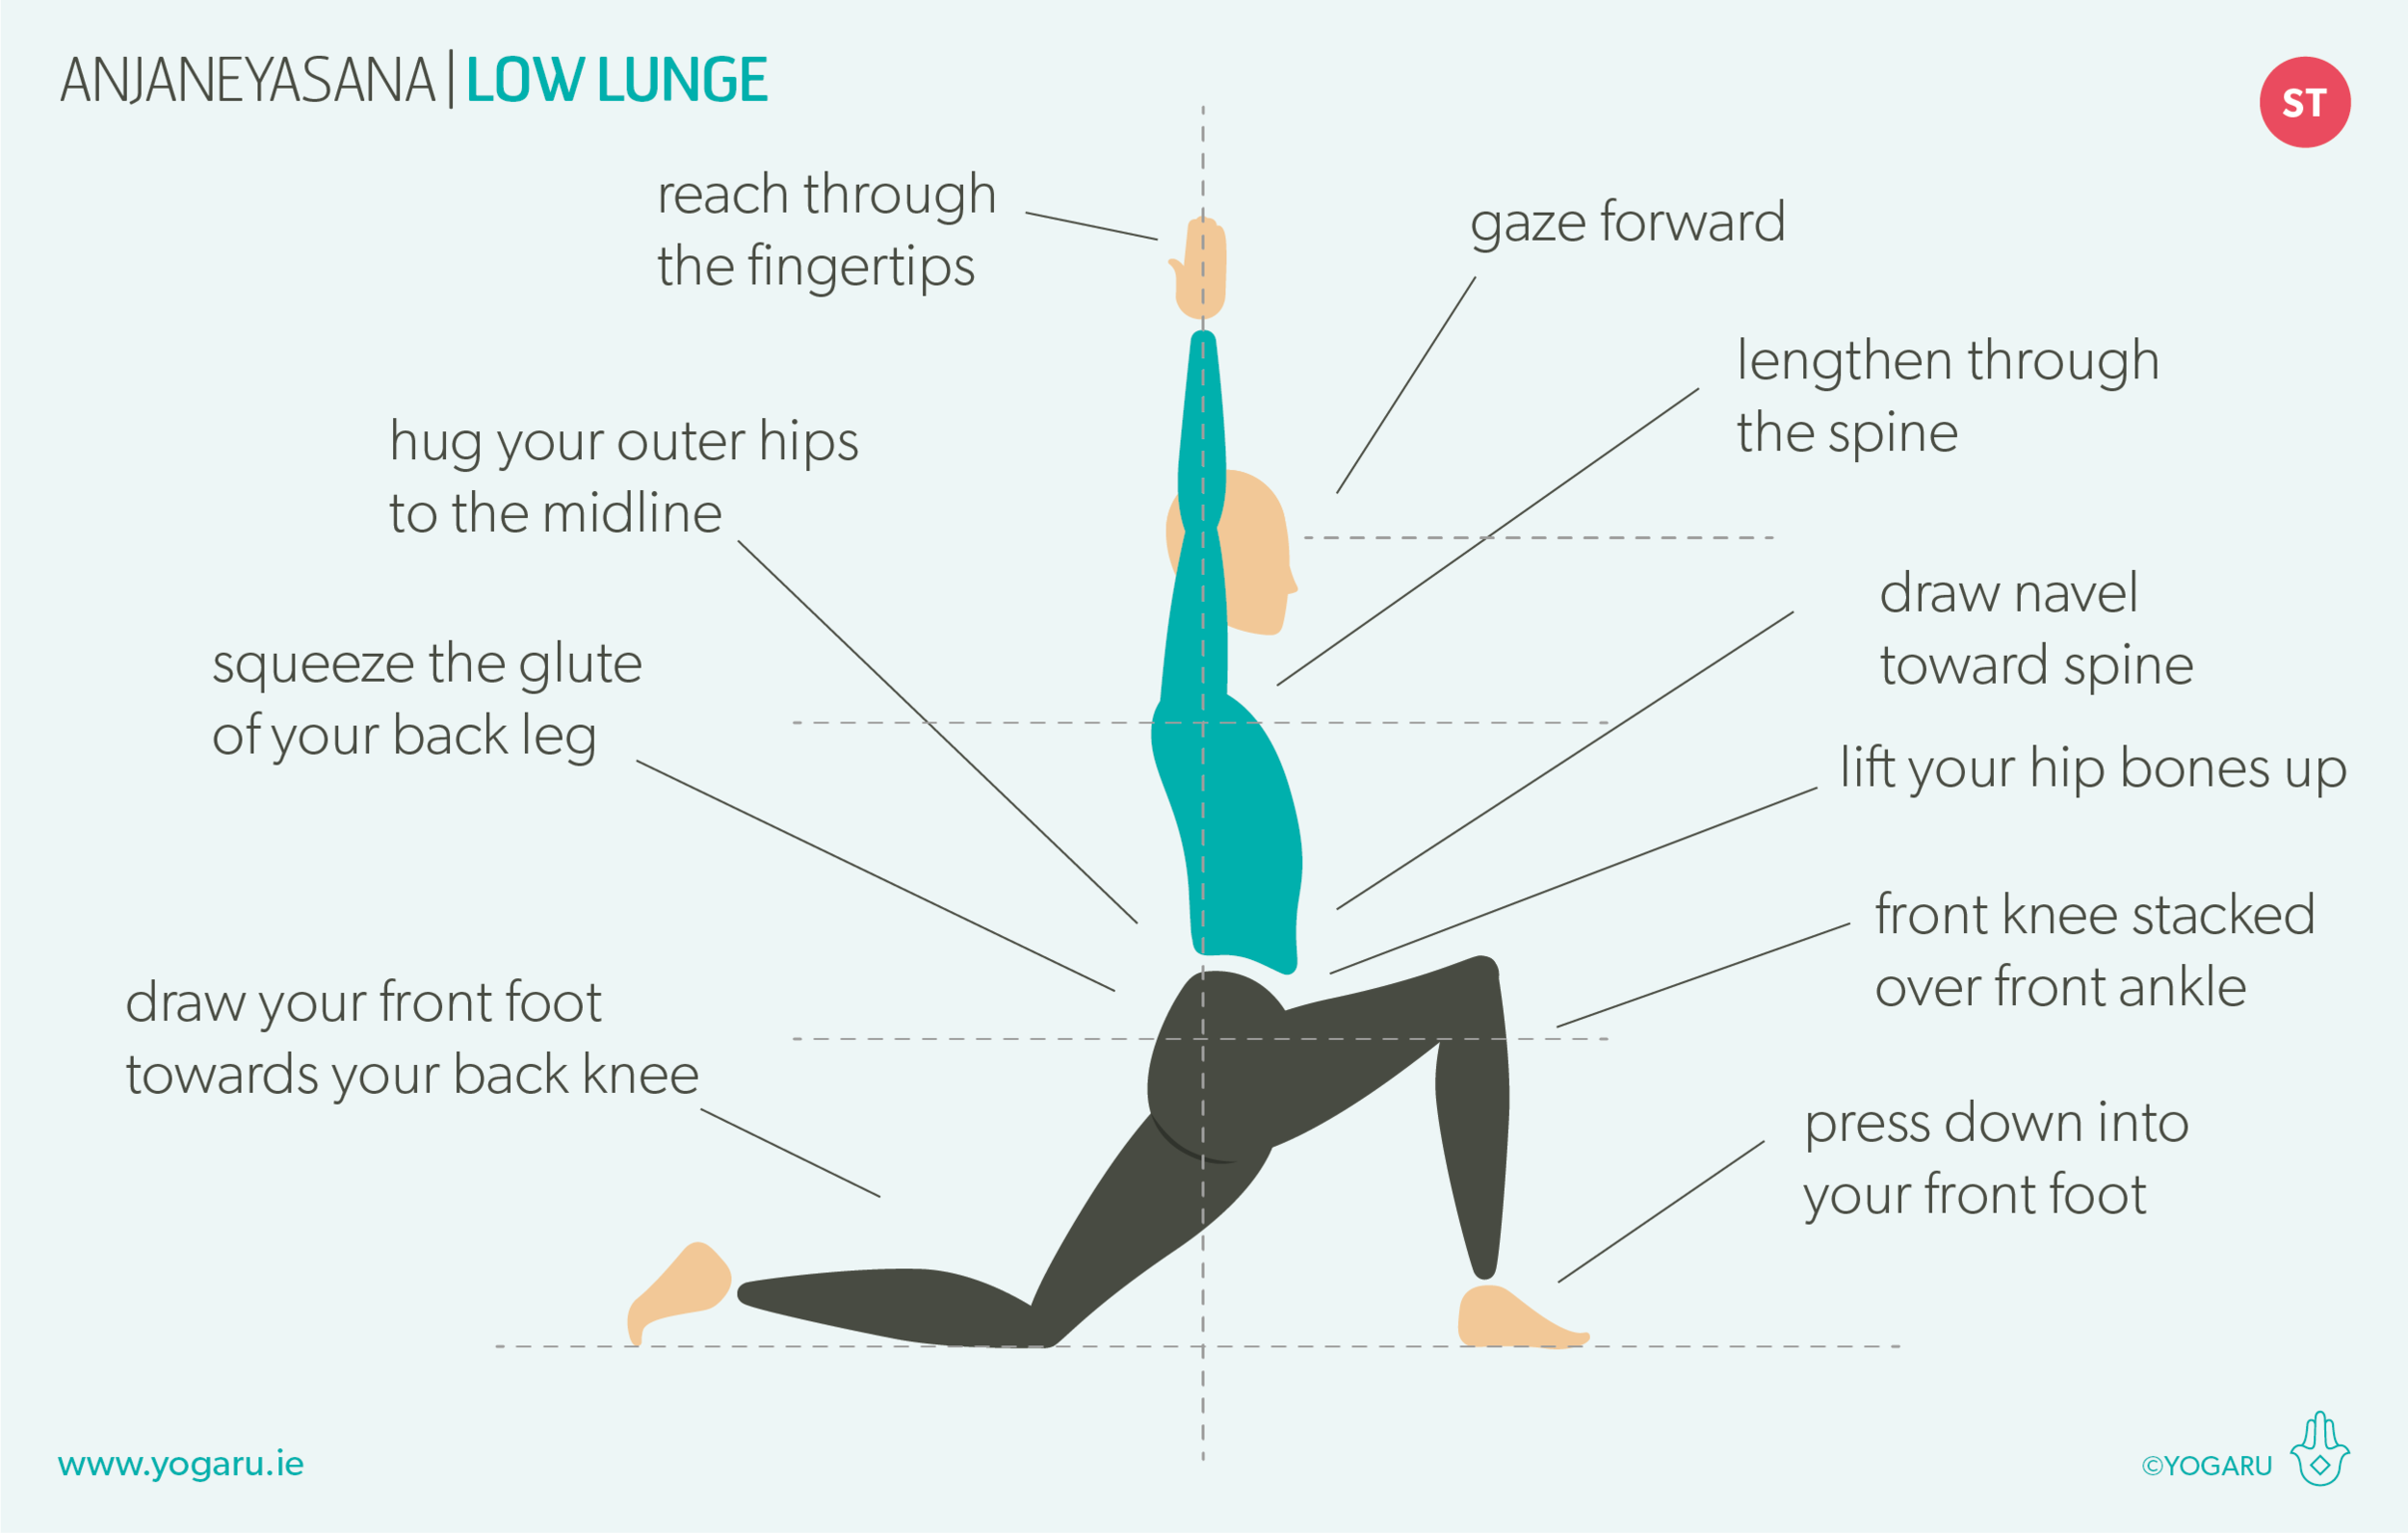
Remember to use the supportive muscles of the hips throughout this sequence to contain your Anjaneyasana/Low Lunge for strong connective tissue and muscles with longevity.

Have a read of the tips below and either print out the sequence or save it onto your device:

  • From Adho Mukha Svanasana, inhale, step your right foot forward just inside your right hand, lower your left knee to the ground, back leg firm.

  • Hug your outer hips to the midline, gently bend your front knee and lower your hips towards the ground, exhale here.

  • Inhale, reach your arm up high shoulder width apart or palms together.

  • Draw your navel towards your spine, broaden through the collarbones, lengthen through your spine to the tip of your crown, gaze forward or to your fingertips.

To save the images for personal use click and hold down the image until the ‘save image’ option appears; on Mac hold down ‘control’ and click the image to get the option box; on PC right click on the image to get the option box. Scroll down in the ‘option box’ and click ‘save image’.

Ruth Delahunty Yogaru

Salamba Sirsasana - Headstand

KING OF ALL ASANA
Salamba Sirsasana/Headstand is probably one of the most widely practiced inversions. It is more accessible than a Adho Mukha Vrksasana/Handstand for many yogis, because it has a wider foundation to build from, but gives exactly the same benefits as a Adho Mukha Vrksasana/Handstand. Including the thrill of flipping your world upside down! Known as ‘the king of all asana’ it has many benefits – it nourishes the cells of the brain; stimulates circulation; balances the hormones; builds focus and concentration; eases stress, tension and anxiety; flushes toxins out; aids the digestive system; and boosts the immune system. With all these benefits it’s no wonder yogis have a certain glow about them – Salamba Sirsasana/Headstand are also well known for their anti-aging properties. What’s not to like about them!

THE BENEFITS OF SALAMBA SIRSASANA/HEADSTAND
Salamba Sirsasana/Headstand strengthens the shoulders, spine, arms and core. While the journey up into the inversion stretches the hamstrings. Most inversions are known for their energising effects. Salamba Sirsasana/Headstand is the one inversion that does the opposite – it is very calming and nourishing to the nervous system. Making it a good pose to practice at any time of day.

EXPLORING SALAMBA SIRSASANA/HEADSTAND IN YOUR PRACTICE
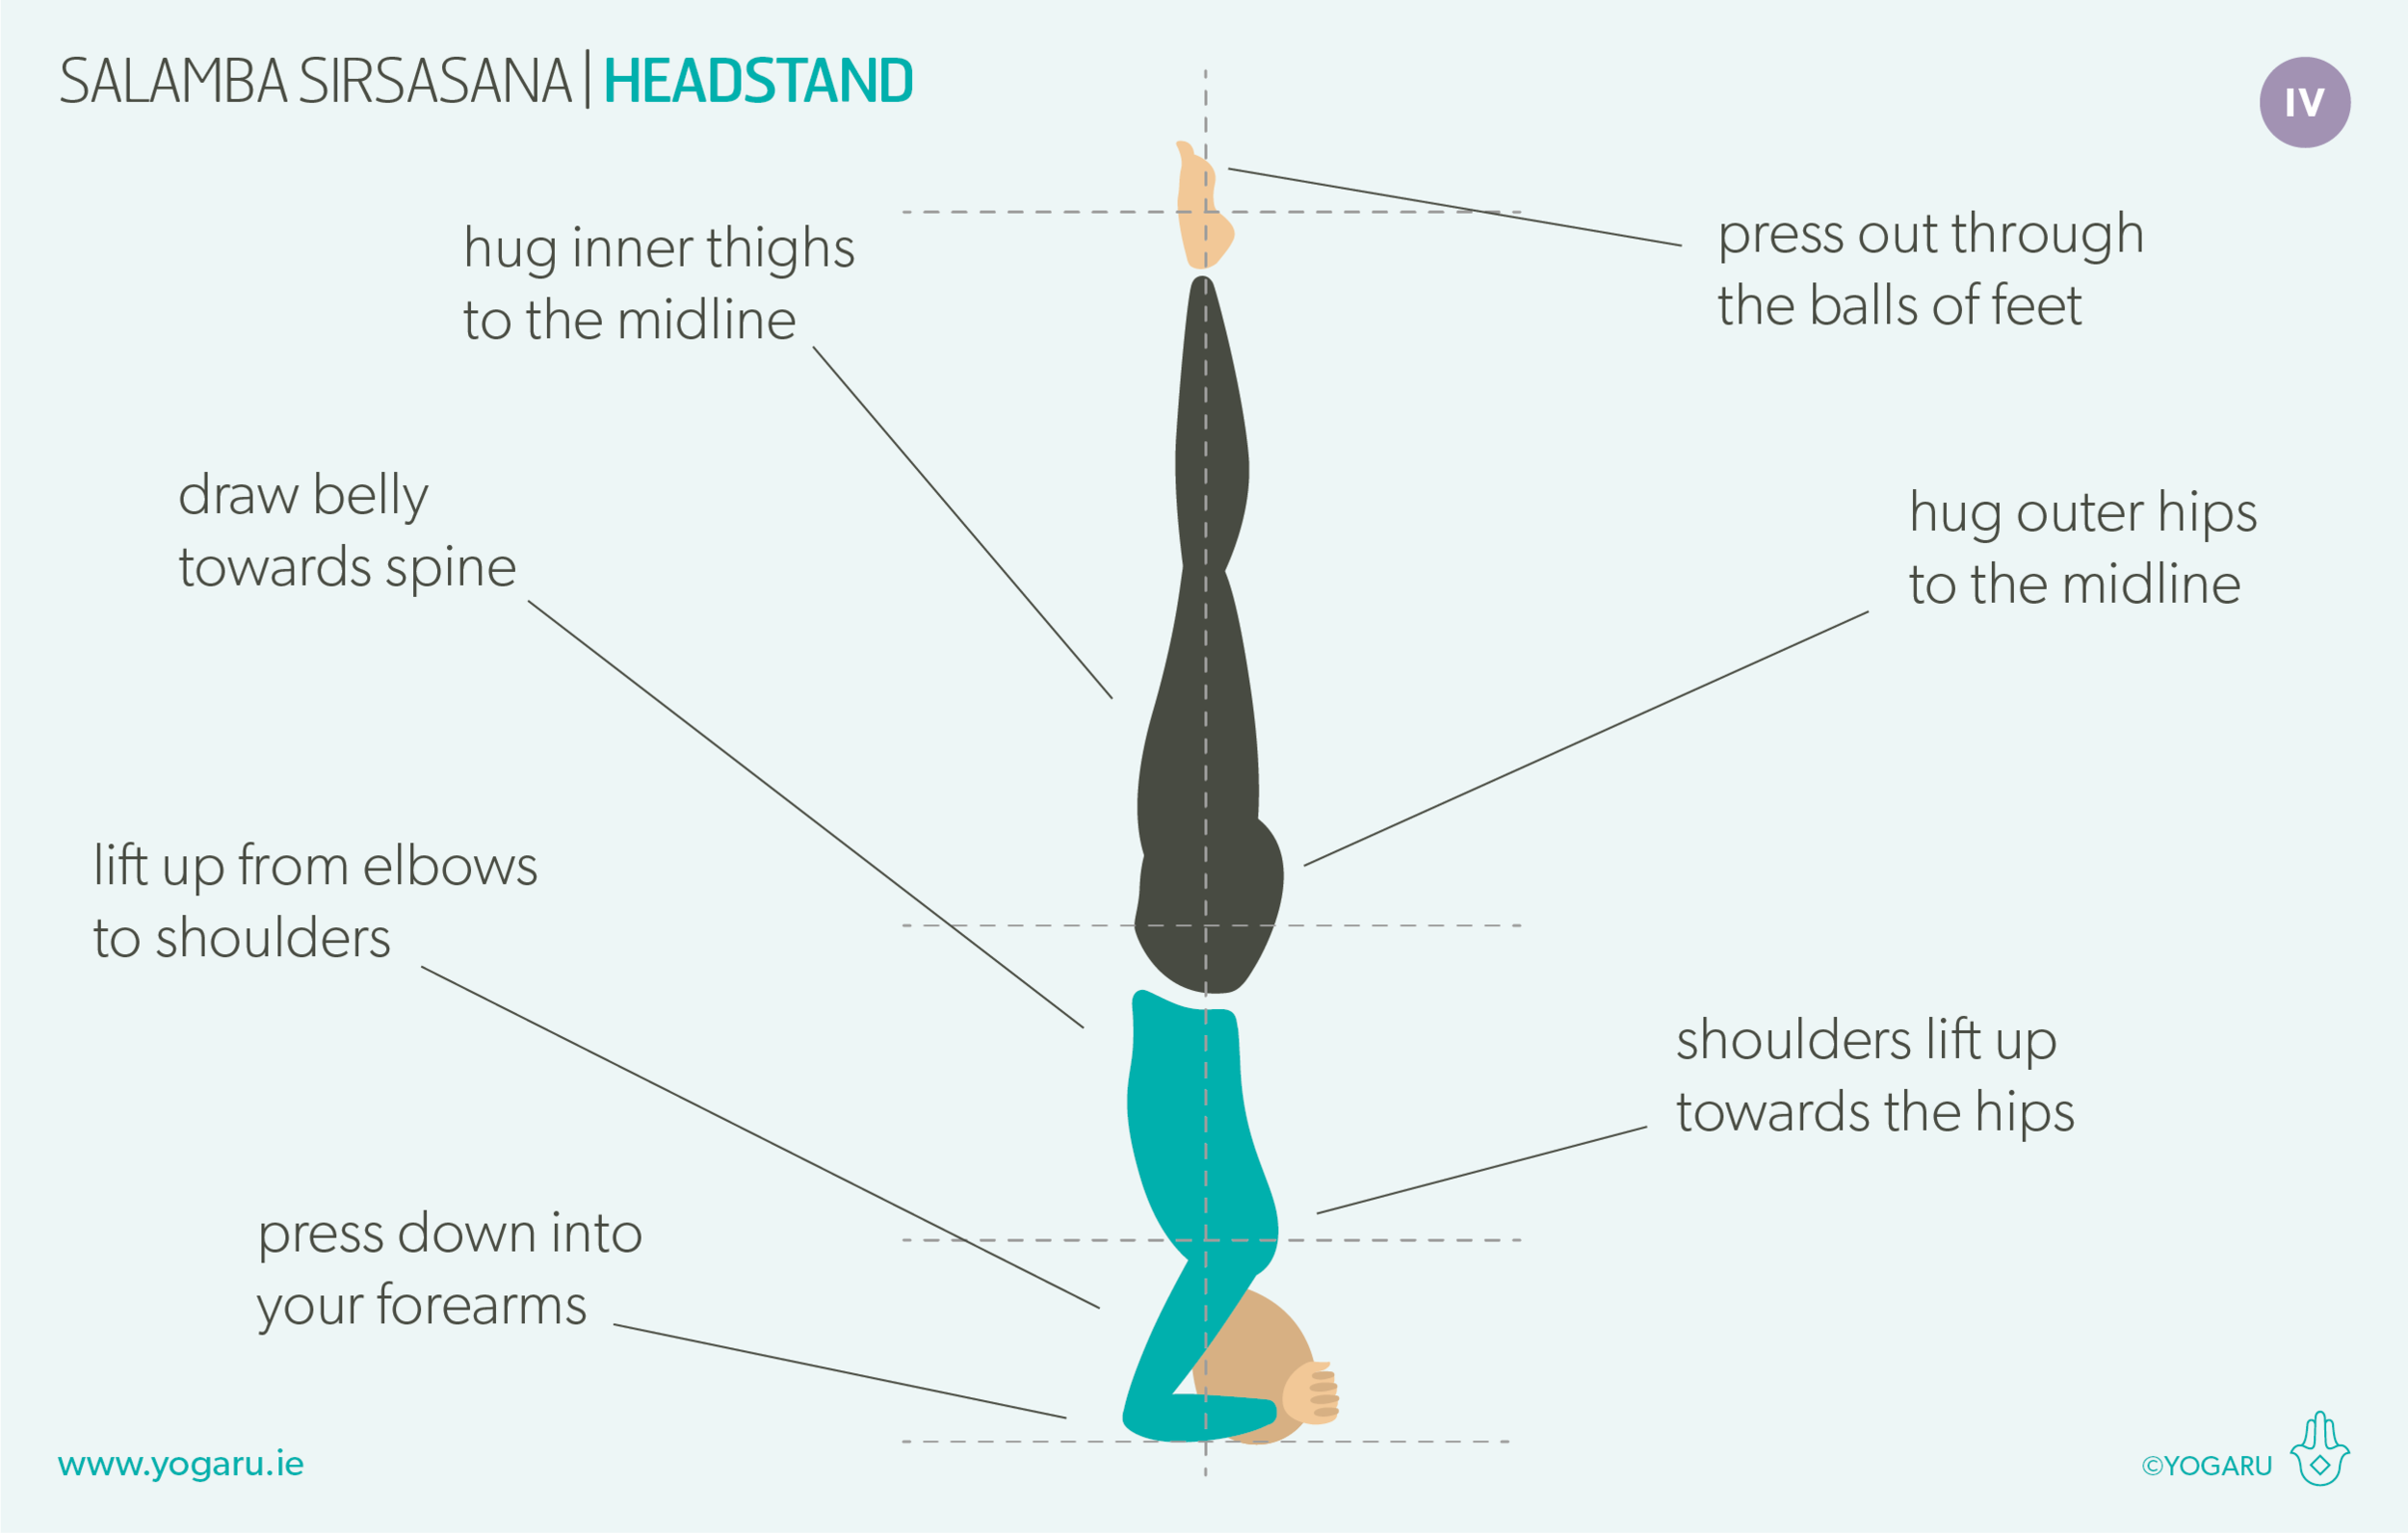
Proper prep and a well warmed up body is essential before you attempt a Salamba Sirsasana/Headstand. The neck wasn’t built for weight bearing, so strong shoulders and core are needed to assist in lifting some of the pressure off the top of the head. It can also help in your prep work to lengthen out the hamstrings at the back of the legs so you can walk your feet in towards your elbows when you are preparing to come into your Salamba Sirsasana/Headstand. Strong core engagement will protect your lower lumbar spine from ‘banana back’ and help you lift up through your shoulders too. You should feel the majority of your body weight through your forearms rather than your head and neck. If you are feeling excessive pressure on your head it would be advisable to revert to the ‘how to lift your legs up’ until you are more able to lift up through the shoulders.

ALIGNMENT CUES
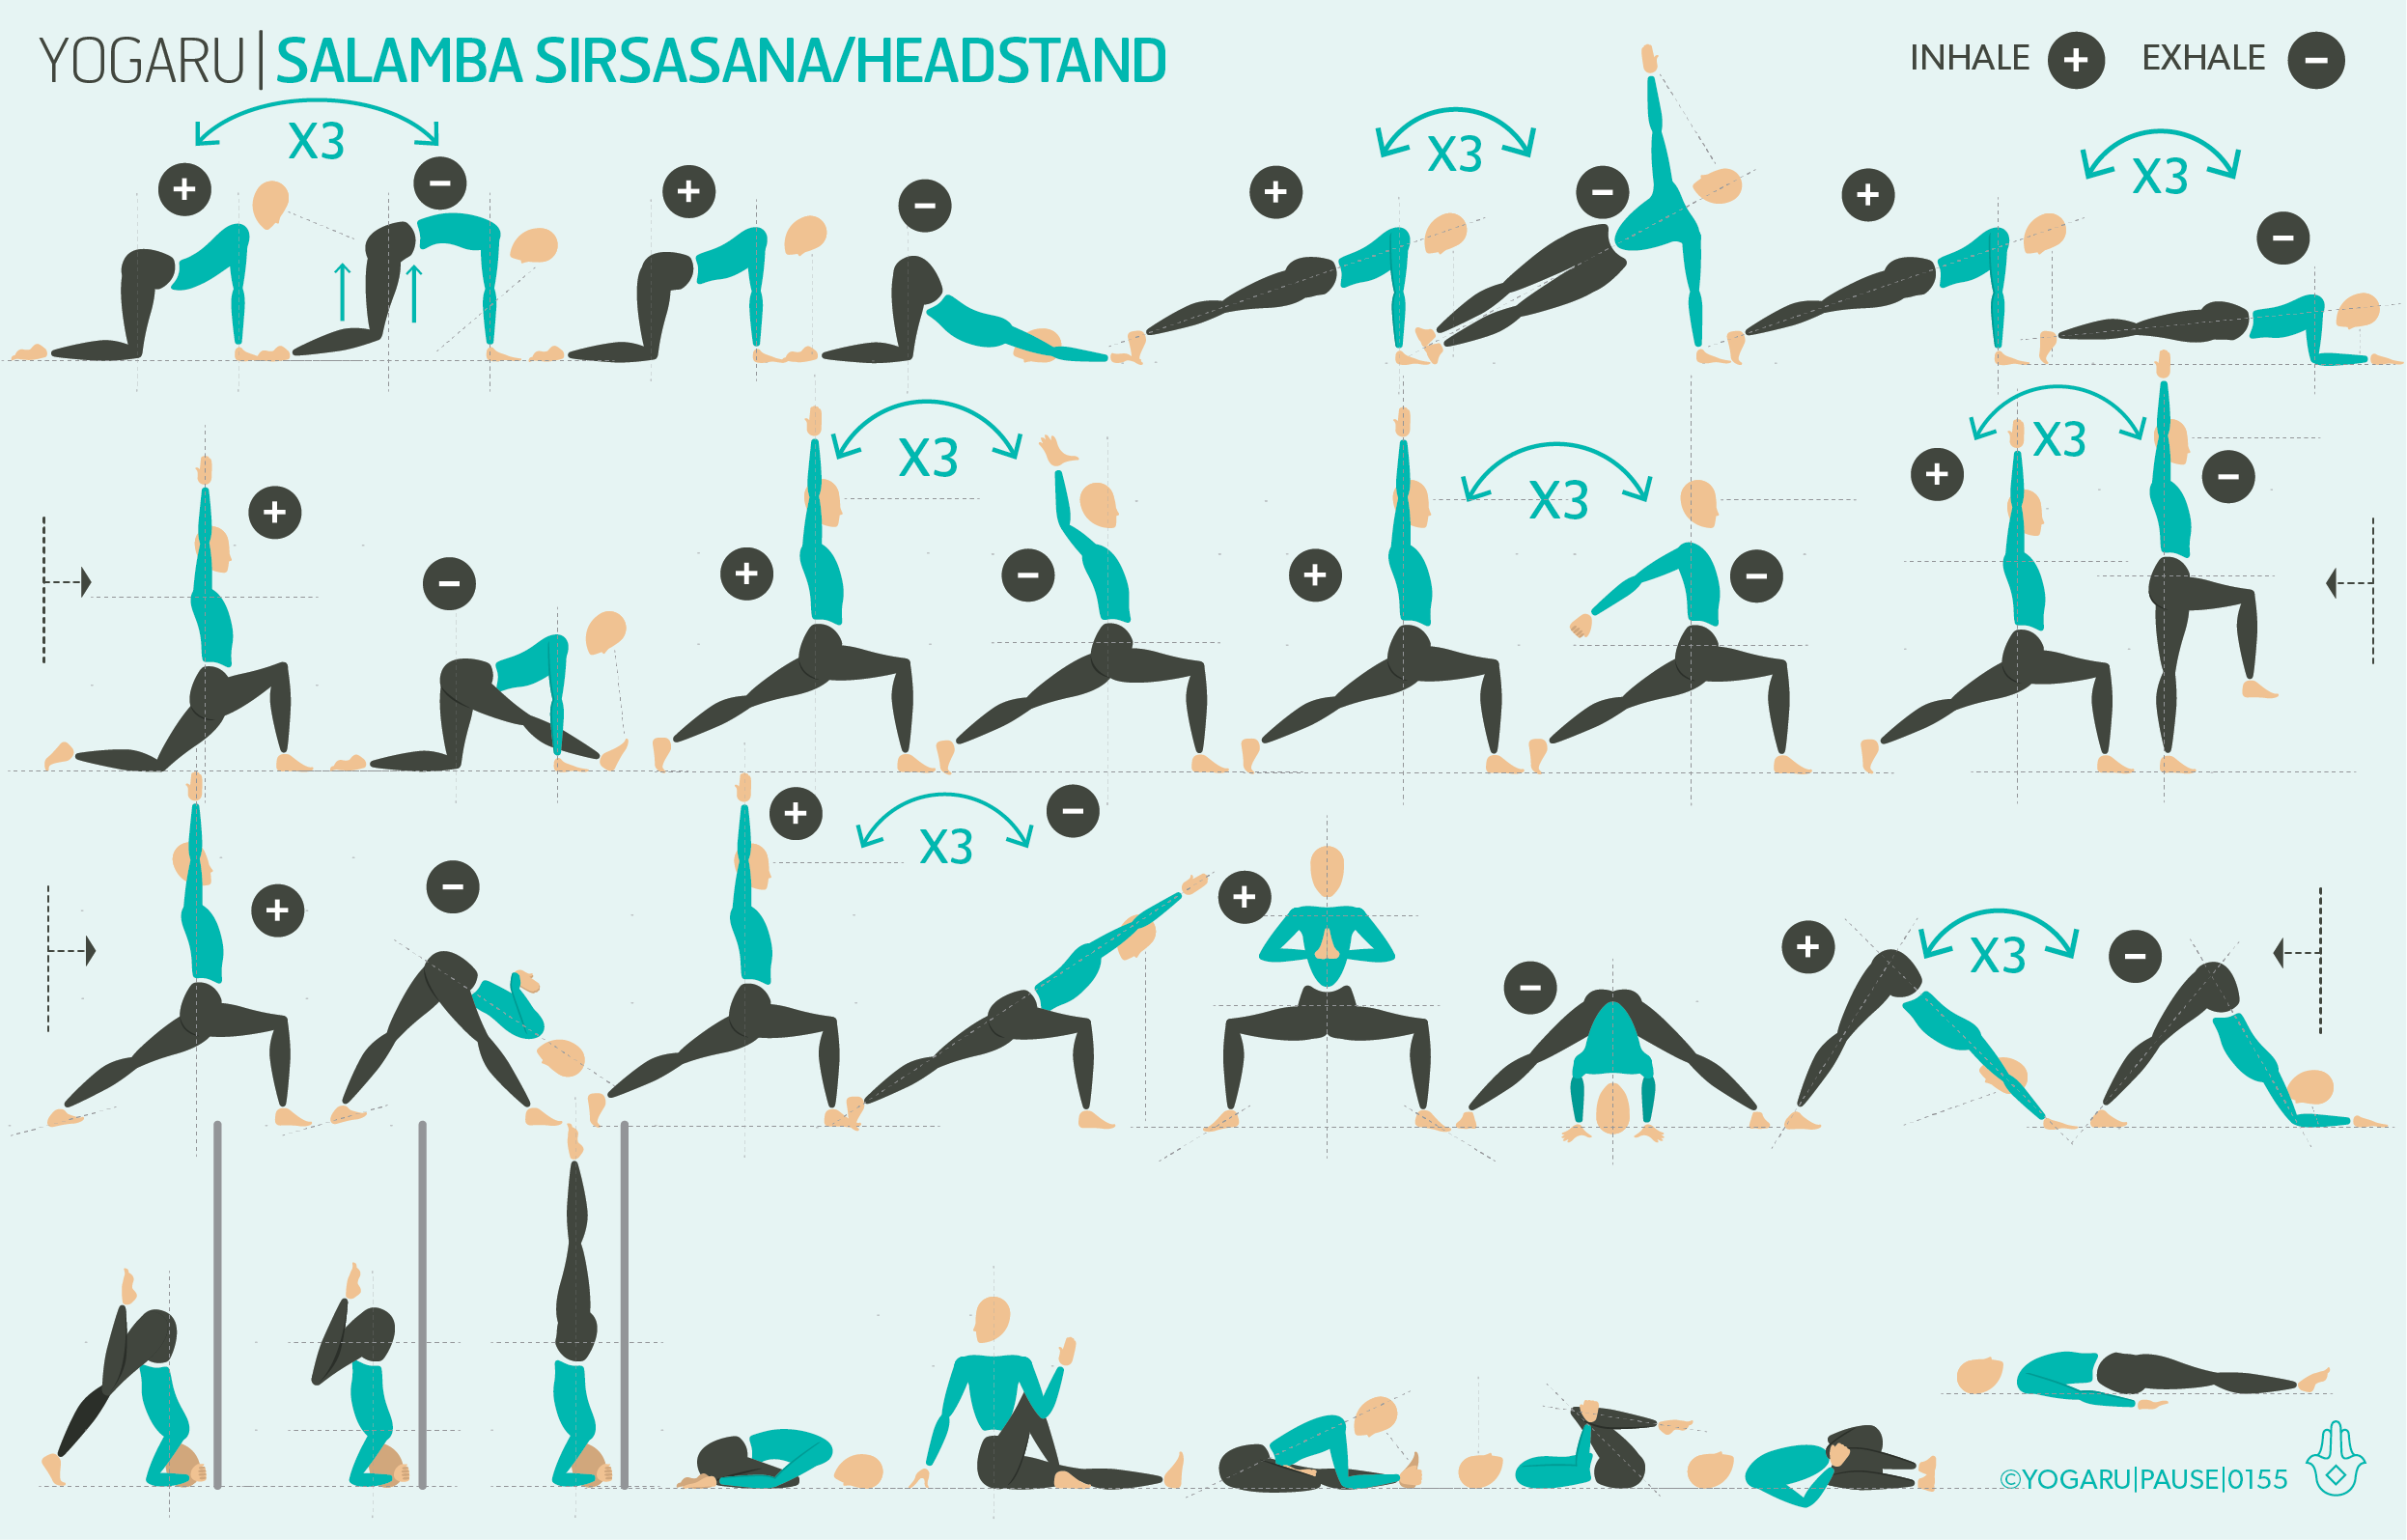
Throughout the sequence lengthen through the whole spine to find strength and build a steady focused practice. Move slowly through the whole flow and then you will be ready to move slowly and carefully for your Salamba Sirsasana/Headstand.

Have a read of the tips below and either print out the sequence or save it onto your device:

HOW TO LIFT YOUR LEGS UP FOR SALAMBA SIRSASANA/HEADSTAND
If you find it hard to get both legs up, work with these tips before you progress into full Salamba Sirsasana/Headstand.

  • Set your yoga mat up short end to the wall. From all fours place your elbows down directly under your shoulders and interlace your fingers. Place your knuckles about an inch away from the wall.

  • Place the crown of your head on the ground using the interlaced fingers as a support wall. Lift your knees up and walk your toes in towards your elbows until you find the support of the wall against your back. Stack your hips over your shoulders and draw your belly strongly towards your spine.

  • Press down into your forearms, lengthen up to your shoulders and hug your upper arms in. Lift your right leg up with a bent knee and draw it into your chest. Squeeze into the back of your knee and reach your toes towards your buttocks.

  • Stack your hips over your shoulders and draw your belly strongly towards your spine. On an exhale, slowly lift your left leg up with a bent knee and reach your toes towards your buttocks.

  • Practice coming up and down with your back supported by the wall until you are comfortable that you can lift without hopping, and you can take some of the weight out of your head with the support of your strong shoulders.

HOW TO USE A WALL FOR SALAMBA SIRSASANA/HEADSTAND
When you’re ready to move on to full Salamba Sirsasana/Headstand stay at the wall until you are very comfortable with balancing without the support of the wall.

  • Set your yoga mat up short end to the wall. From all fours place your elbows down directly under your shoulders and interlace your fingers. Place your knuckles about 5 inches from the wall.

  • Place the crown of your head on the ground using the interlaced fingers as a support wall. Lift your knees up and walk your toes in towards your elbows.

  • Press down into your forearms, lengthen up to your shoulders and hug your upper arms in. Lift your right leg up with a bent knee and draw it into your chest. Squeeze into the back of your knee and reach your toes towards your buttocks.

  • Stack your hips over your shoulders and draw your belly strongly towards your spine. On an exhale, slowly lift your left leg up with a bent knee and reach your toes towards your buttocks.

  • Slowly extend both legs up high using your core as brakes. Hug your outer hips and inner thighs to the midline, press out through the balls of your feet. BREATHE!

  • To come down, slowly bend your knees and lower your feet to the ground. Remember to counterpose your headstand with a few deep breaths in Child Pose.

TIPS
Below are some extra tips to help you along the way.

  • If you are not ready to fully weight bear in Salamba Sirsasana/Headstand practice this sequence and follow ‘How to lift your legs’ with single leg lifts until you get used to carrying extra weight in your head and neck.

  • To work on strengthening your core work on lowering your legs from full Salamba Sirsasana/Headstand as slow as you can all the way down to the ground with knees bent. Sounds easy but very hard to hold the legs steady on the descent!

  • If you are working on your Salamba Sirsasana/Headstand, take advantage of a well warmed up body at the end of class and ask your teacher if you can practice just before they guide the class in Savasana.

  • If you are new to Salamba Sirsasana/Headstand practice with the guidance of a yoga teacher before you incorporate them into a home practice.

  • Avoid practicing Salamba Sirsasana/Headstand if you have a back injury, neck injury, shoulder injury, high blood pressure, glaucoma, sinus infection or it’s your time of the month.

To save the images for personal use click and hold down the image until the ‘save image’ option appears; on Mac hold down ‘control’ and click the image to get the option box; on PC right click on the image to get the option box. Scroll down in the ‘option box’ and click ‘save image’.
Ruth Delahunty Yogaru