Pose breakdowns

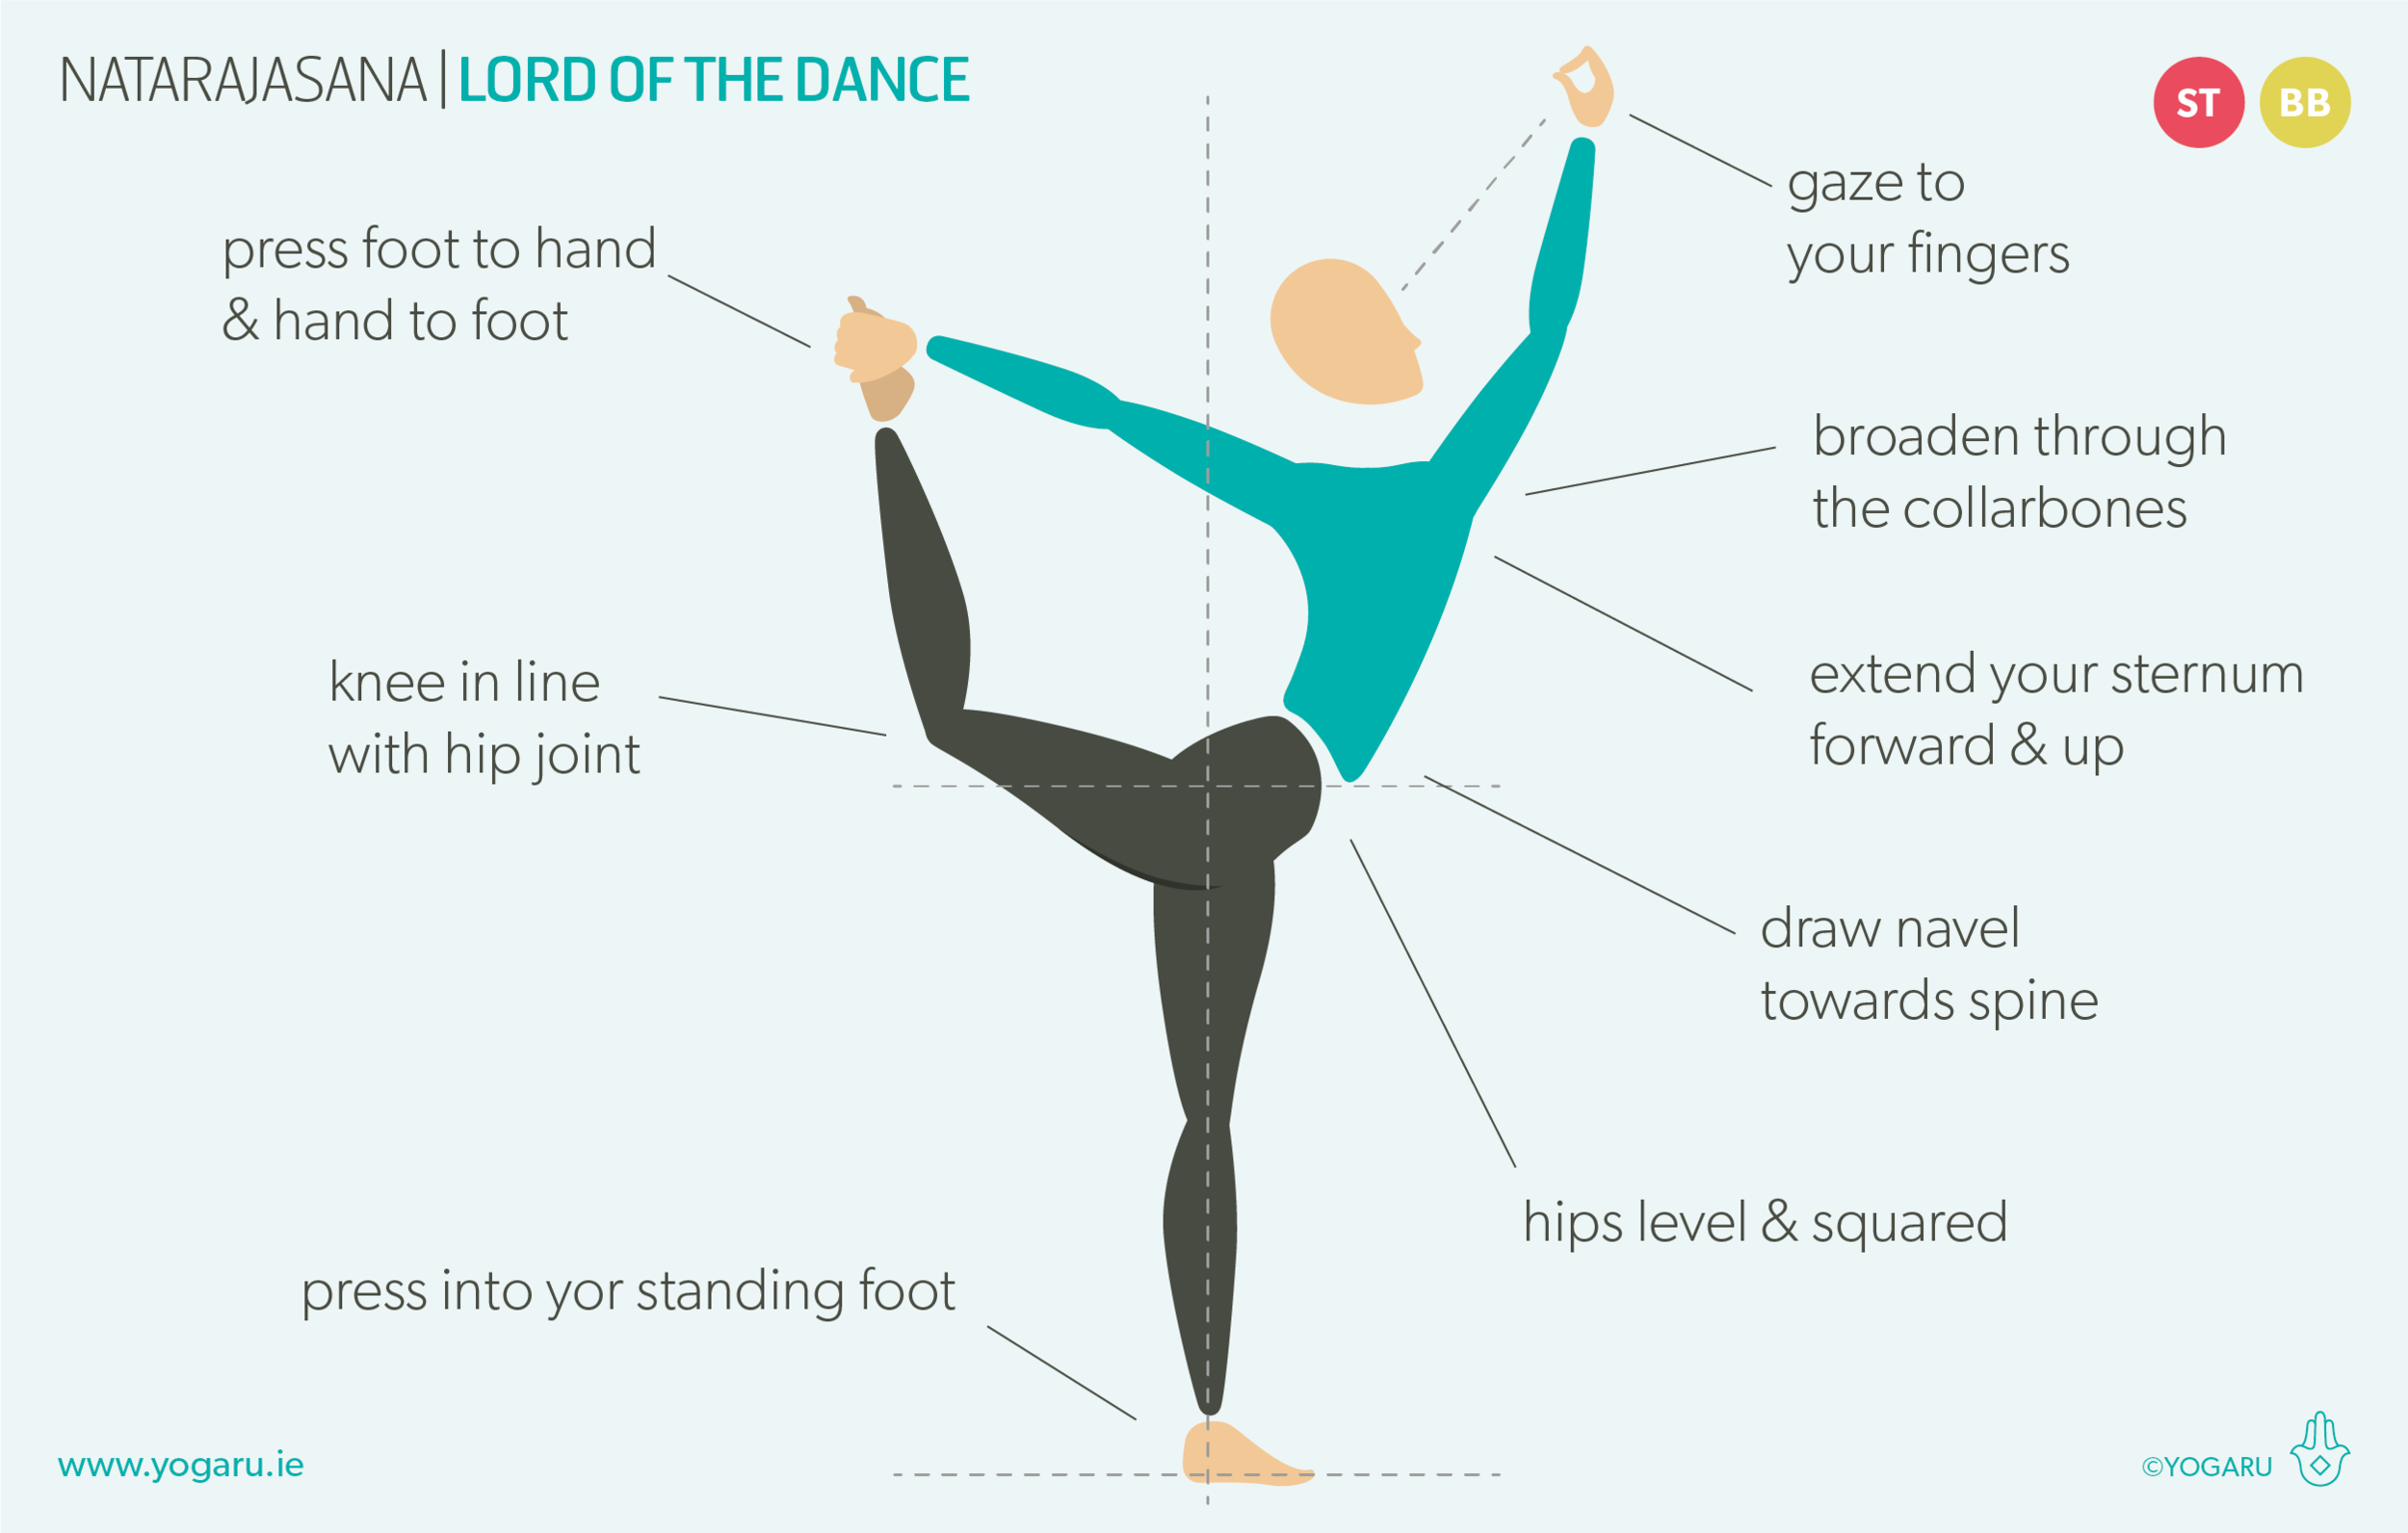
Natarajasana - Lord of the Dance

YOGARU_Natarajasana_PB.png

FOCUSED STRESS RELIEF
Natarajasana/Lord of the Dance is named after the third god of the Hindu trinity Nataraja who performed a dance to restore the cosmic balance of the universe. Similar to our last pose of the month Hanumanasana/Monkey or Splits it is a hip opener and eases tension in the hip flexors of the lifted leg. A muscle that can get very tight on runners, cyclists and those who sit for extended periods of time. It is also a muscle that can get very tense when you are feeling stressed or anxious. Extending this region of the body sends signals to the brain to release physical and emotional tension and help relieve stress.

The pose also requires focus to stand on one leg which also works as a distraction from a racing mind. The muscular activity of standing, and lifting the leg back, stimulates circulation through the whole body. The combination of the focused effort and increase in circulation is very energising and uplifting. You also get a lovely heart opening stretch through the chest which not only improves shoulder posture but helps to lift your spirits.

THE BENEFITS OF NATARAJASANA/LORD OF THE DANCE
Natarajasana/Lord of the Dance is an advanced balancing pose. It is also a standing backbend pose that requires equal amounts of strength and flexibility. It strengthens the spine and legs; tones the abdominal organs; and stretches the chest, hips and quads of the lifted leg. It is a great pose to add in if you are working with your proprioception and everyday balance. With the leg reaching back you need to focus your attention on finding your centre of gravity.

EXPLORING NATARAJASANA/LORD OF THE DANCE IN YOUR PRACTICE
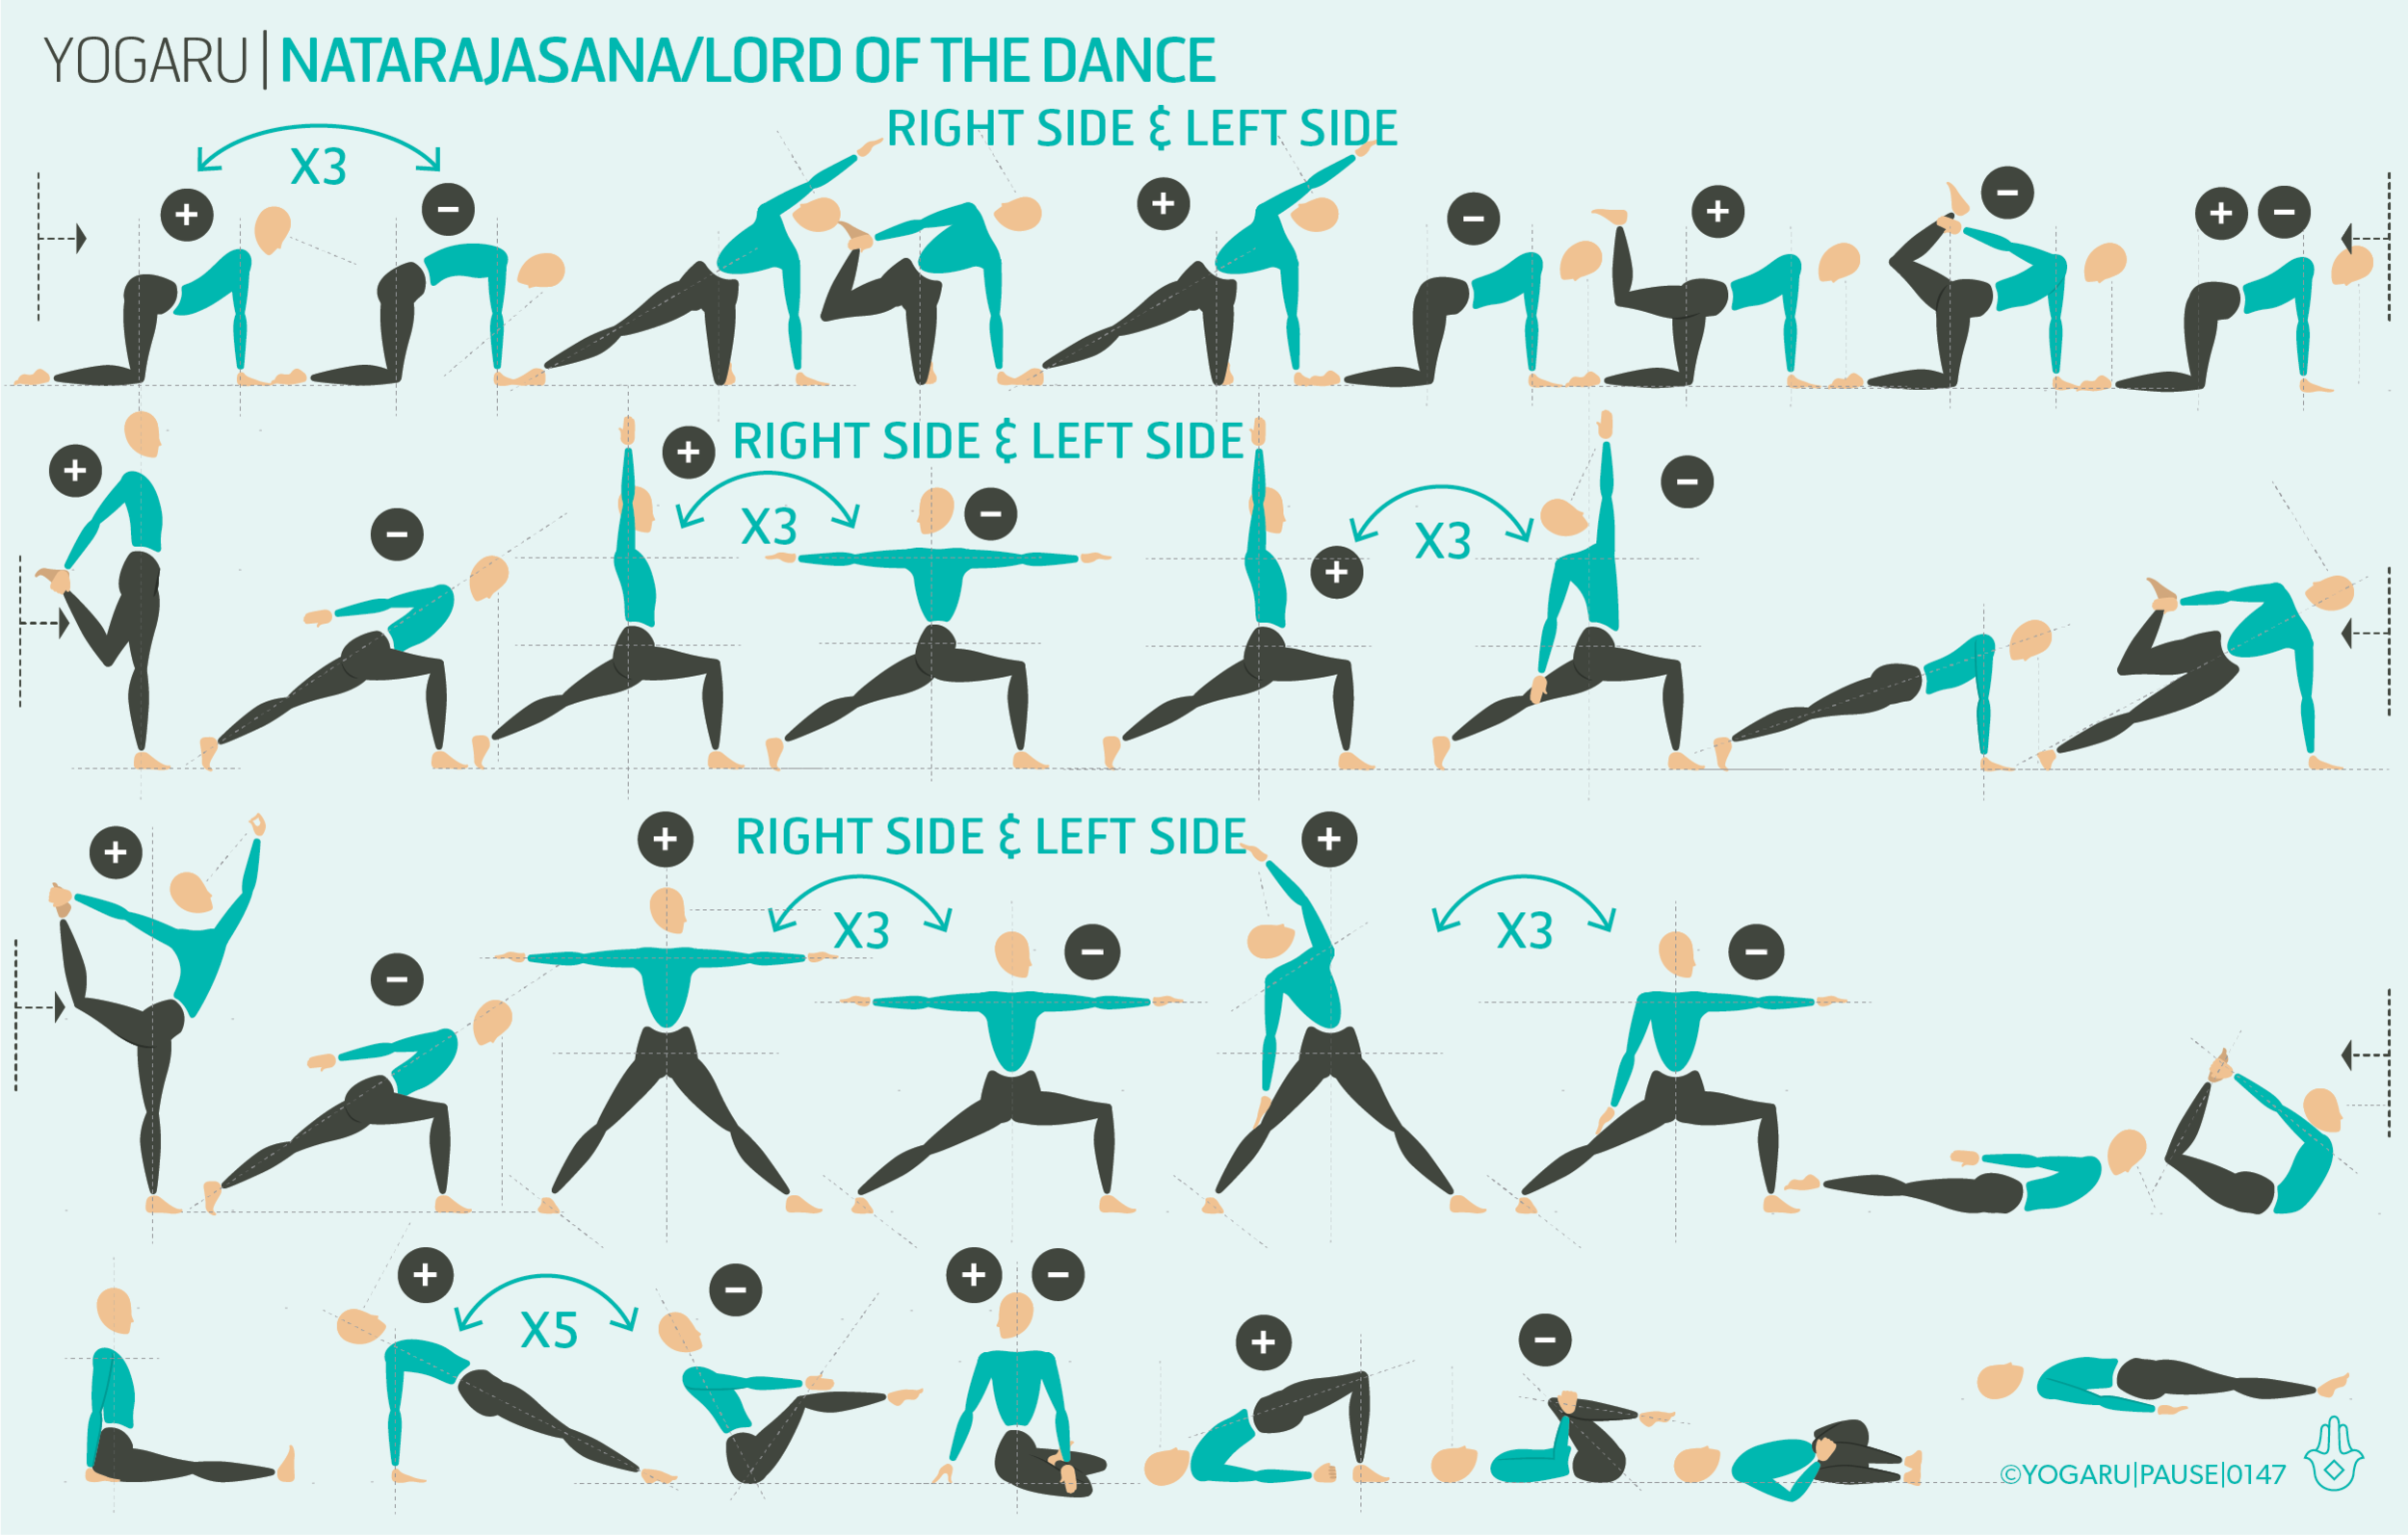
This sequence kicks straight in with a targeted warm up which will start to open up the hip flexors and prepare the shoulders for arm flexion. The warm up is followed by two standing flows. The first one starts with a quad stretch and will get your standing leg warmed up and ready for your peak pose. It also prepares the back with a gentle extended arm backbend. The second standing flow starts with your peak pose and is followed by a series of Warrior II style flows to enjoy the opening created in the chest area and spine.

The standing sequence ends with two backbends. You can repeat Salabhasana/Locust if Dhanurasana/Bow is not part of your practice. You then transition into your cool down which opens the chest and closes it, twists the spine as a lovely counterpose to the backbend and finally Salabhasana.

PAUSE_0147.png

ALIGNMENT CUES
You can choose to flow through this sequence and pause in each pose or you can use the breath cues to link the poses and flow with your breath.

Have a read of the tips below and either print out the sequence or save it onto your device:

  • From Tadasana, hands on hips, inhale, pour your weight into your left foot, bend your right leg back and lift your heel up towards your right buttocks.

  • Reach your right hand back and hold onto the outside of your right foot, lift your right foot up and back, press your foot into your hand and your hand against your foot, hips level and squared forward, right knee in line with right hip.

  • Extend your sternum forward and up, broaden through the collarbones, shoulders level.

  • Reach your left arm up high, press your thumb and forefinger together, gaze to the fingers of your left hand.

To save the images for personal use click and hold down the image until the ‘save image’ option appears; on Mac hold down ‘control’ and click the image to get the option box; on PC right click on the image to get the option box. Scroll down in the ‘option box’ and click ‘save image’.

Ruth Delahunty Yogaru

Hanumanasana - Monkey or Splits

GOD OF MONKEYS
Splits, or ‘monkey pose’ named after the God of Monkeys Hanuman, is a very challenging pose for most of us – especially if you are a runner, cyclist, or a gym goer. It falls into the ‘hip opener’ category, and stretches the hamstrings in the front leg, and the hip flexors of the back leg. Hip openers are one of those poses that definitely have a feel good factor. They are the most requested poses in a yoga class, and are known for releasing stress, tension and anxiety – physically and emotionally. The psoas (one of the hip flexor muscles) is linked with the ‘fight or flight’ response. When this muscle is tight the fight or flight response is constantly being triggered – leaving you feeling stressed, anxious and exhausted. When it is stretched it stimulates the opposite reaction – the ‘rest, restore and digest’ response. Which is why you feel a calm and happy demeanor after a good hip opening class.

Hanumanasana/Monkey or Splits also help you with your transition into Adho Mukha Vrksasana/Handstand. Handstands are all about getting your hips stacked over your shoulders – the more open your hamstring are, the higher you can lift your top leg, the easier it is to hop up into handstand. This sequence would be a good prep if you are working on your Adho Mukha Vrksasana/Handstand.

Hanumanasana/Monkey or Splits challenge your ego and teach you (sometimes the hard way!) to listen to the messages from your muscles, and respect your limitations. The hamstrings and hip flexors are big muscles and need time to release. Move slowly and take extra time in the prep poses, breathe deeply and let the muscle dictate when it is time to progress. It is a pose that should be approached with care and an ability to tap into feedback from the stretching muscles. The hamstrings in particular are prone to overstretch injuries and an over enthusiastic Hanumanasana/Monkey or Splits can leave you with an overstretch injury for upto 6 to 8 weeks or longer.

THE BENEFITS OF HANUMANASANA/SPLITS OR MONKEY
Hanumanasana/Monkey or Splits is a deep hip opener. It stretches the hamstrings, hip flexors, inner groins and glutes. It counteracts tight hips and the effects of sitting for long periods of time and helps the hips move freer and assists with mobility in everyday activities. It is also a lovely grounding pose, helps balance the nervous system and eases stress, tension and anxiety.

EXPLORING HANUMANASANA/SPLITS OR MONKEY IN YOUR PRACTICE
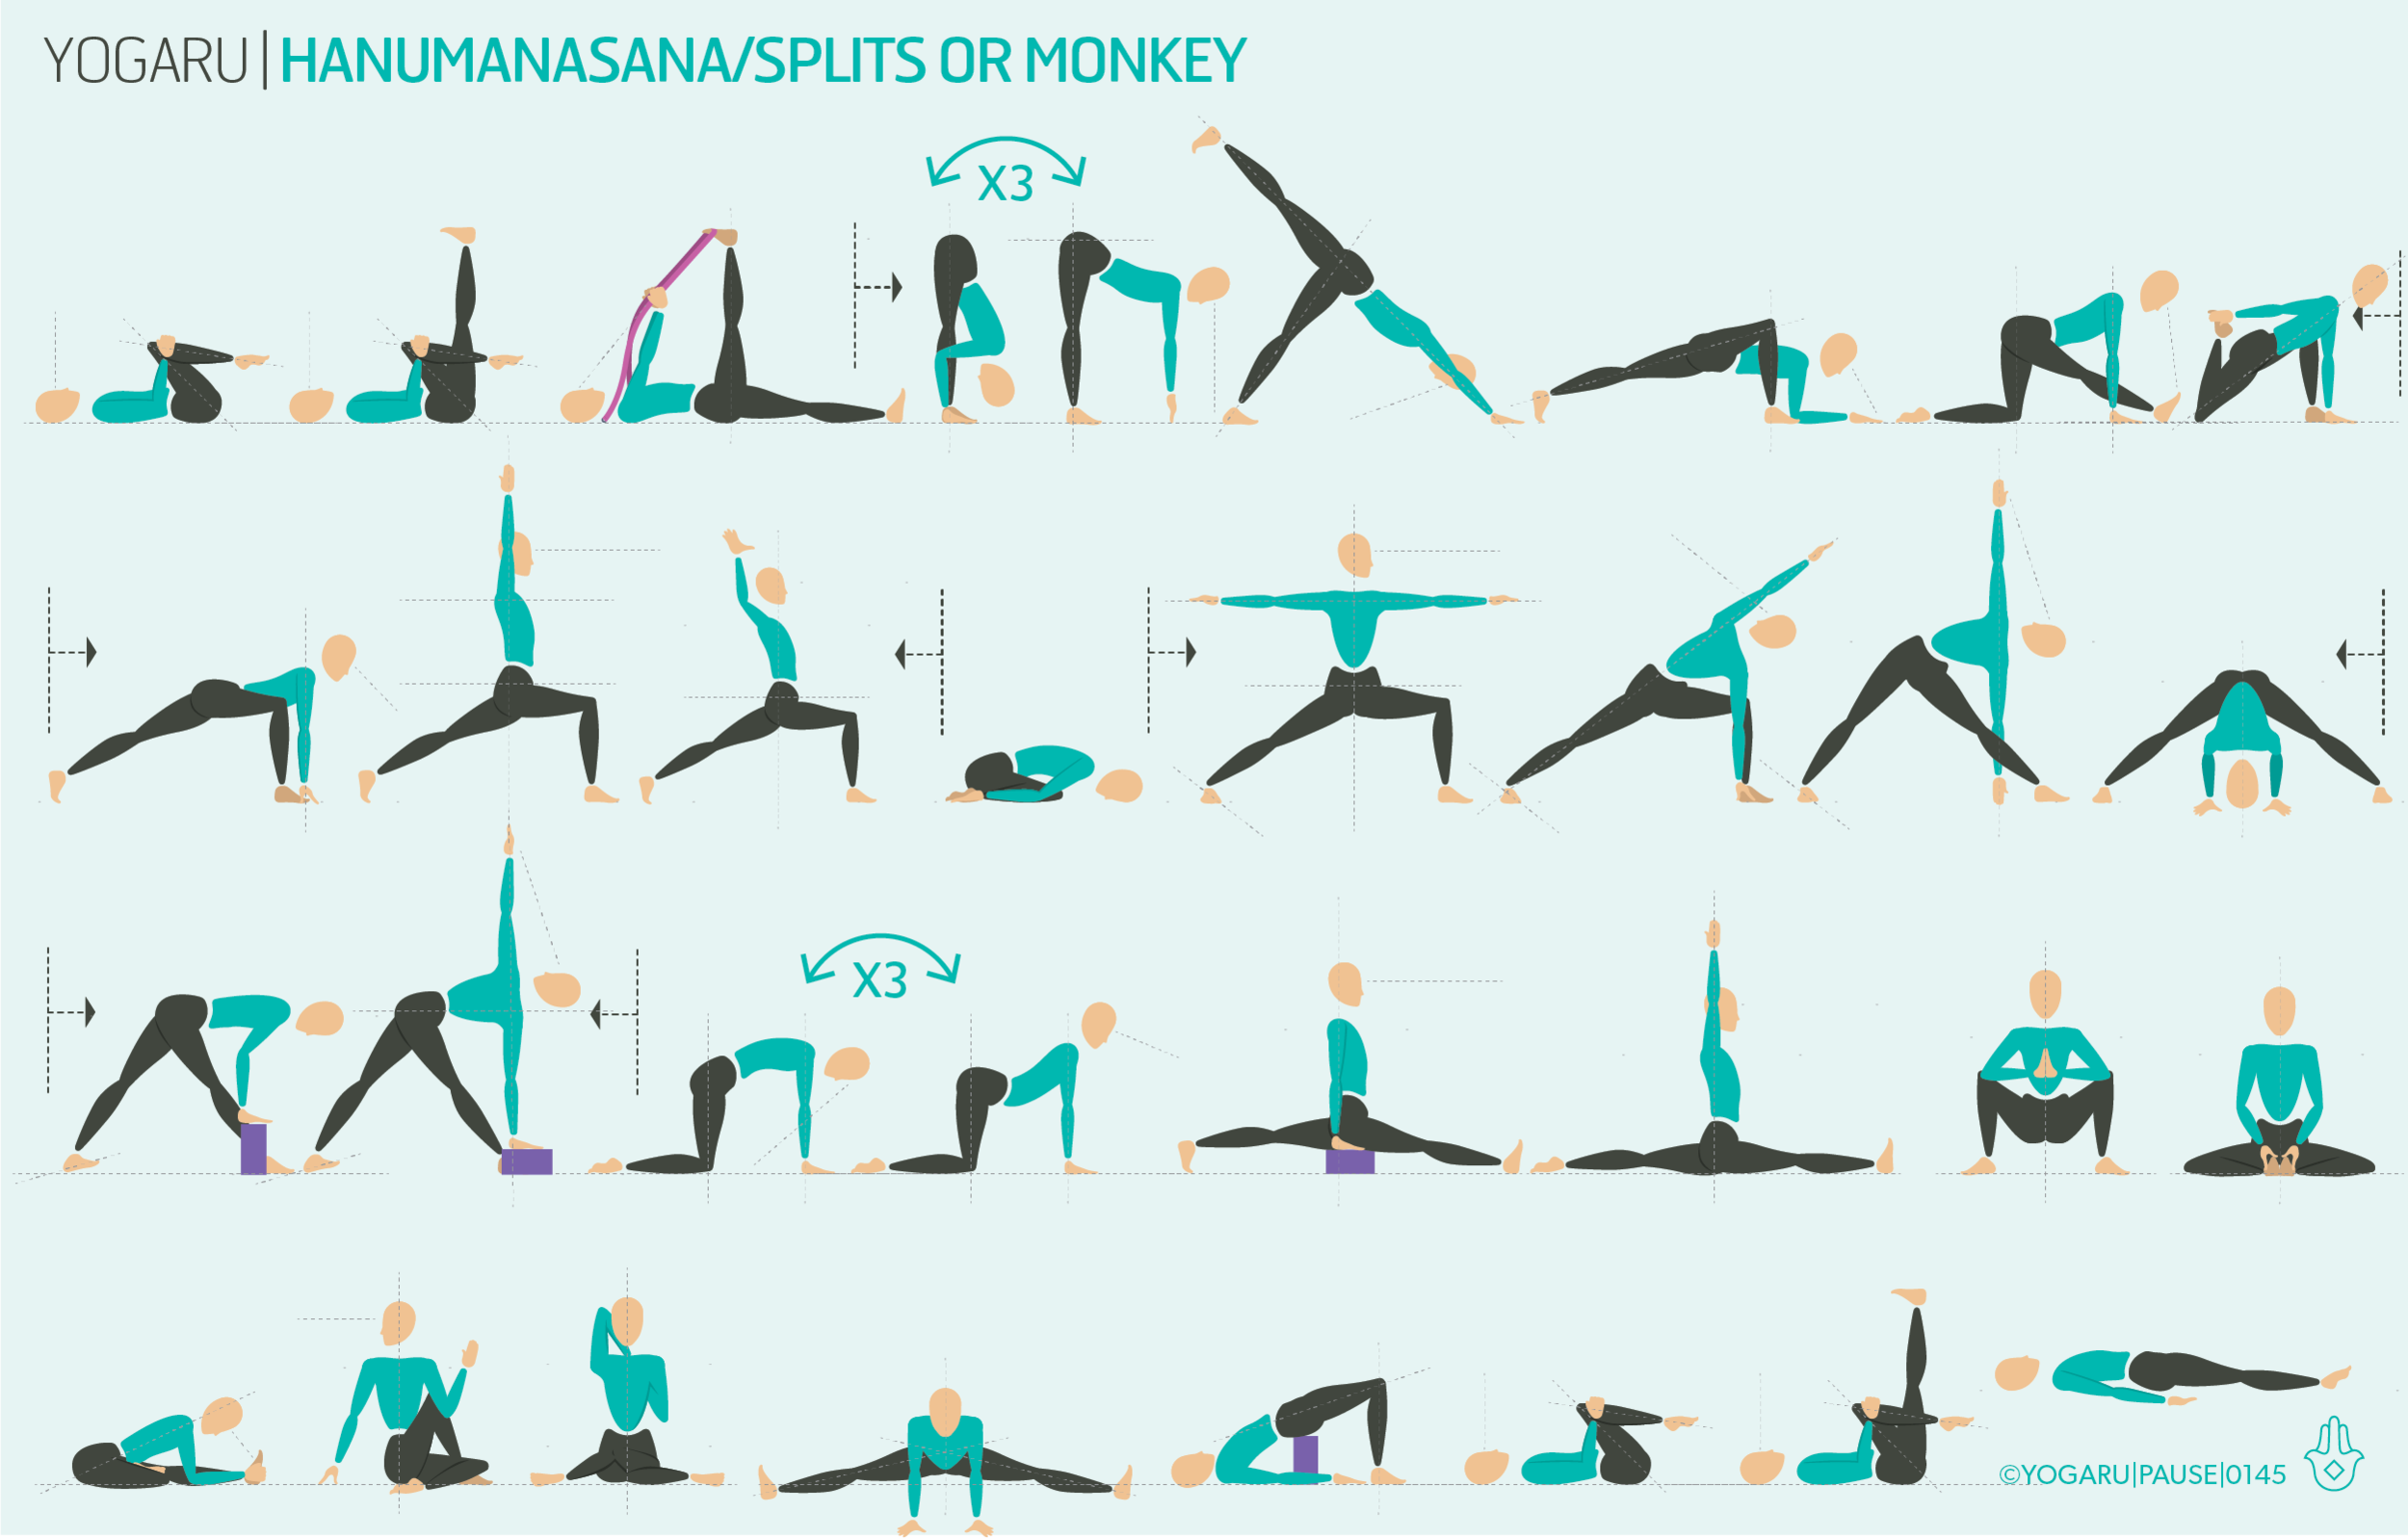
This sequence will gradually warm up your hamstrings and hip flexors. You will have plenty of opportunities to ease them open, so very gently at the start with the supine leg stretch. Move slowly and carefully to ensure you do not overstretch the hamstrings. The best lesson to learn as a yogi is the difference between an opening stretch and a pinchy stretch, which can be an indication of an overstretching muscle.

If your hips are quite high up when you come into Hanumanasana/Monkey or Splits place a bolster, or some cushions, under your pelvis to help support you in the pose. If your hips still don't reach the bolster comfortably, push the bolster further down your front leg, just under your thigh which will support you from the front leg. If you don’t quite need this amount of lift, use a brick or a rolled up blanket under your pelvis for support, as illustrated in the sequence.

Place your hands on bricks, or piles of books, either side of your hips to help you keep your chest open and your hips squared to the front on your mat. Focus on keeping the hips level rather than getting your hips to the ground.

If your hamstrings are not comfortable in any of the above versions, have a look at my Instagram post for some different versions of Hanumanasana/Monkey or Splits.

PAUSE_0145.png

ALIGNMENT CUES
This is definitely a sequence to link your breath with your movement. Pause in the poses where you feel the hips opening and use the inhale to retract slightly from the pose and the exhale to soften into your comfortable range of movement.

Have a read of the tips below and either print out the sequence or save it onto your device:

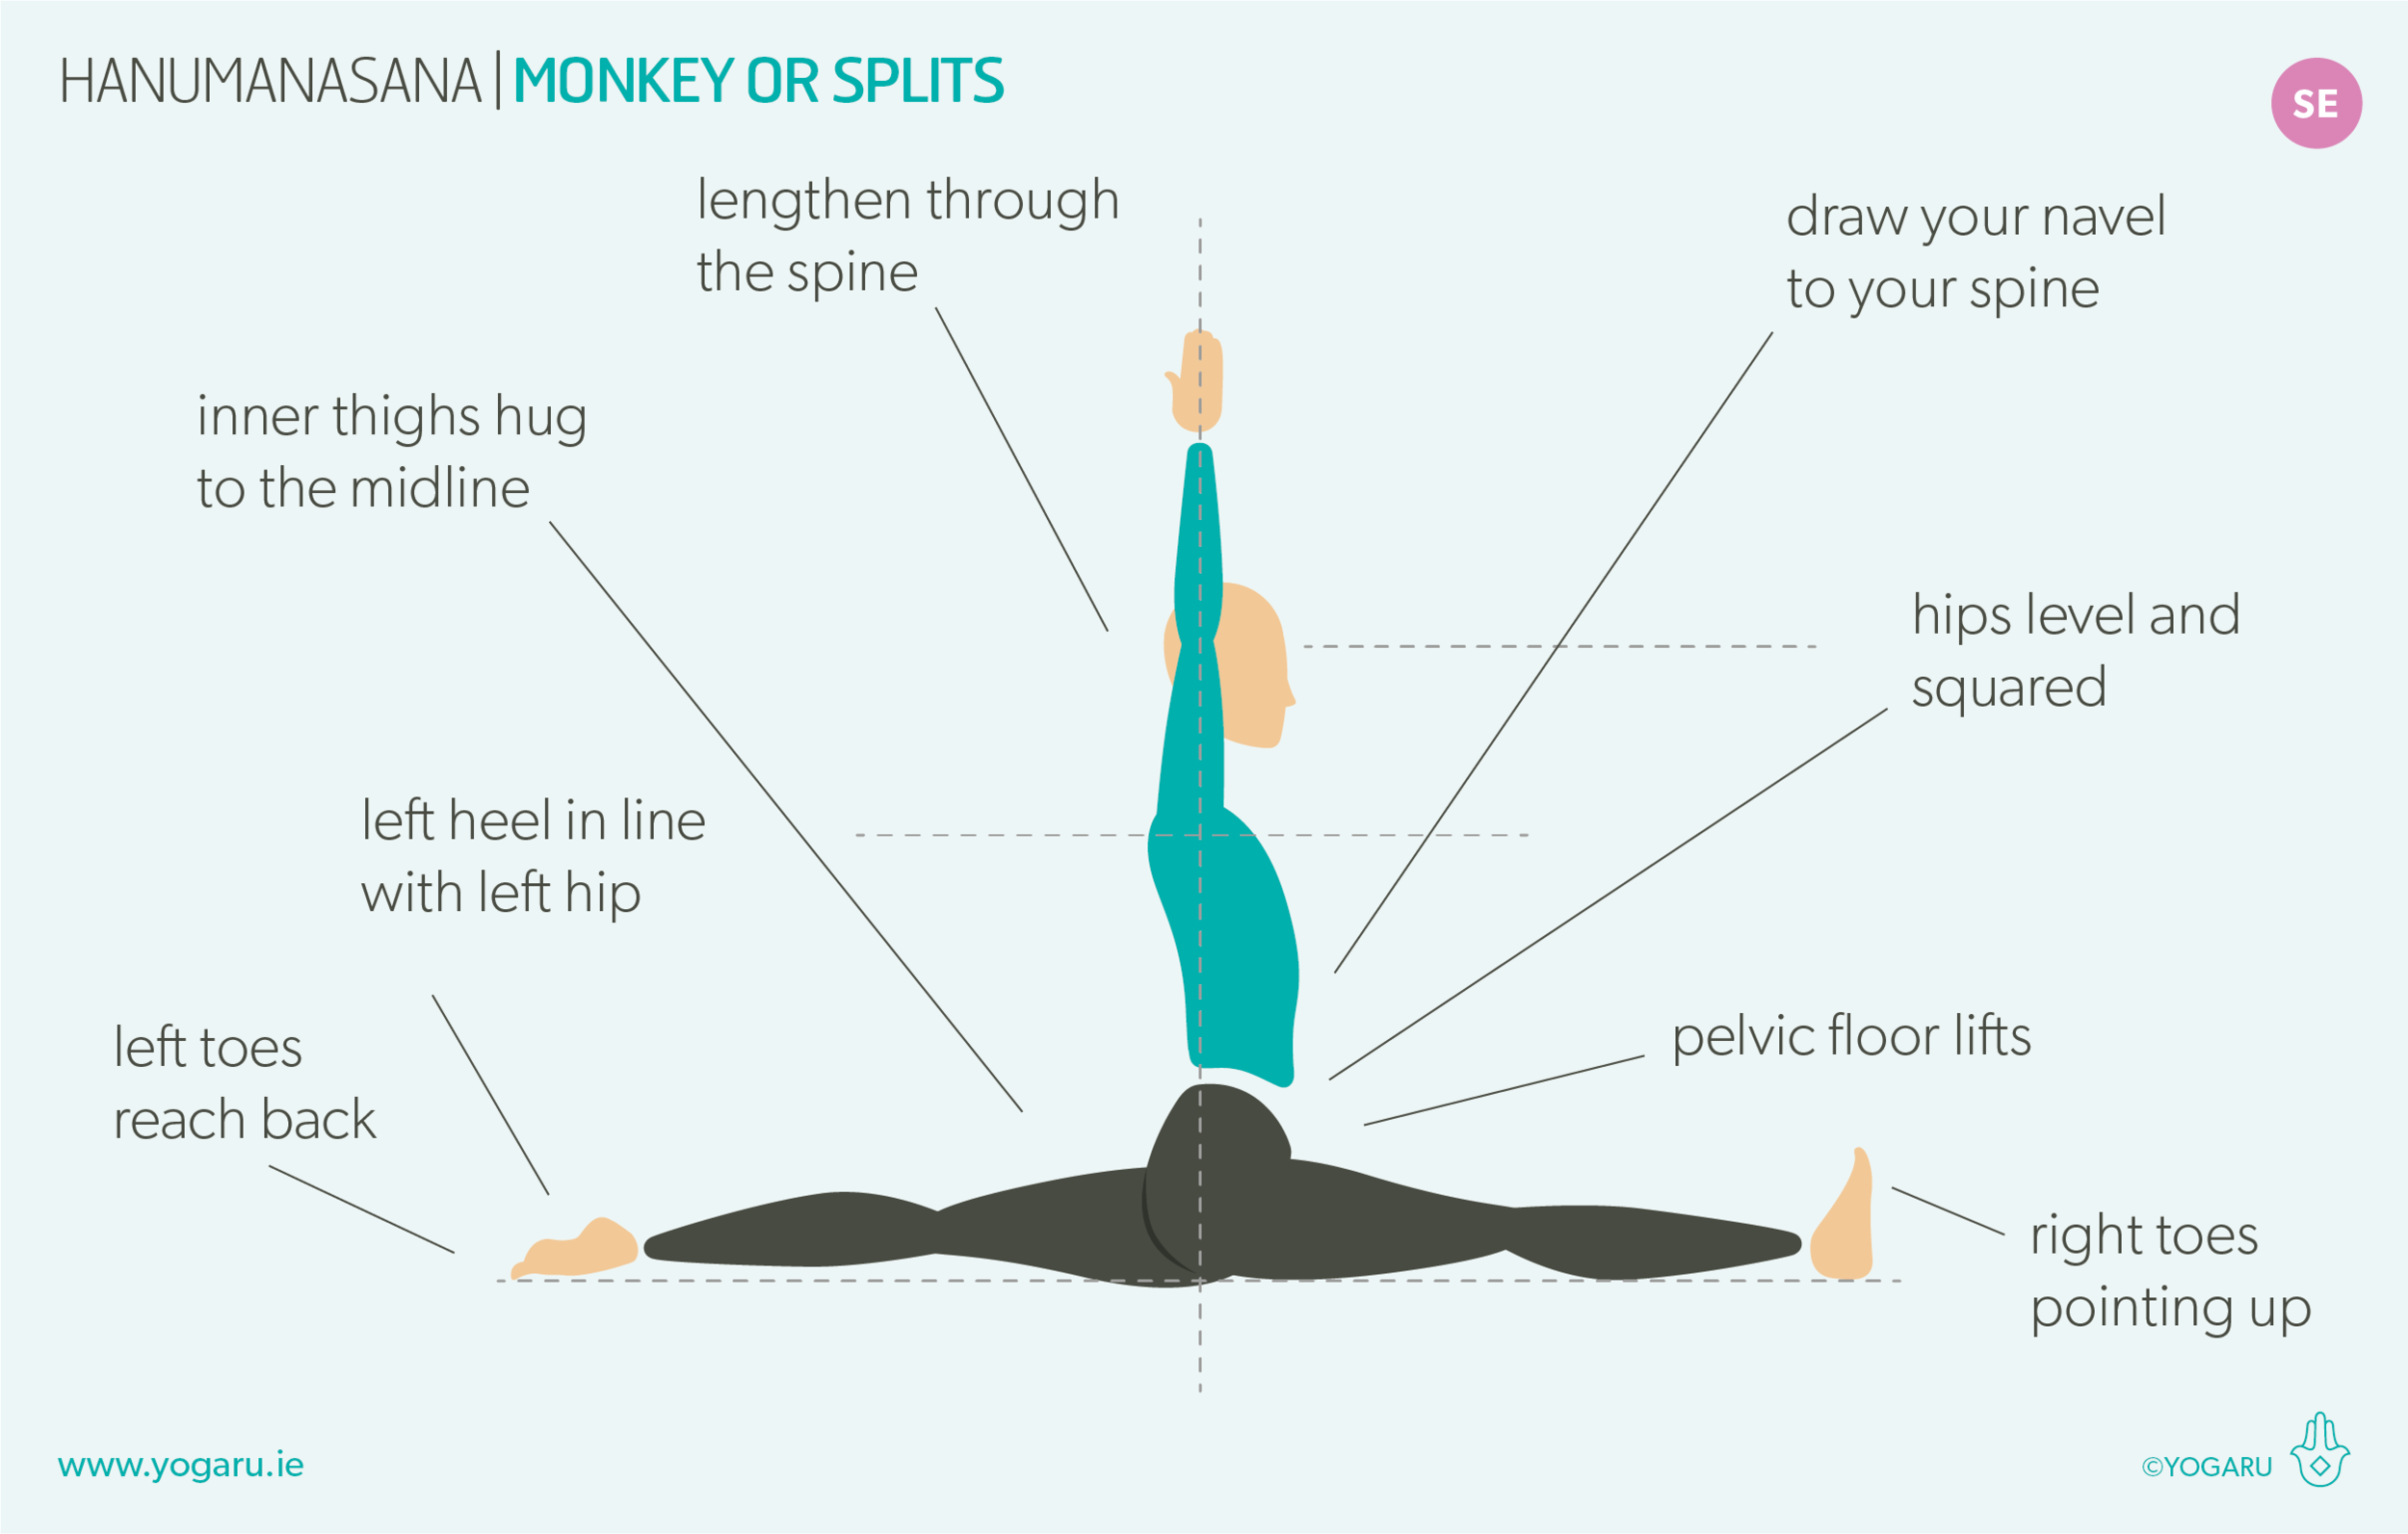
  • From Anjaneyasana, place your hands on bricks, or the ground, either side of your hips, gradually straighten your right leg, slide your heel forward along the ground.

  • At the same time slide your left leg back, reach the top of the foot back along the ground.

  • Keep your hips level and squared as you dip your hips down, working towards your pelvis sitting on the ground.

  • Hug your inner thighs and hips to the midline. Right toes pointing up, left heel in line with your left hip joint.

  • Lengthen through the spine. If your hips are grounded, reach your arms up high, gaze forward.

To save the images for personal use click and hold down the image until the ‘save image’ option appears; on Mac hold down ‘control’ and click the image to get the option box; on PC right click on the image to get the option box. Scroll down in the ‘option box’ and click ‘save image’.
Ruth Delahunty Yogaru

Vasisthasana - Side Plank

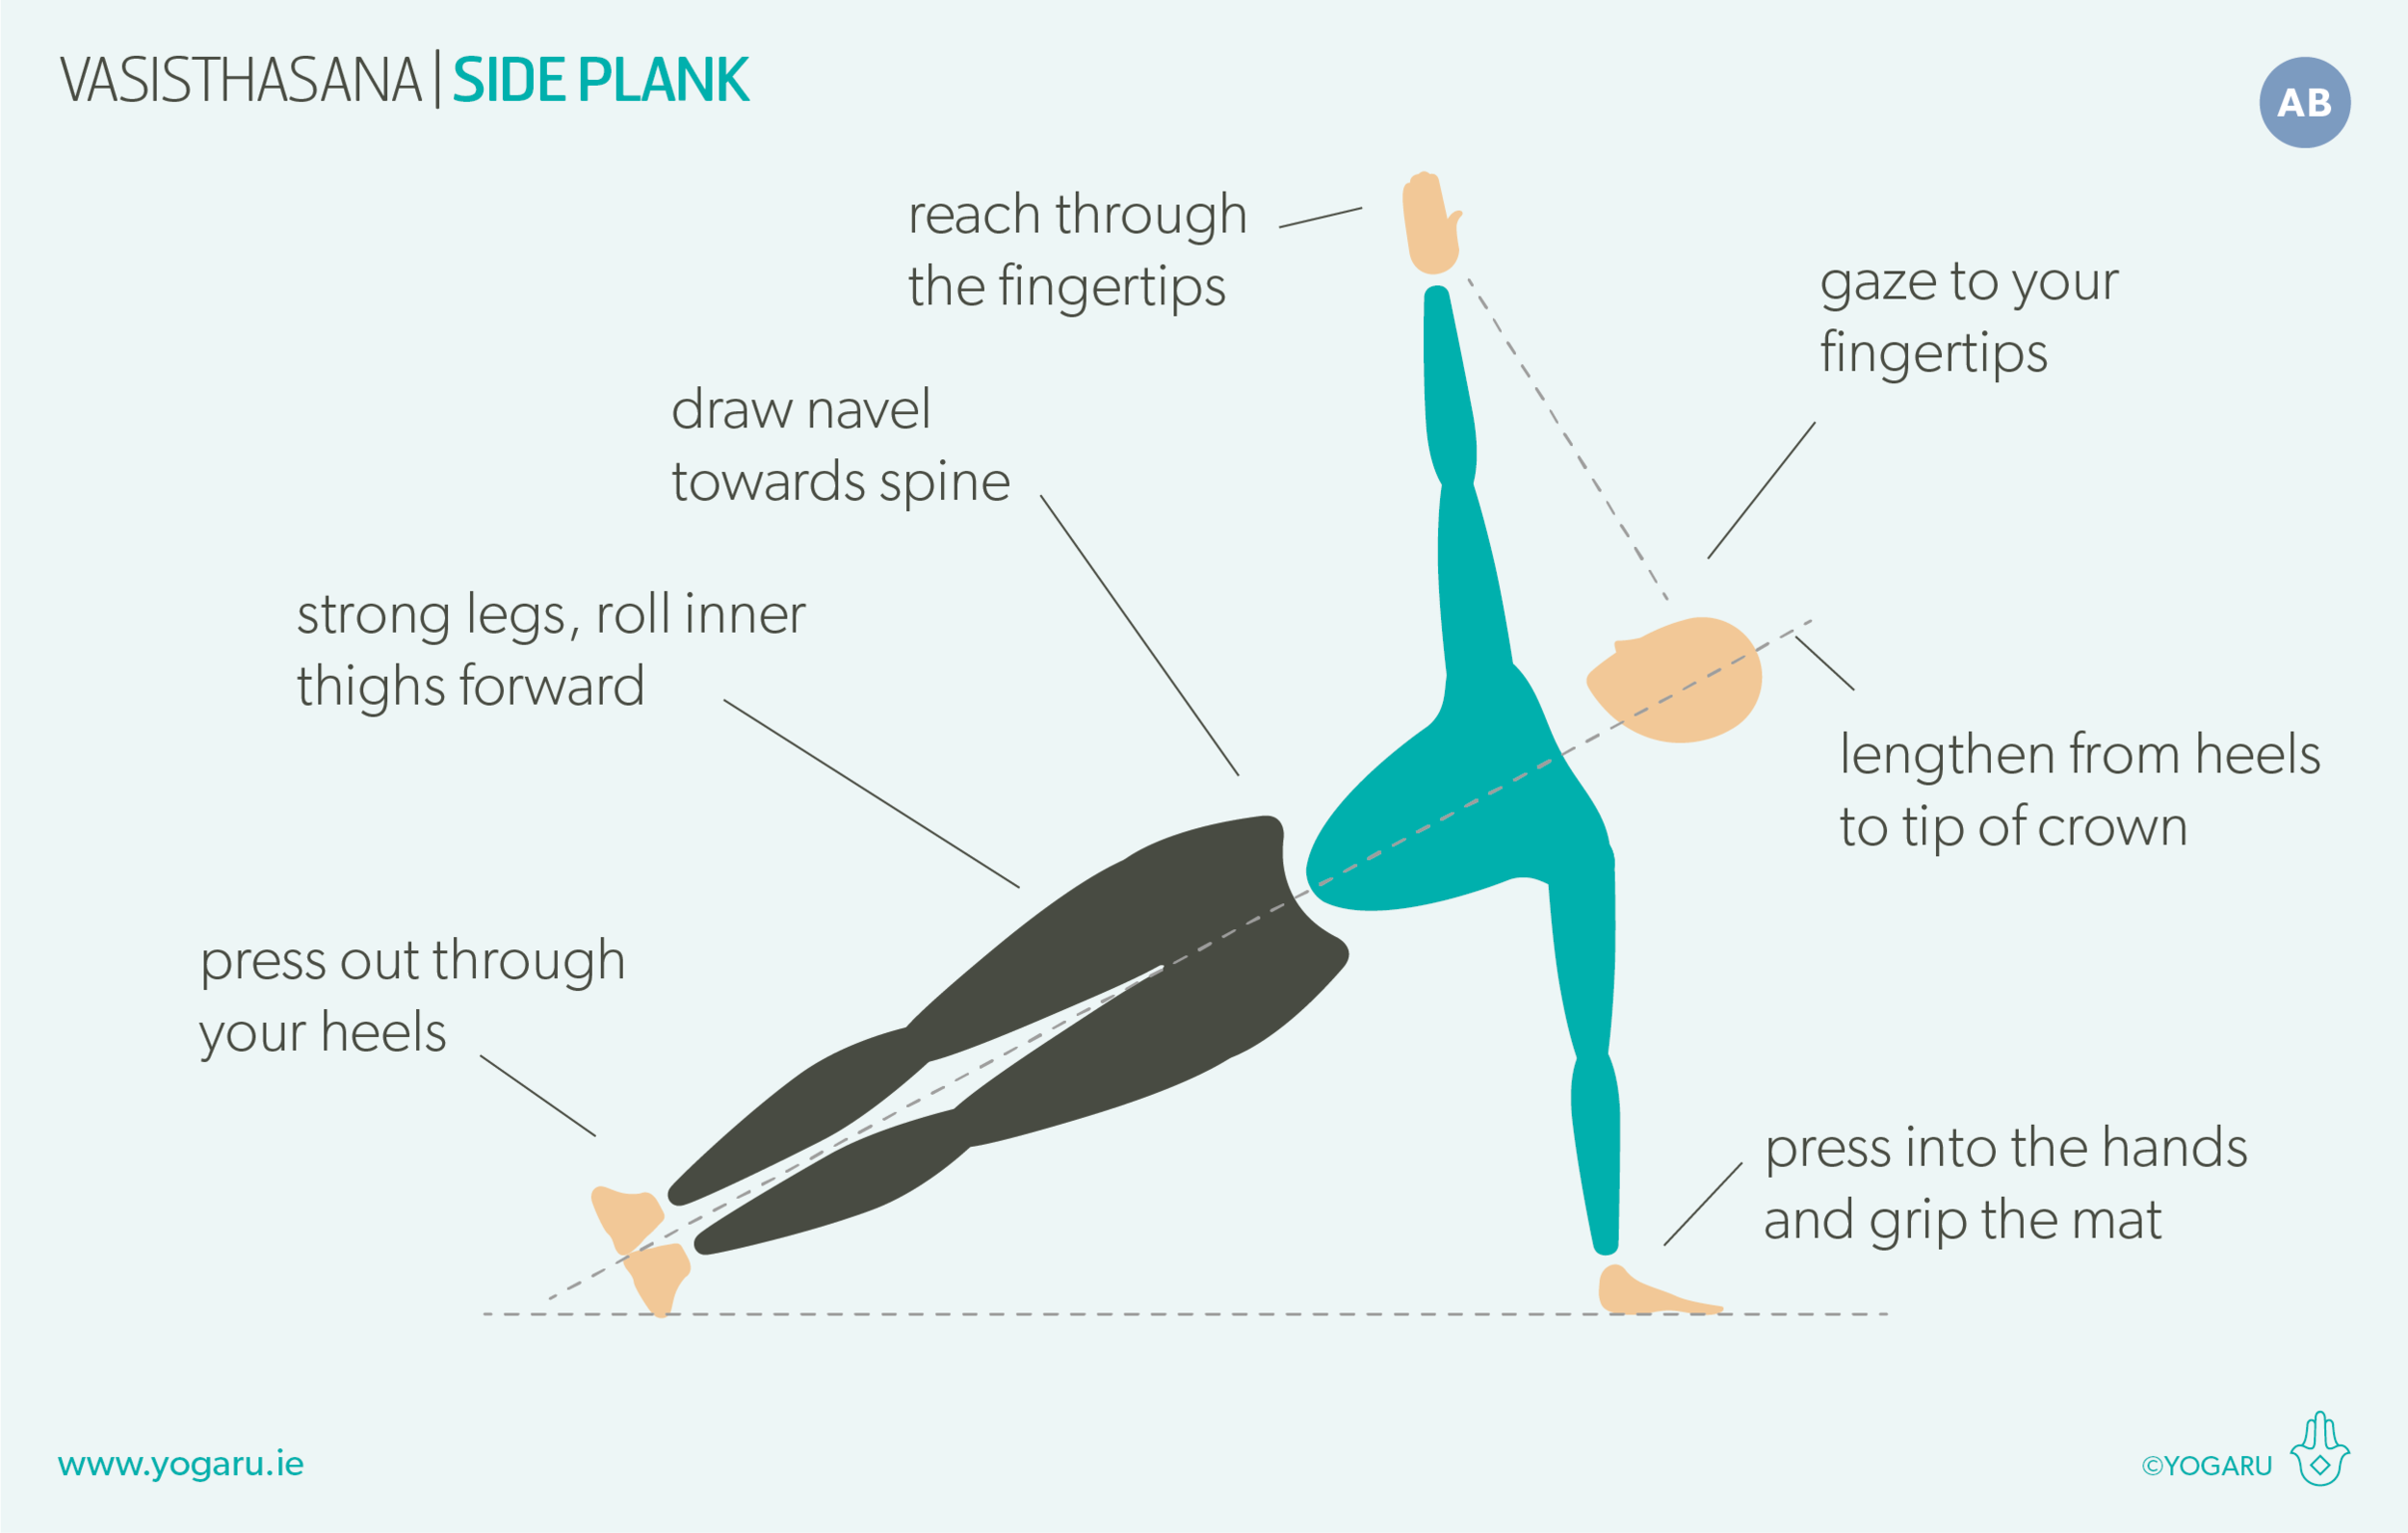
YOGARU_Vasisthasana_PB.png

‘MOST EXCELLENT’ POSE
Named after the sage Vasitha Vasisthasana/Side Plank is a simple but challenging pose that works the whole body as it works out how to balance on one hand and the outer edge of one foot. It is considered one of the best poses for strengthening the full 360 core, improving posture and building strength in all the muscles that support the spine. The challenge of the pose is in balancing and maintaining a neutral spine against the forces of gravity. When we balance on one hand with the body at a slant it takes great effort and strength to keep the hips perfectly in line with the spine – not lifted too high or low and not tipping the top hip forward or back. It is the perfect pose to understand the principles of proprioception and our awareness of the space we inhabit.

THE BENEFITS OF VASISTHASANA/SIDE PLANK
Vasisthasana/Side Plank strengthens the arms, shoulders, core, spine, legs and glutes. It also gives a lovely opening to the chest. Similar to our last peak pose Parsvakonasana/Side Angle this pose builds awareness of the core being a 360 degree wrapping muscle. The full wrap of the 360 core is working to protect the spine and keep it in a neutral position. The lower obliques are helping to keep the hips lifted against the forces of gravity. The front of the core is helping you from tipping forward and the back of the core is helping from tipping backwards. When they are all working in partnership in the centre of this pose they will help to stabilise the spine and along with the strong legs will take some of the effort out of the bottom arm and shoulder.

EXPLORING VASISTHASANA/SIDE PLANK IN YOUR PRACTICE
Think of Vasisthasana/Side Plank through the lens of Tadasana/Mountain with the arms in a ‘T’ shape. In Tadasana/Mountain we are pressing through the feet, hugging the hips to the midline, lengthening through all sides of the body and broadening through the collarbones. In Vasisthasana/Side Plank we are following these exact blueprints and adding an extra level of lifting the hips against gravity with the strength of the core.

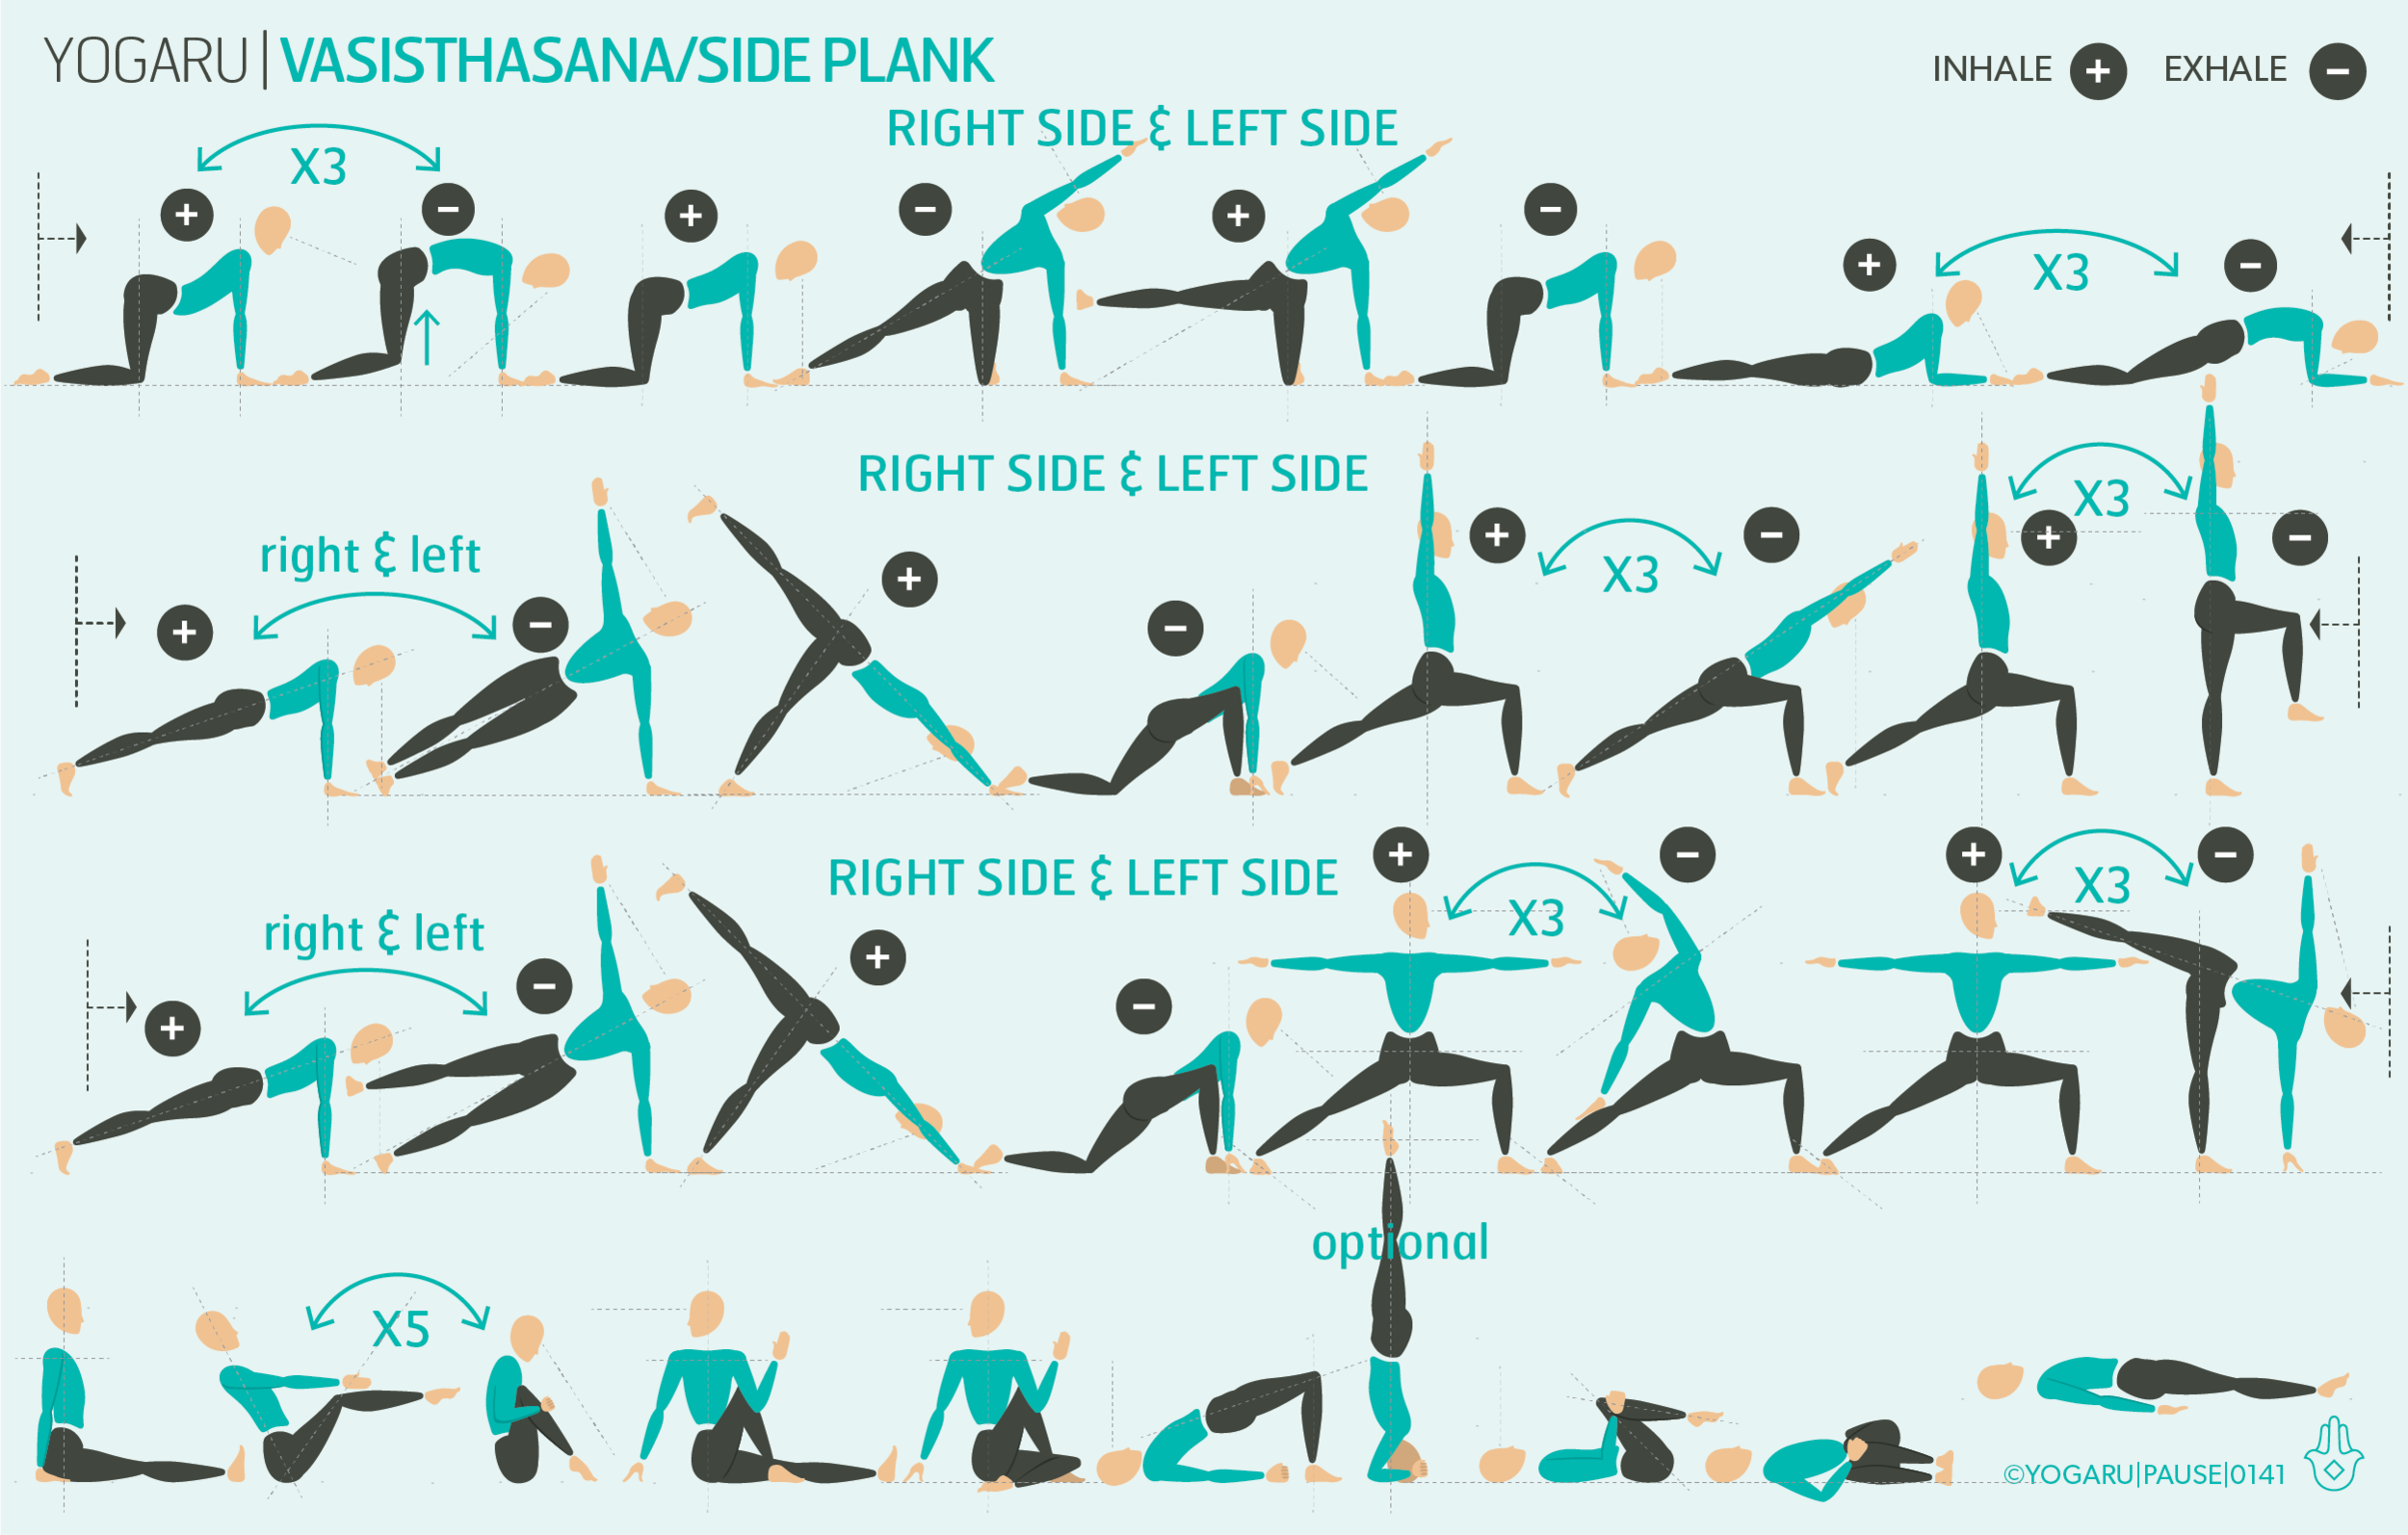
The sequence builds to full Vasisthasana/Side Plank from the ground up to allow your wrist and arm to warm up before the peak pose. The warm up flow starts to build heat and strength in the arms, core and legs. Use the breath guide to help you link breath with movement as you flow.

In Vasisthasana/Side Plank press strongly through the soles of your feet and extend through the tip of your crown. Glance down to check your hips are stacked and haven’t tipped forward or back. Press into your supporting hand, grip your mat and lengthen the space between your shoulder joint and your neck. See can you find lightness and space in the shoulder joint and a sense of the shoulder blade containing the effort of the pose within the joint.

If Vasisthasana/Side Plank is not part of your practice, take a modified version of the pose with the bottom knee on the ground as illustrated in the first line of the sequence after the cat/cow flow.

PAUSE_0141.png

ALIGNMENT CUES
In this sequence there are three main standing flows starting with the peak pose of Vasisthasana/Side Plank. Flow through the poses within the married lines on the right side first and then the full mini flow on the left side. You can extend your practice by running through these two standing flows for two full rounds of each side. If you want to try a few different versions of Vasisthasana/Side Plank have a look at my Instagram post.

Have a read of the tips below and either print out the sequence or save it onto your device:

  • From Phalakasana with feet together, roll onto the little toe side of your right foot, stack your feet together, legs straight.

  • Place your right hand slightly forward of your right shoulder, shoulders stacked, place your left hand on your hip, hips stacked, draw your navel towards your spine.

  • Lift your hips up, press out through your heels, lengthen from your heels through your spine to the tip of the crown in a diagonal line.

  • Reach your left arm up high, palm facing left, gaze forward or to your extended hand.

To save the images for personal use click and hold down the image until the ‘save image’ option appears; on Mac hold down ‘control’ and click the image to get the option box; on PC right click on the image to get the option box. Scroll down in the ‘option box’ and click ‘save image’.

Ruth Delahunty Yogaru