Pose breakdowns

Virabhadrasana III - Warrior III

YOGARU_Virabhadrasana III_PB.png

MAKING PEACE WITH WARRIOR III
After years of getting frustrated by how difficult I found Virabhadrasana III/Warrior III I have finally made peace with it. That’s not to say I have found perfection in the pose, but by breaking down its components I understand better why it is a tricky pose. The main challenge of Virabhadrasana III/Warrior III is that essentially it is a balancing pose where the standing leg is carrying the full weight of the body, and your centre of gravity is challenged by the back leg extending back and the upper body extending forward like a seesaw. You are also reaching back through the heel of that back leg with nothing to press against, which makes it much harder to find strength in the lifted leg. Your back is lifting the weight of the whole upper body, and the standing leg is stretching the back of the hip and the hamstrings. This means the upper body is using the muscles of a backbends, while the lower body is using the muscles of a forward bend. With all this going on the core strength is being recruited in its full circumference – front, sides and back – to stabilise you. All these opposing actions happening at the same time, it's no wonder we find Virabhadrasana III/Warrior III challenging!

THE BENEFITS OF VIRABHADRASANA III/WARRIOR III
Virabhadrasana III/Warrior III is very strengthening for the ankles, legs, shoulders and spine. It gives an opportunity to use the deep muscles of the care to find you balance and work against gravity to keep you reaching in both directions.

EXPLORING VIRABHADRASANA III/WARRIOR III IN YOUR PRACTICE
When you are coming into the pose keep the back foot on the ground for an extra breath before you lift up till you find the power of the muscle. If you are finding it hard to establish your balance bend the standing leg and press your foot into the ground. Lowering your centre of gravity makes it easier to find your balance. If you are finding it very hard to press through the lifted leg bend your knee and look for the strength of your muscles. Work on keeping your hips level and keep the raised leg lower than parallel to the ground if the hip of the back leg lifts up. Play around with flexing and pointing the foot of the raised leg. You’ll notice with the toes flexed you rely more on the quads to lift the leg and when pointed the hamstrings come into play.

PAUSE_0057.png

ALIGNMENT CUES
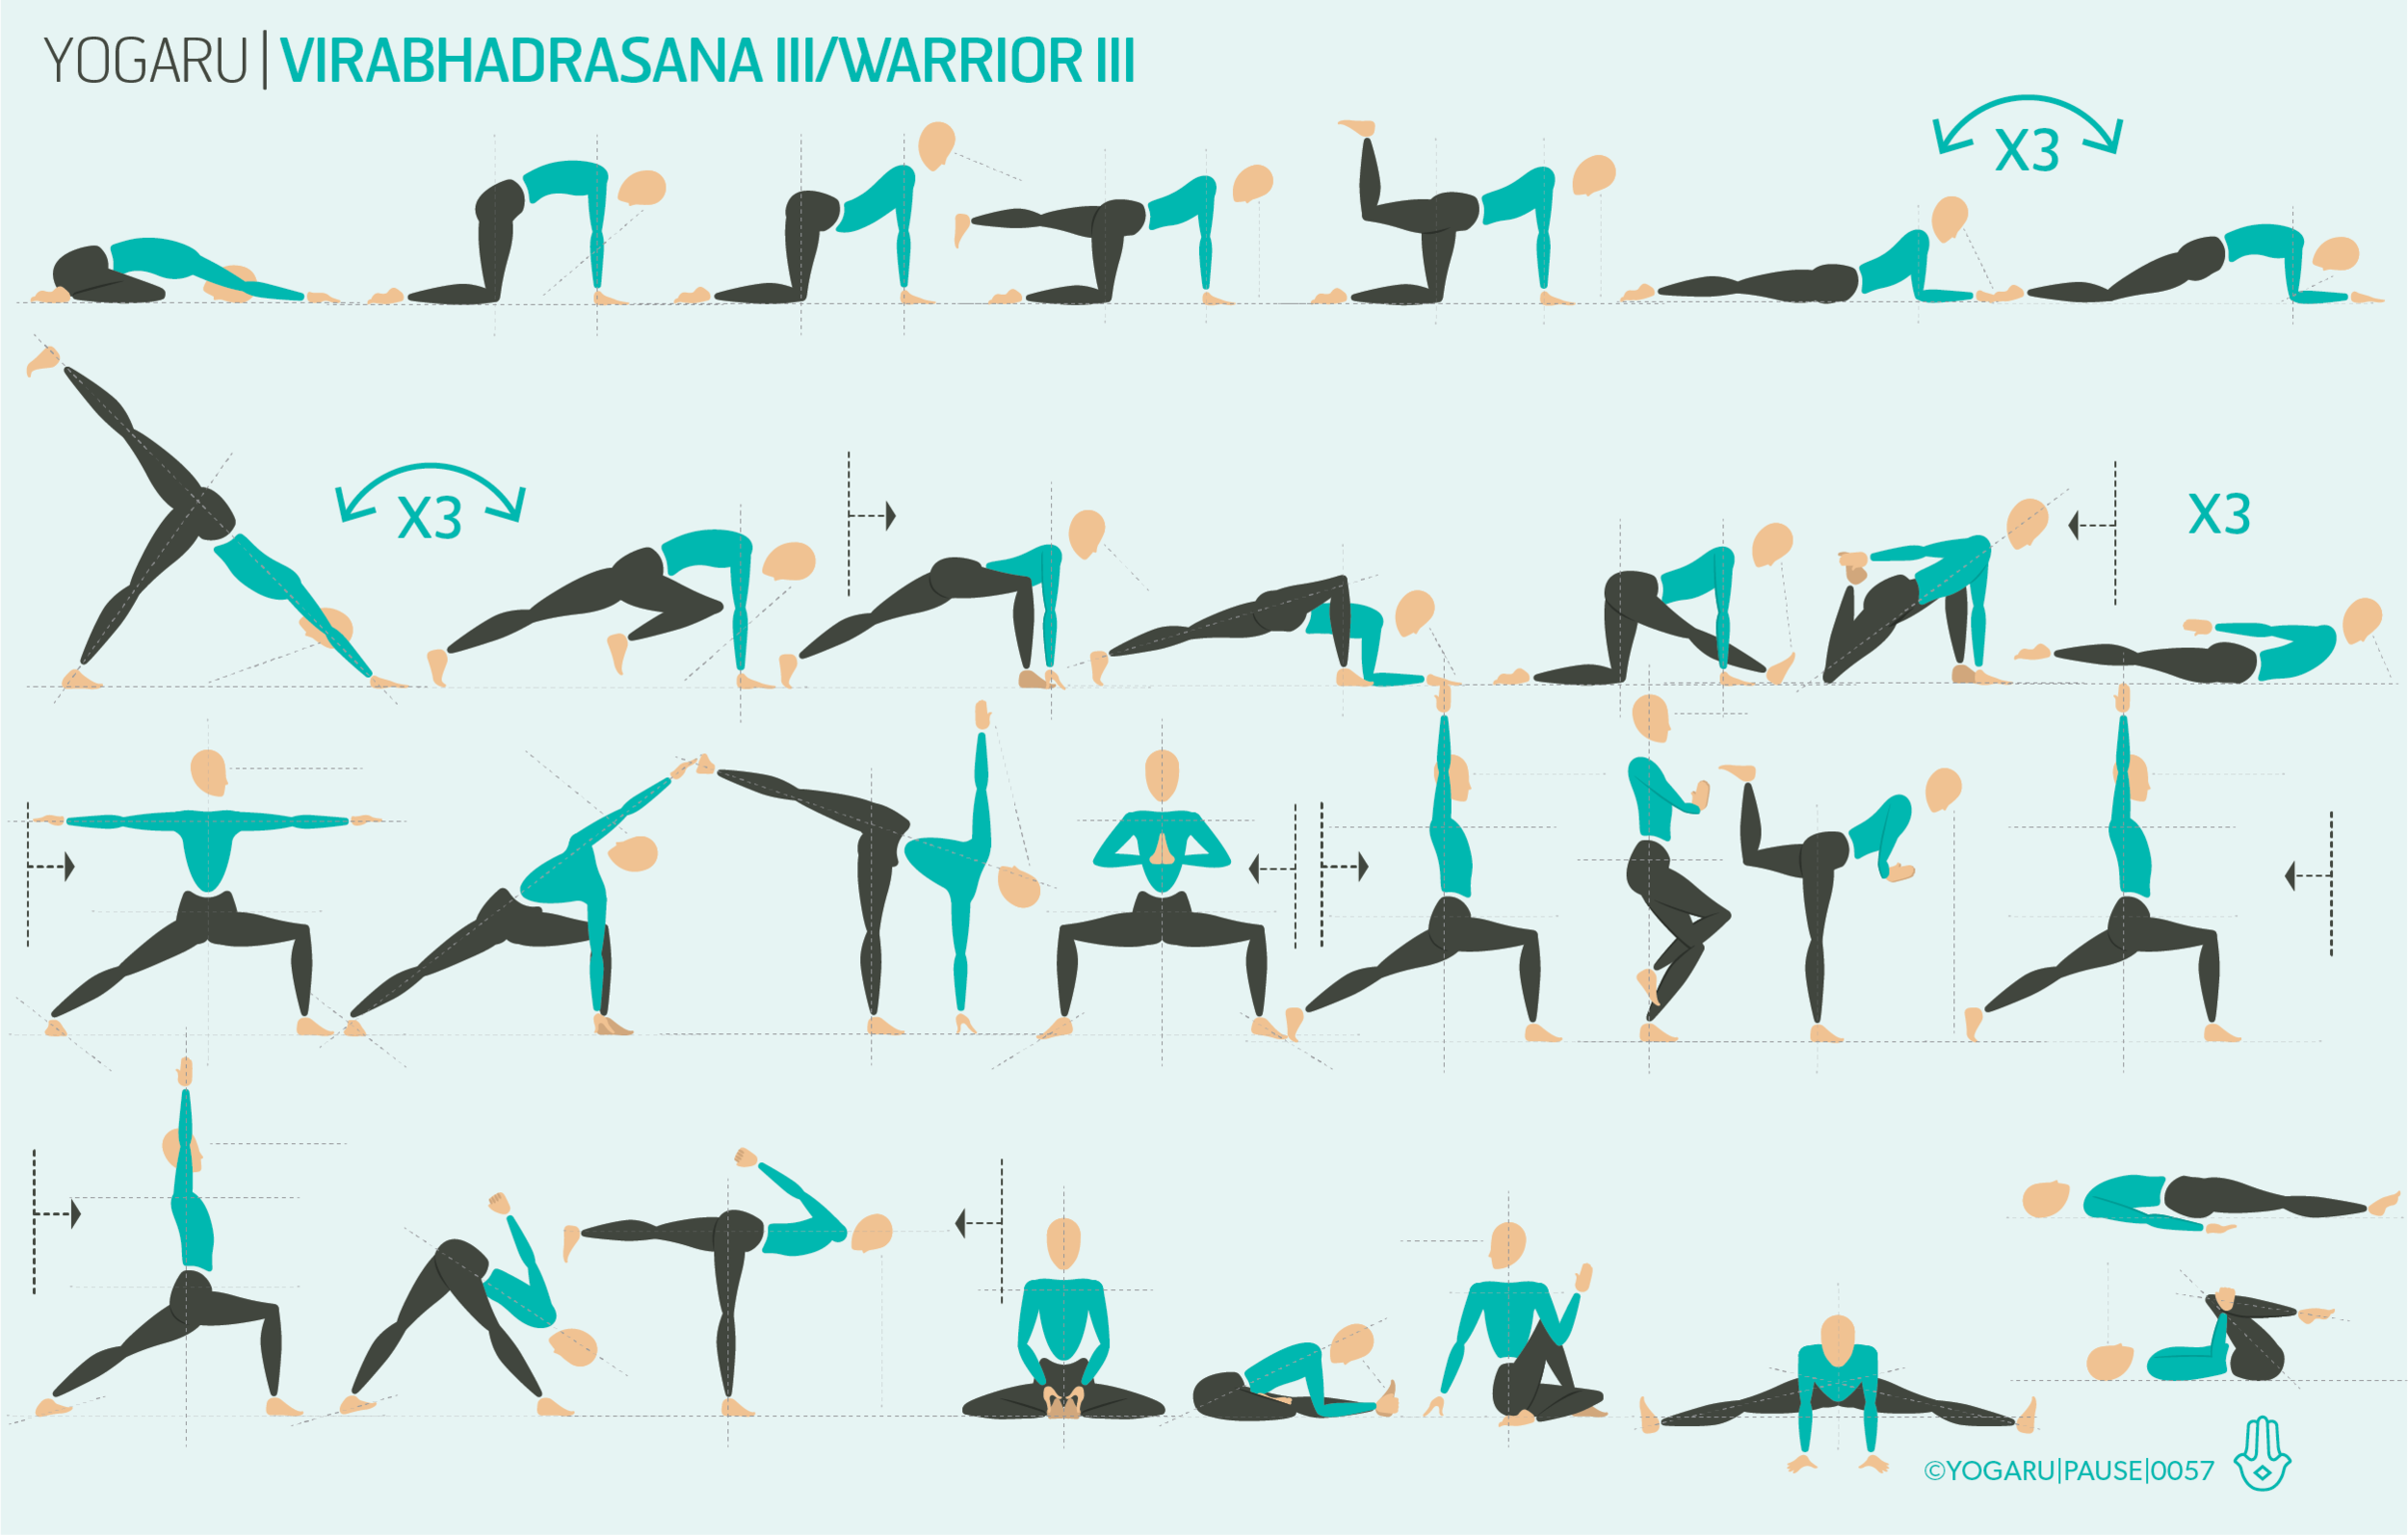
The above sequence strengthens your hamstrings, quads, glutes and core first and then gently stretches them in preparation for you peak pose.

Print out the below tips, along with the sequence, and take some extra time in your Warrior III:

  • From Ashta Chandrasana/Eight Crescent Moon or Virabhadrasana I/Warrior I, place your hands on your hips, inhale, lean forward and step your left leg forward a little.

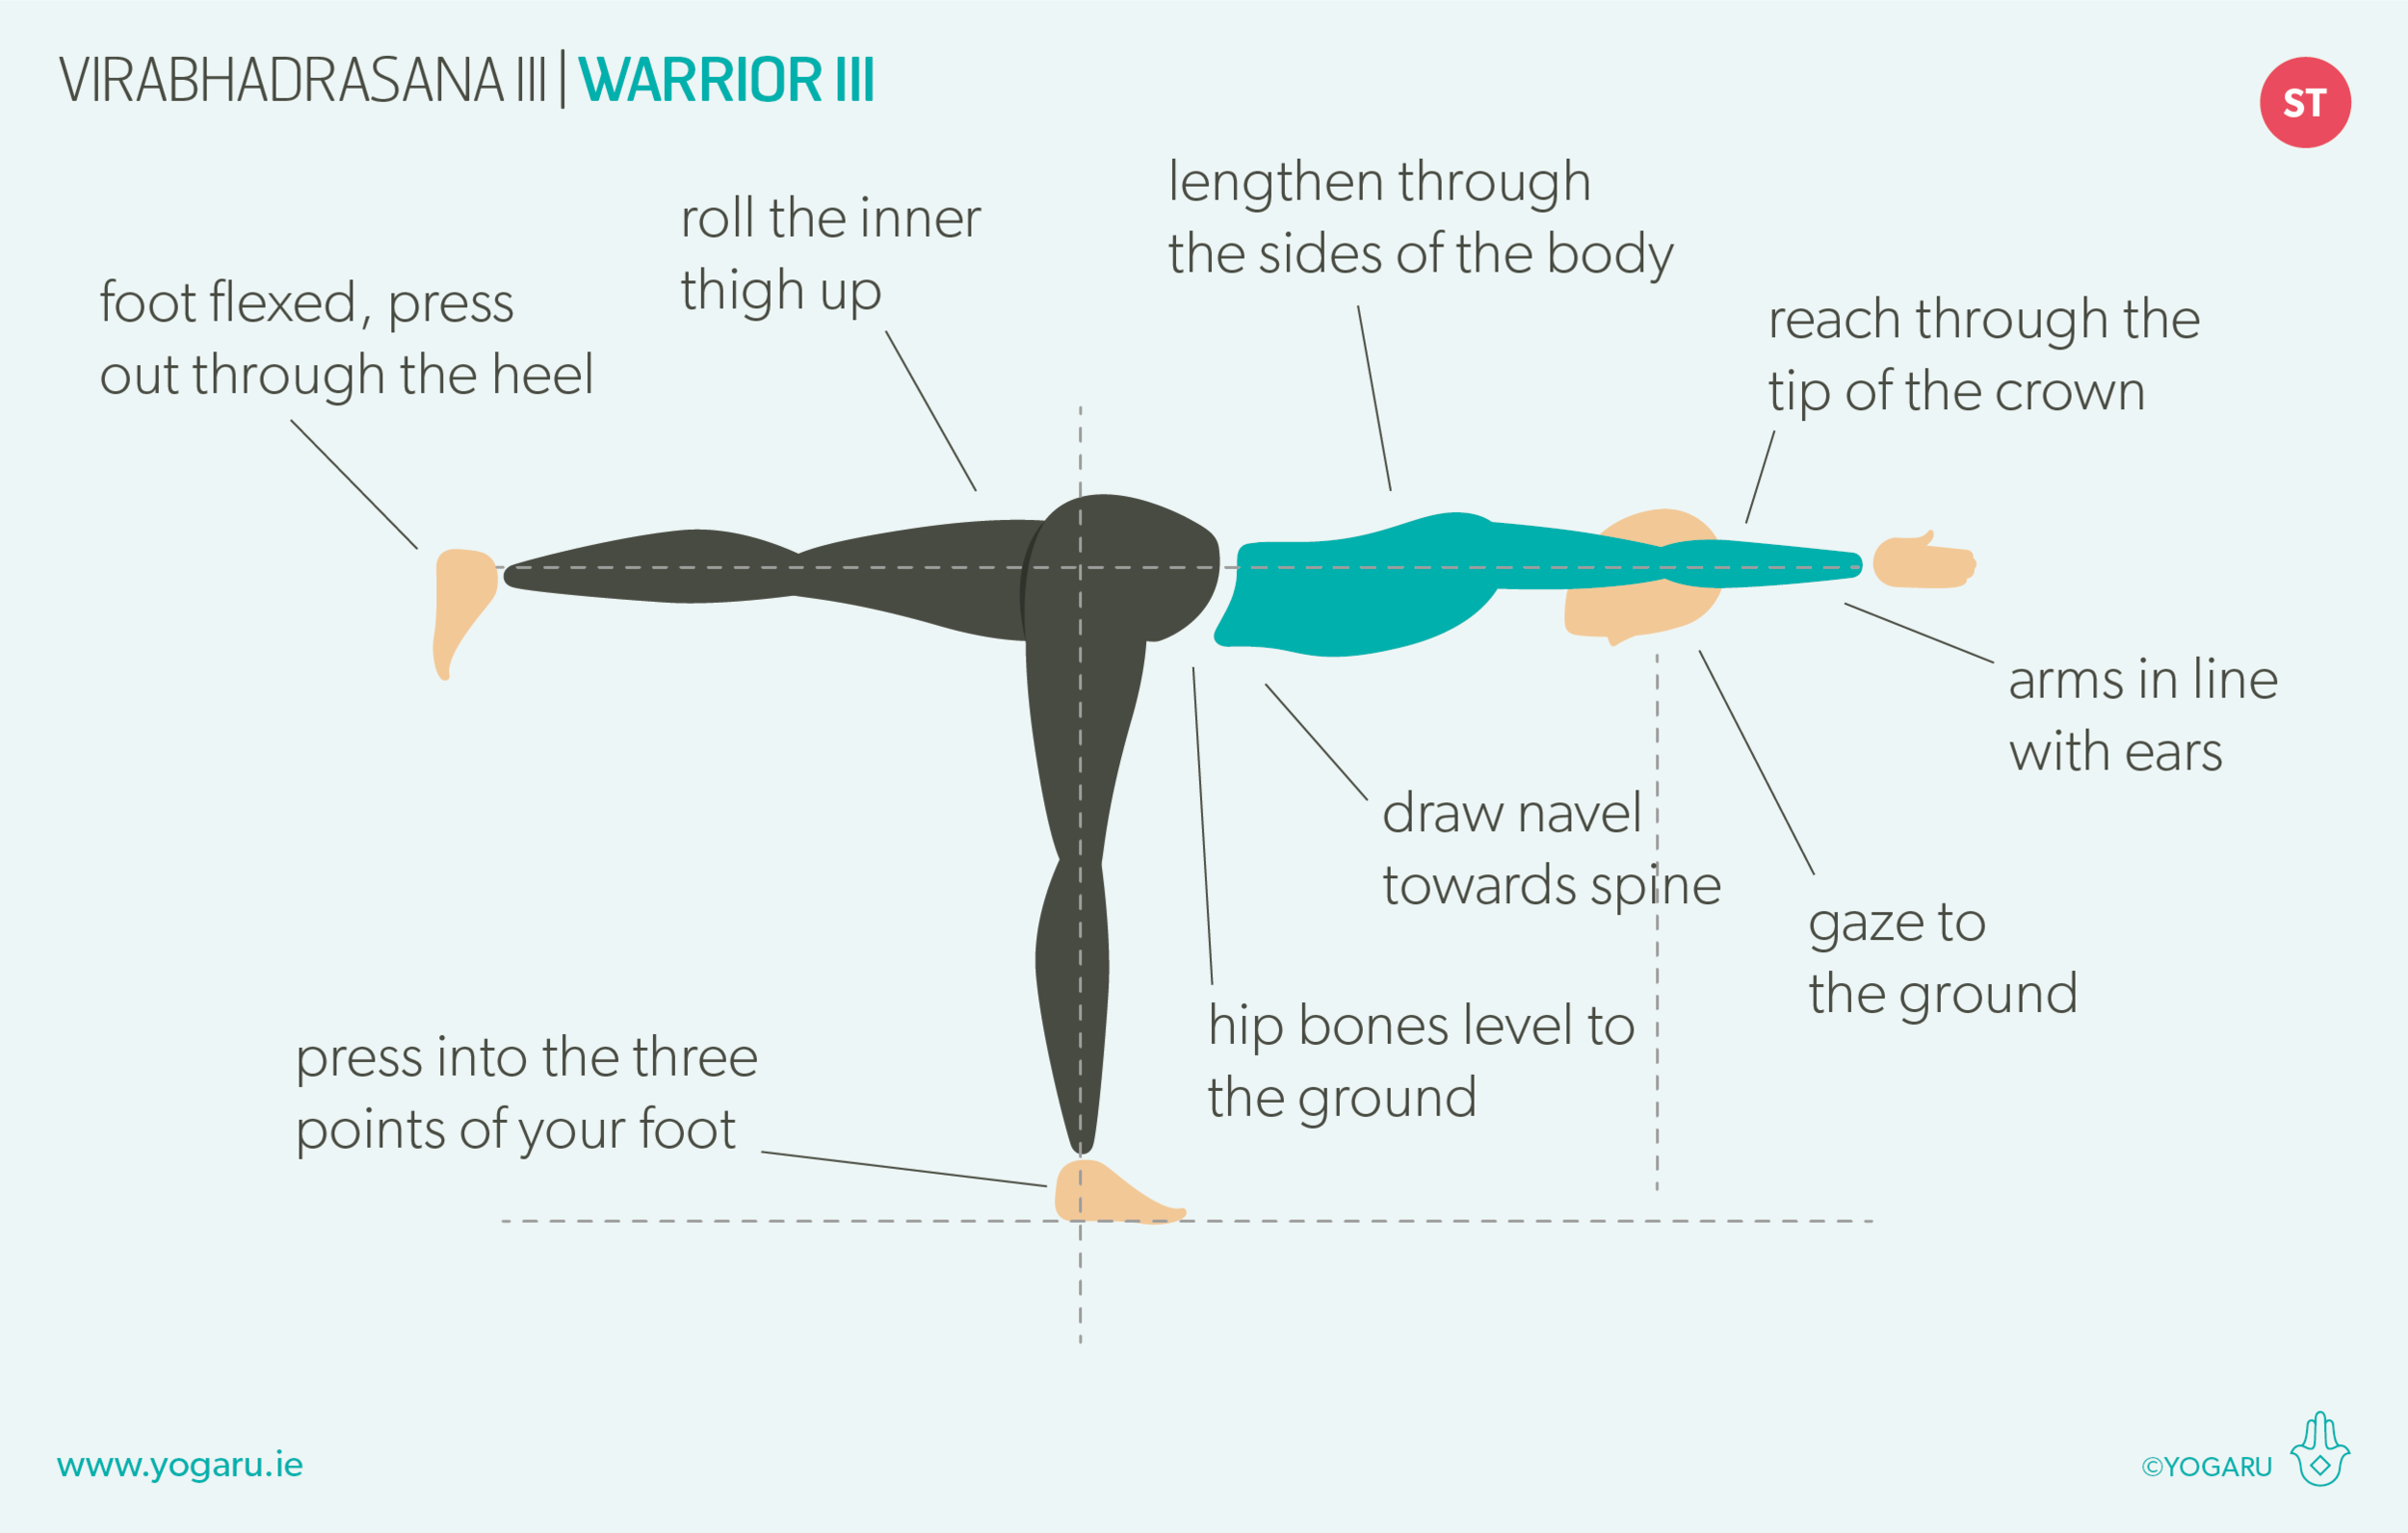
  • Exhale, hinge forward from the hip joint, lift your left leg parallel to the ground behind you, hips level to the ground. Roll the inner thigh of your left leg up, flex your foot and press out through the heel.

  • Reach your arms back or reach your arms forward in line with your ears, lengthen through your spine and the sides of the body, gaze to the ground, or to your fingertips if your arms are forward.

Enjoy establishing a new relationship to Warrior III with no self judgement and perfectionism.

To save the images for personal use click and hold down the image until the ‘save image’ option appears; on Mac hold down ‘control’ and click the image to get the option box; on PC right click on the image to get the option box. Scroll down in the ‘option box’ and click ‘save image’.

Ruth Delahunty Yogaru

Virabhadrasana II - Warrior II

YOGARU_Virabhadrasana II_PB.png

EXPLORING VIRABHADRASANA II/WARRIOR II IN YOUR PRACTICE
Hip opening classes are one of the most requested and popular class themes. They release tension physically and mentally, and leave you feeling a lovely freedom of movement in the hip joint as you leave your class. When you consider a hip opening class, which asana springs to mind? Most people think of asana that stretch the outer hip muscles, for example Gomukhasana /Cow Face or Eka Pada Rajakapotasana/Pigeon Pose. For me, I feel a deeper hip opening in asana where the leg is rotated outwards, strengthening the outer hip and stretching the inner leg. Warrior II is not traditionally considered a hip opener, but there is a deep opening of the inner groin in the front leg in particular, as the outer glute is working hard to keep the inner knee from collapsing in. Asana with similar leg arrangement such as Parsvakonasana/Side Angle, Trikonasana/Triangle & Ardha Chandrasana/Half Moon will externally rotate the leg, and open the hip, in a similar way.

The hip joint is made up of several families of muscles – the hamstrings, the glutes, the quads, the groin and the hip flexors. Warrior II works all five muscle groups. Below are some alignment cues to try out in the sequence above or in your next class. As you test out some of the tips bring your attention to the muscles you are strengthening and stretching.

PAUSE_0048.png

ALIGNMENT CUES
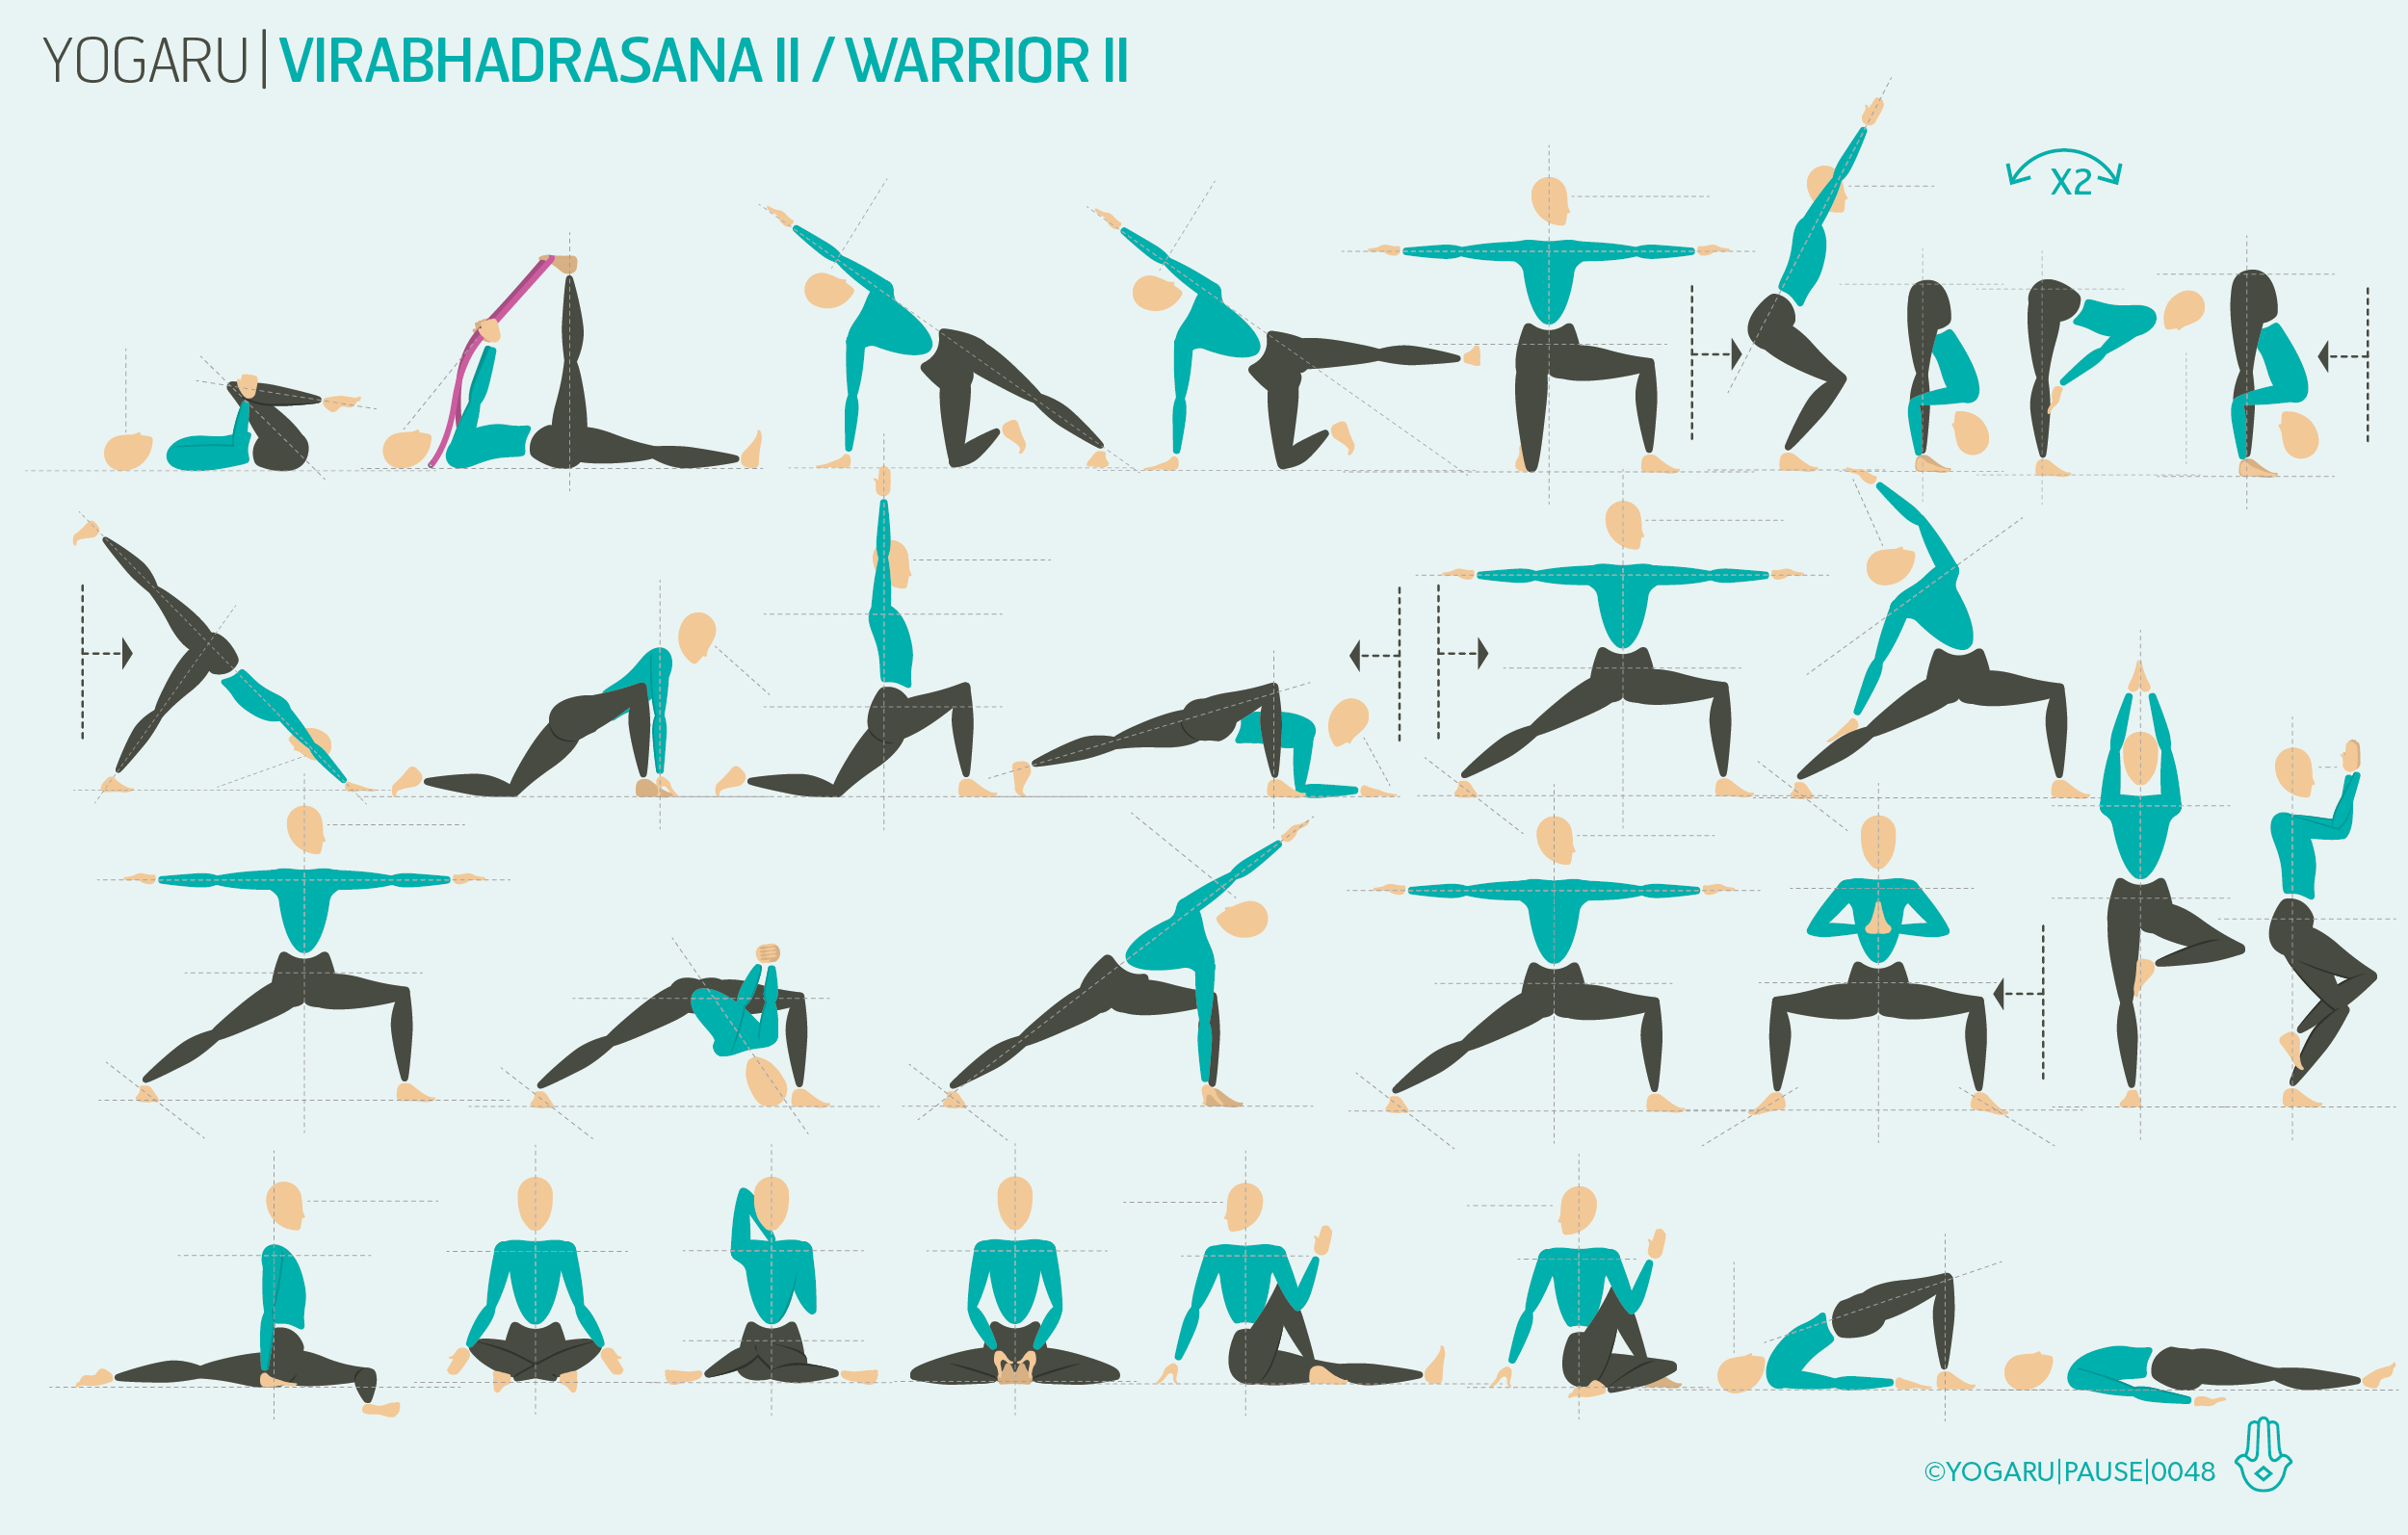
The above sequence starts with Supta Padangusthasana/Reclined Hand to Big Toe to warm up and lengthen the hamstrings. After you have pressed the leg up straight, hinge the leg out to the side from the hip joint to start to open up the groin. There is also a half Warrior II kneeling version to help you find the outward rotation of the hip without the full weight of the body.

Print out the below tips, along with the sequence, and take some extra time in your Warrior II:

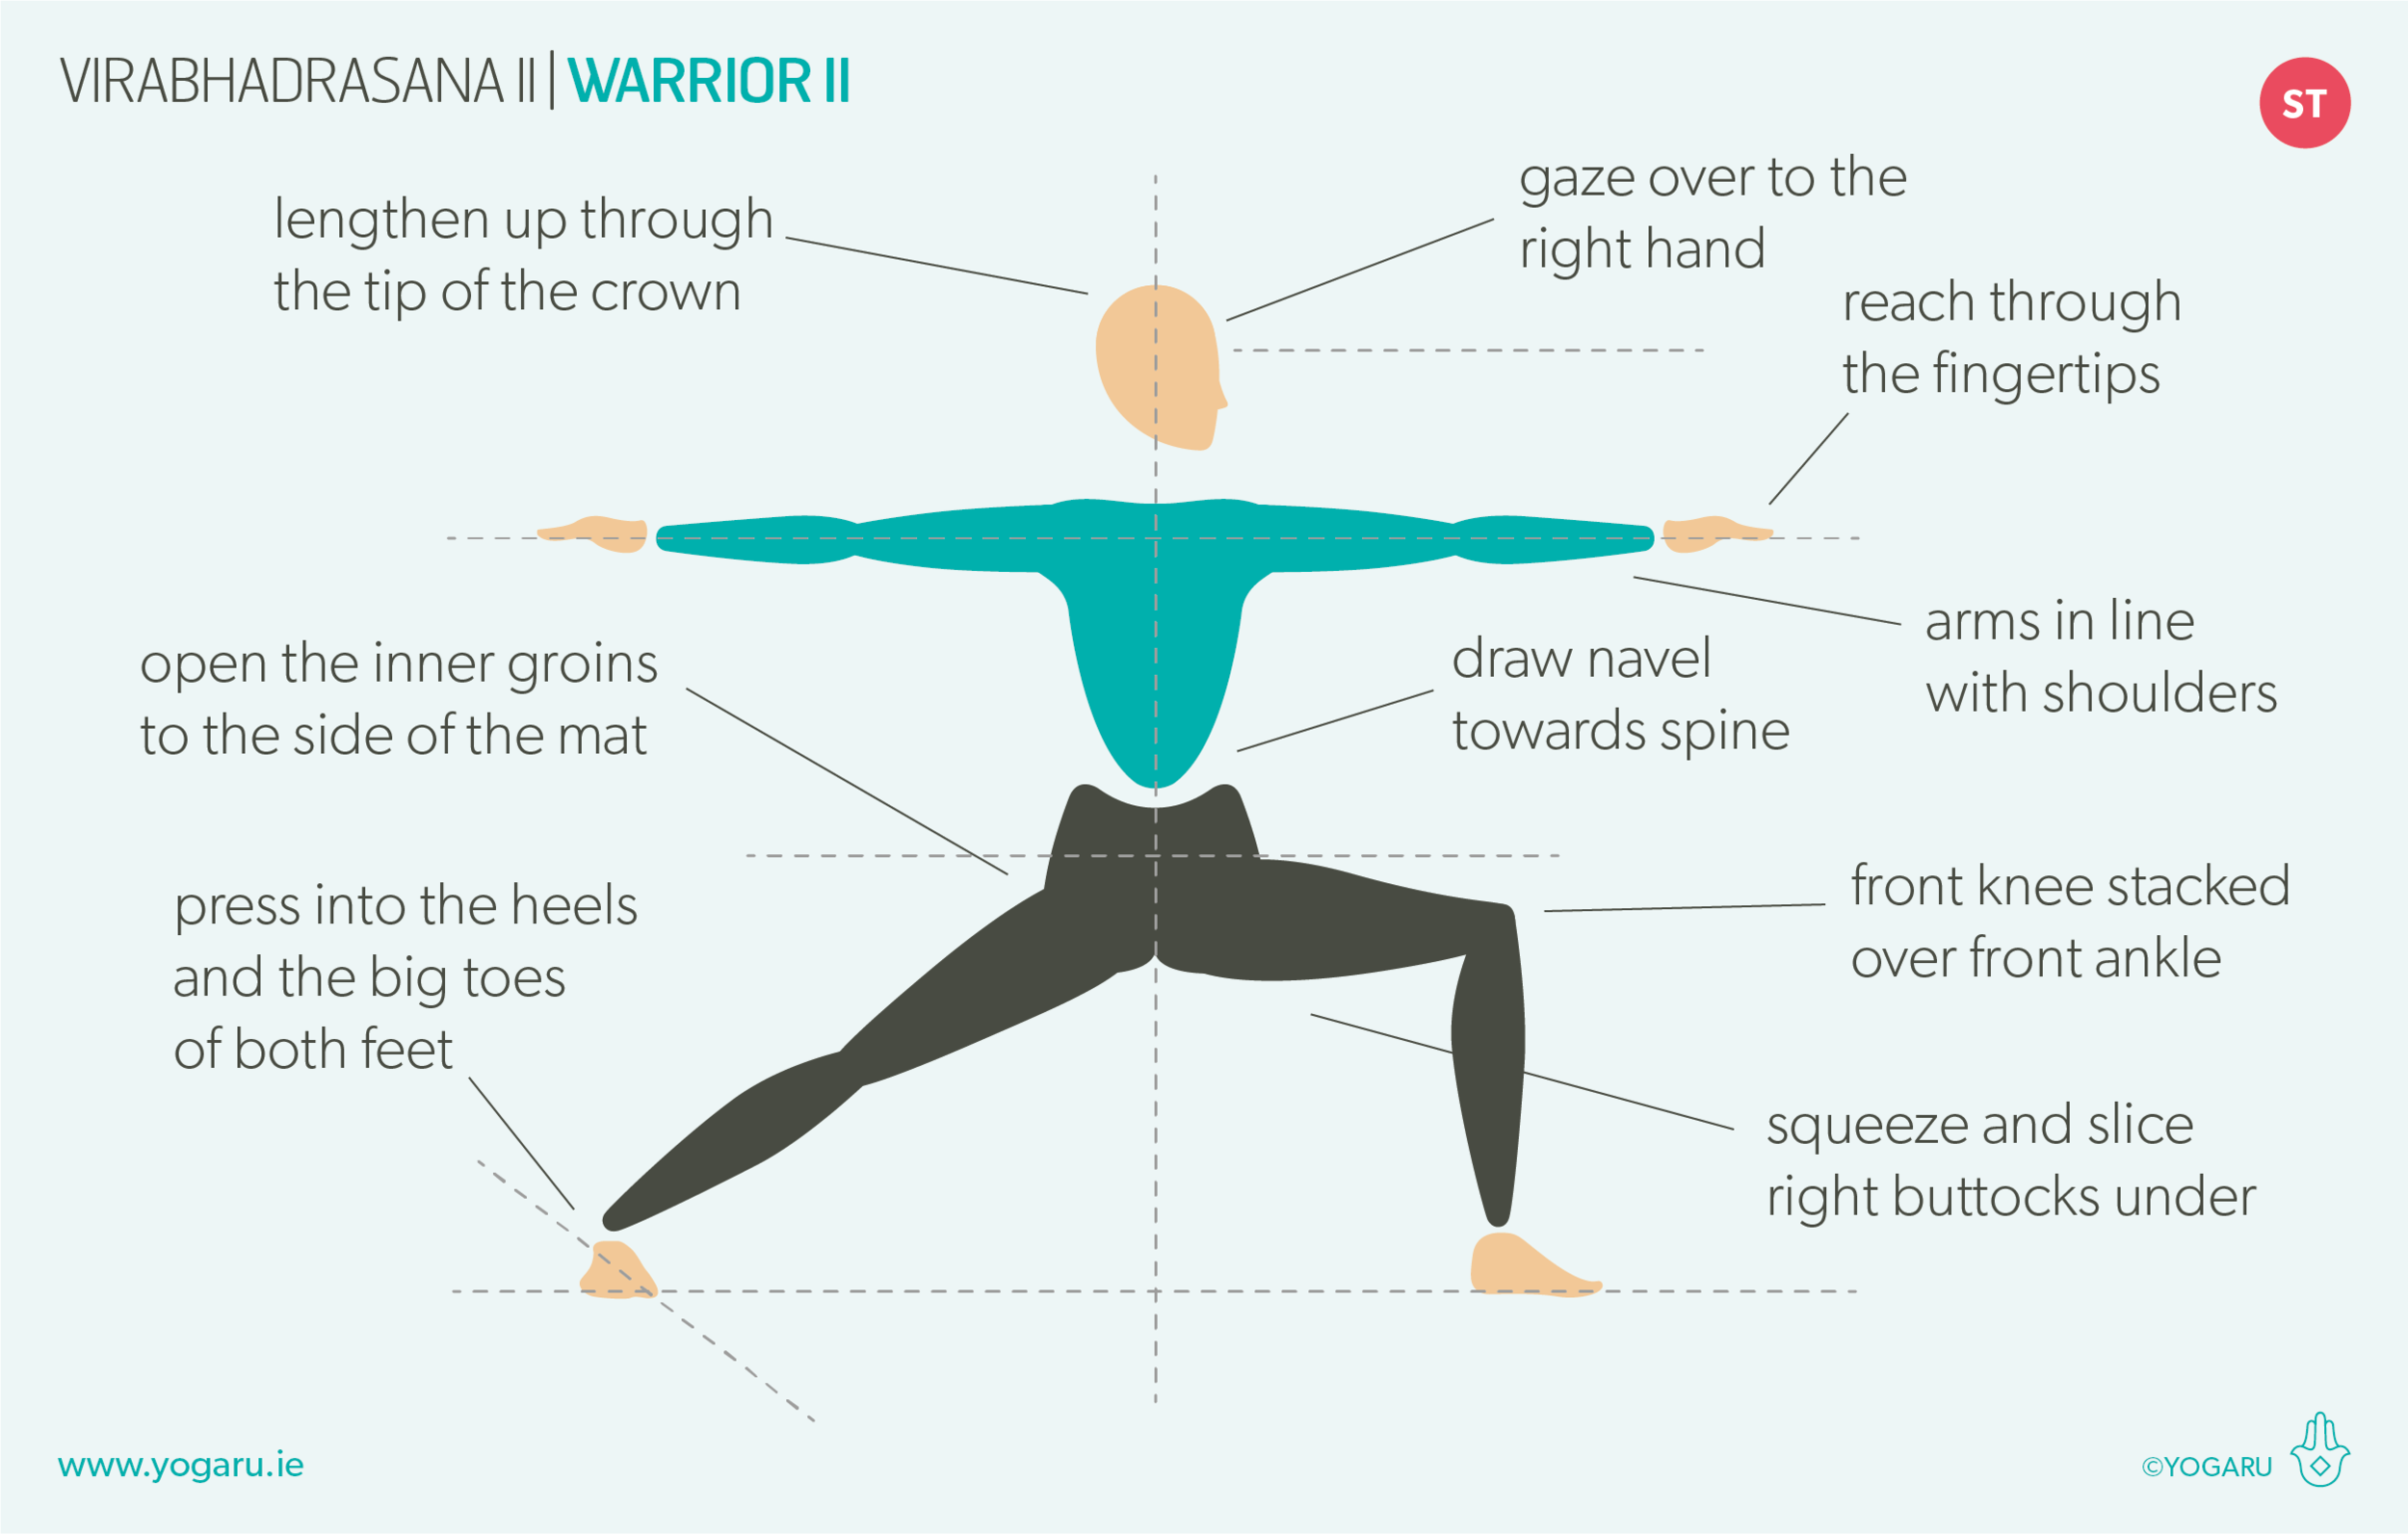
  • With your hips facing the side of the mat your left hip will naturally sits slightly forward of your right hip.

  • Squeeze your right outer hip muscles and press lightly into you big toe mound to track your knee over your ankle and open the groin out to the side of the mat.

  • Press into your front heel and pull it back towards you to feel the quads and hamstrings wake up.

  • As your groin starts to open see can you find more space to drop your hips down, making sure to adjust your front foot to keep the knee tracking.

  • Draw your navel in towards your spine and lengthen up through the tip of the crown, shoulders directly over pelvis.

  • With equal weight between front and back foot, press into your back heel to feel the arches of the foot lift.

To save the images for personal use click and hold down the image until the ‘save image’ option appears; on Mac hold down ‘control’ and click the image to get the option box; on PC right click on the image to get the option box. Scroll down in the ‘option box’ and click ‘save image’.

Ruth Delahunty Yogaru

Utkatasana - Chair

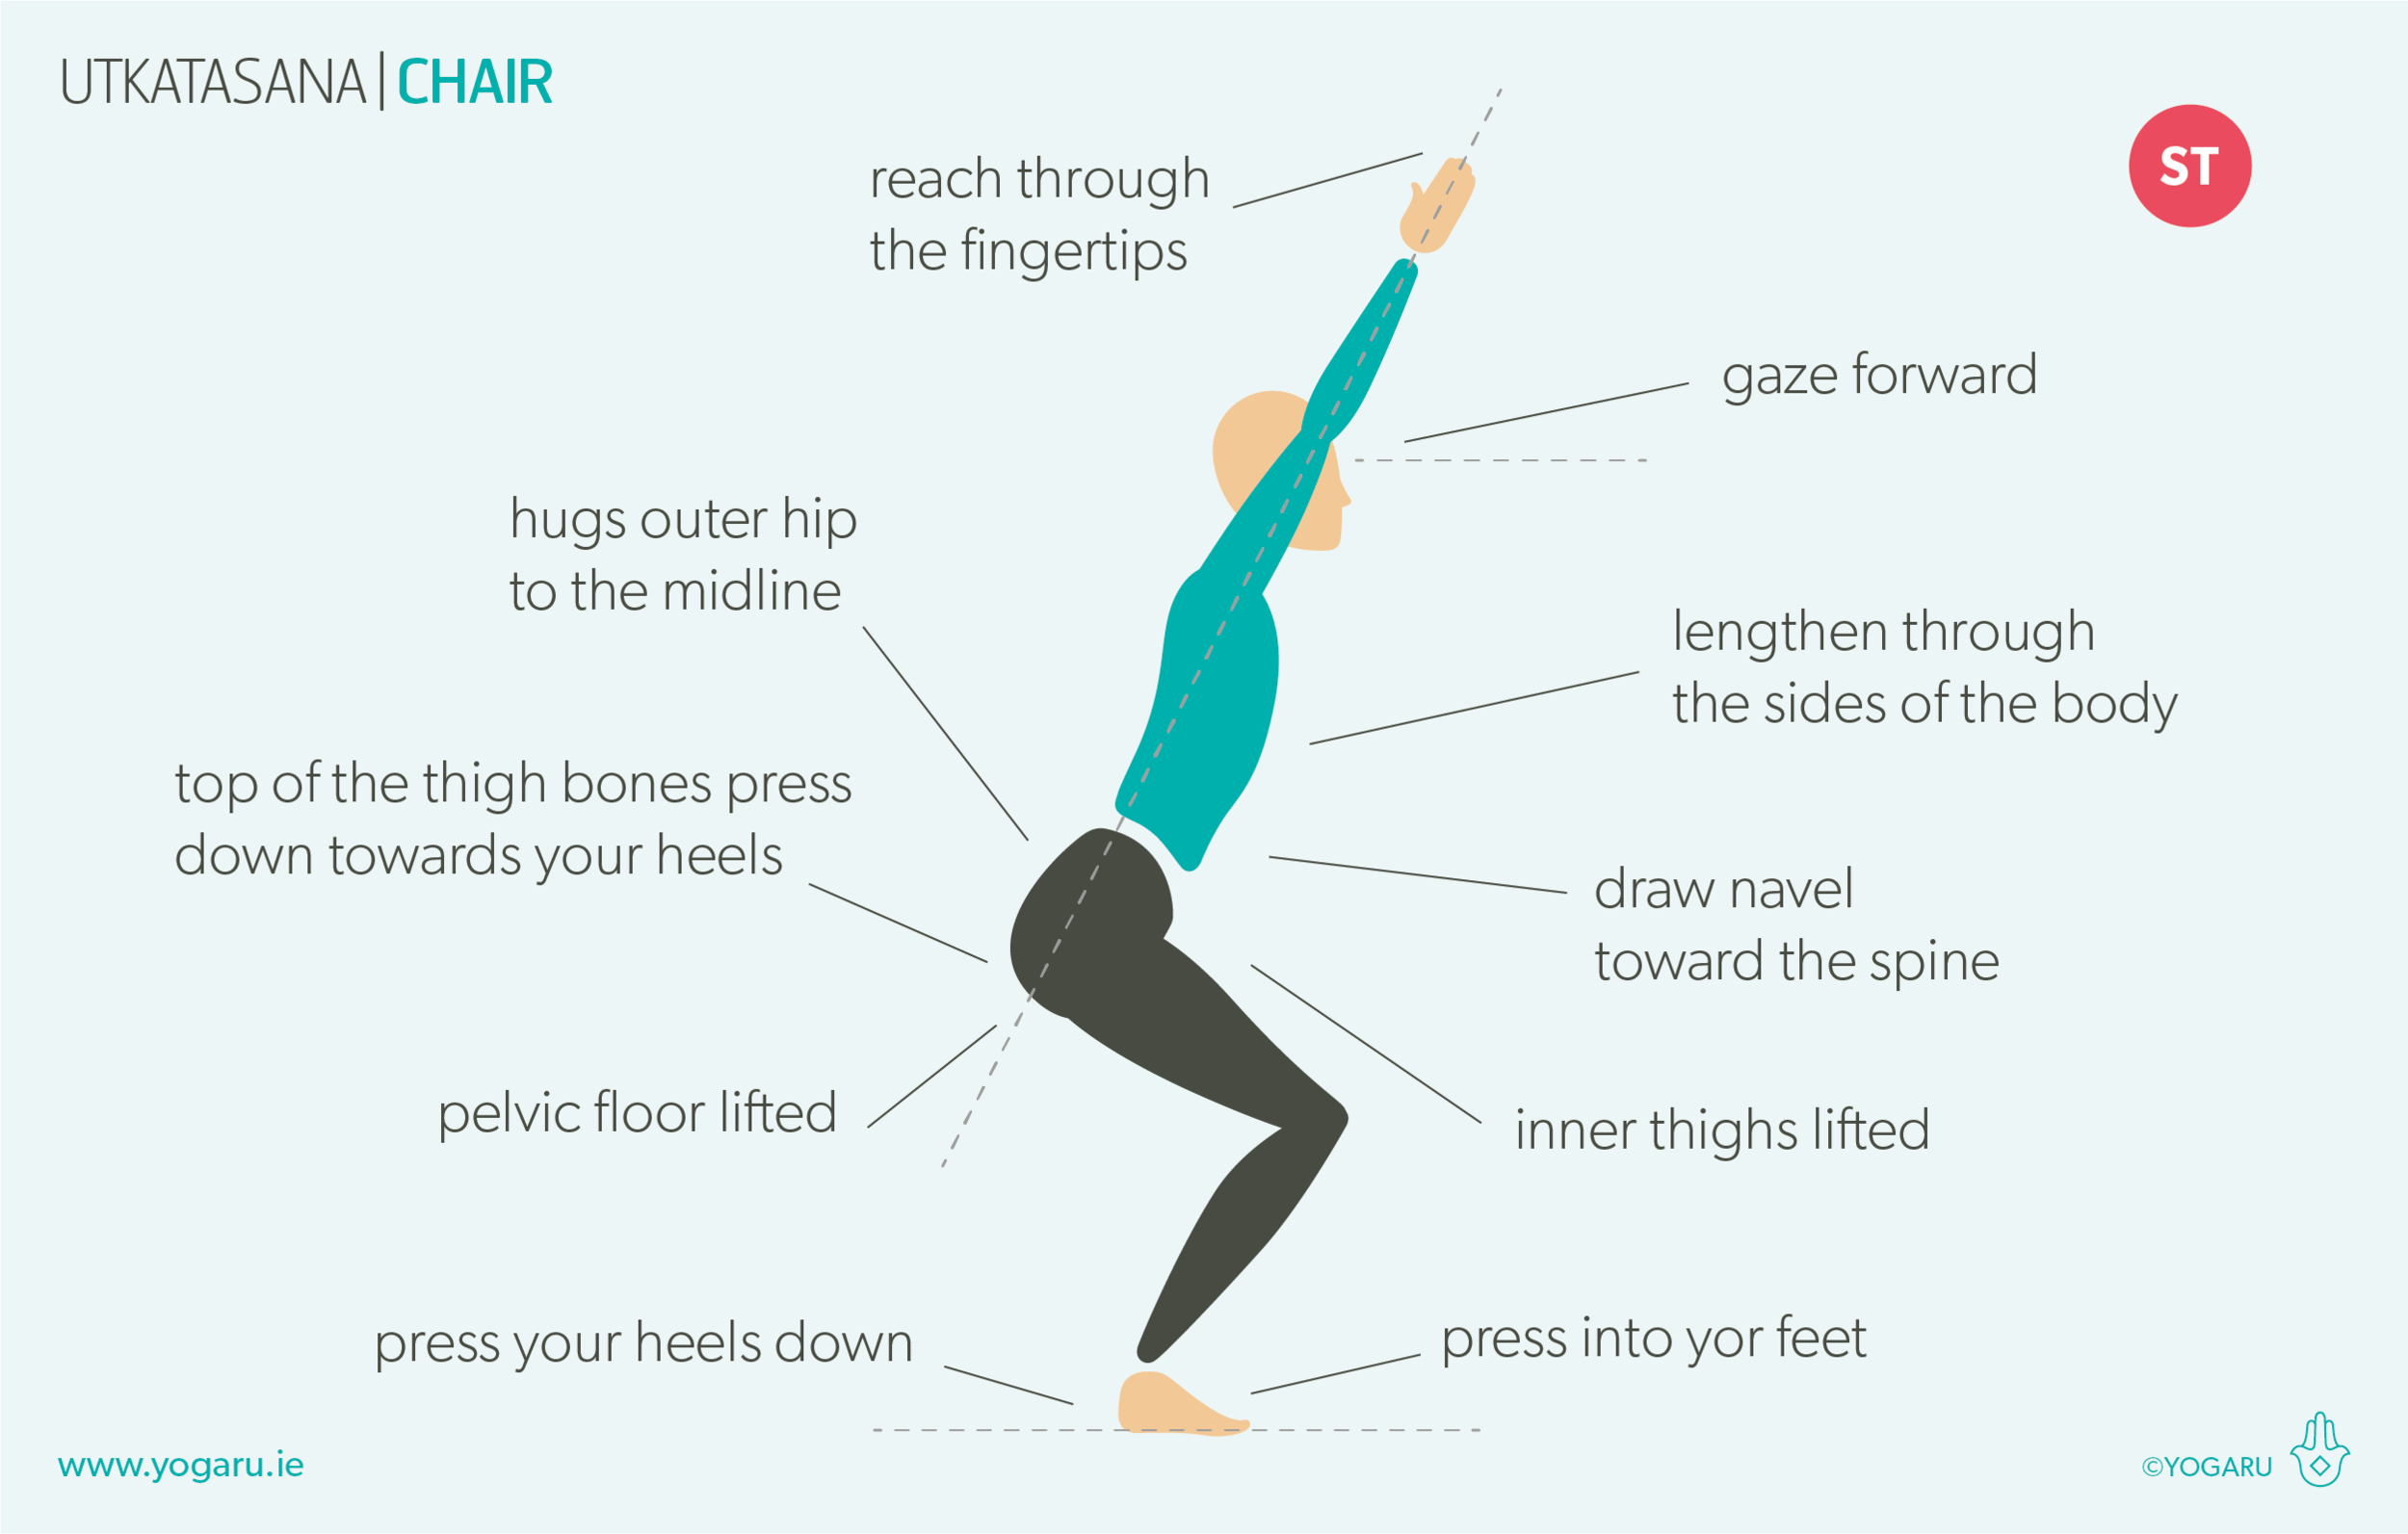
YOGARU_Utkatasana_PB.png

EXPLORING UTKATASANA IN YOUR PRACTICE
Utkatasana/Chair is one of those ‘more than meets the eye’ asana. It is a full body pose – strengthening the lower spine, legs, shoulders, hips, glutes and core – and teaching the principles of sthira & sukha, effort & ease, in your practice. As a standing asana, it is energising and stimulates all the organs of the abdomen – particularly the digestive system, which in turn boosts the immune system. As you bend you knees, and dip your pelvis down towards your heels, try to maintain the natural lumbar curve of the lower back. Lightly drawing your navel in towards your spine will protect your lower back from over arching, while it supports the weight of the upper body as it tilts forward from the hip joints.

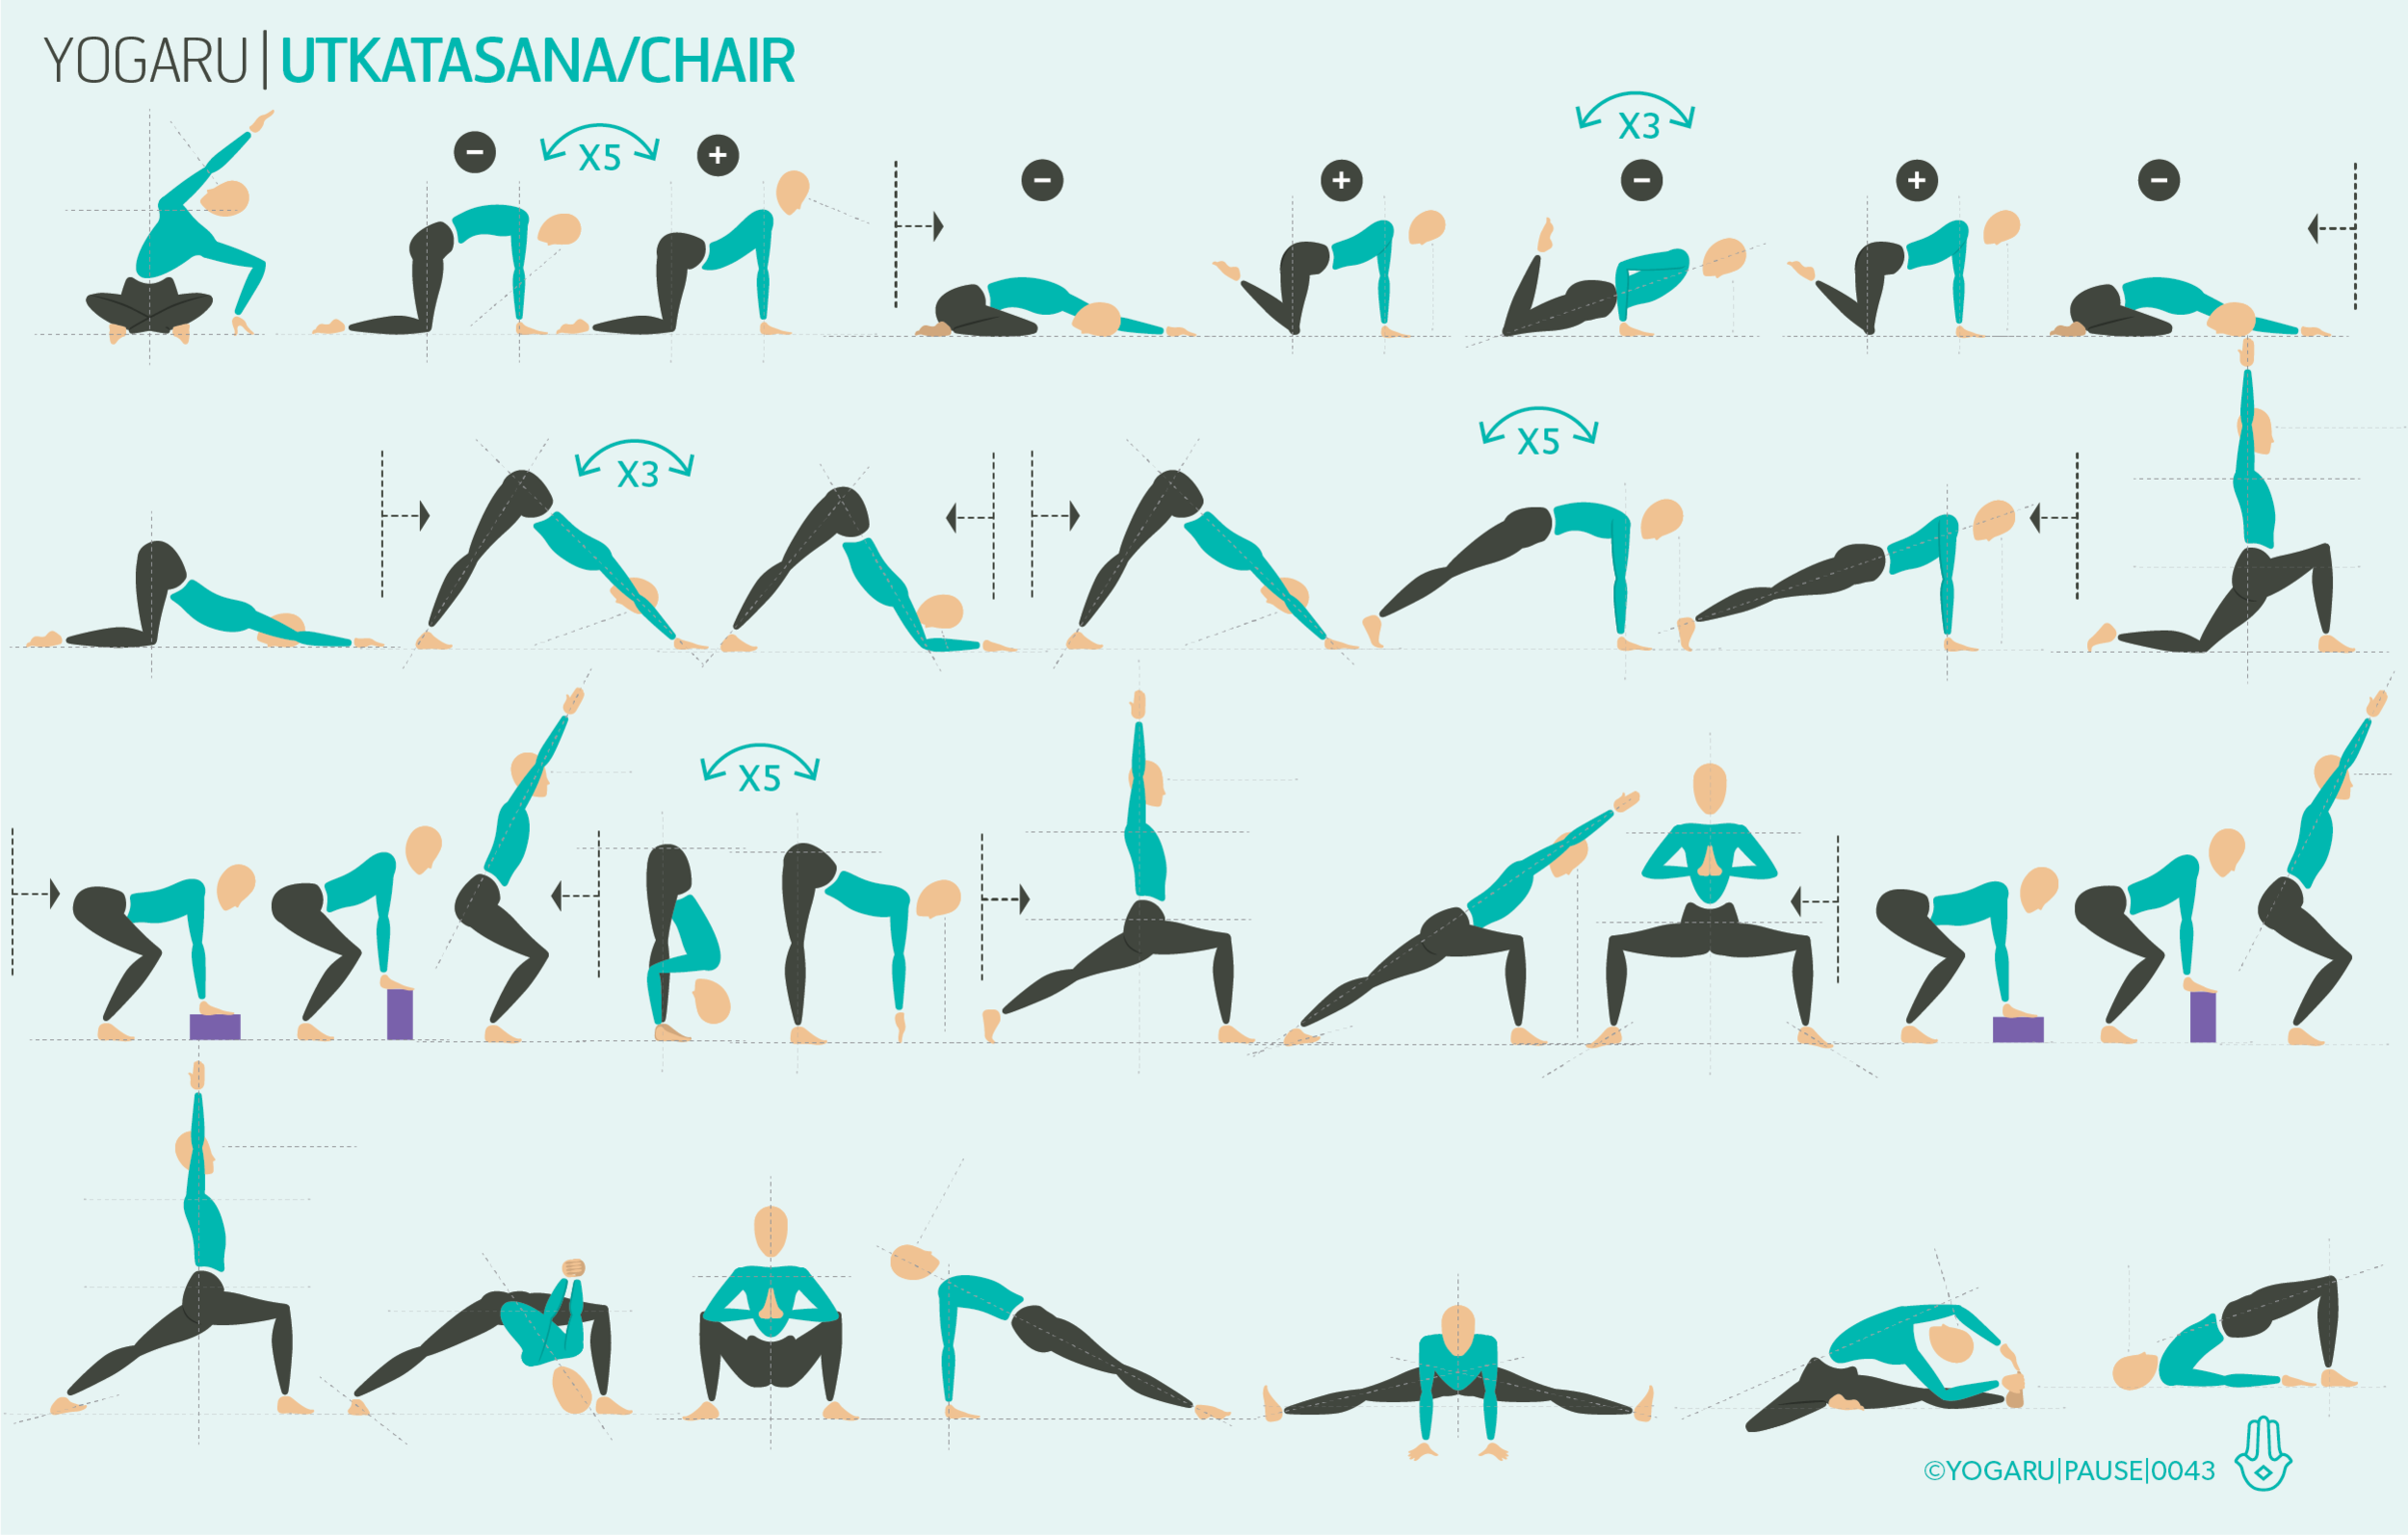
PAUSE_0043.png

ALIGNMENT CUES
Try the above sequence which breaks Utkatasana/Chair into three stages. It is not an asana that is easy to hold for many breaths, take a restorative forward fold in between each step, as you explore your alignment. The first two stages of the steps use a brick to support the upper body, while you settle the pelvis into position.

The following are some alignment cues to help you find a Utkatasana/Chair with effort & ease. Print them out, along with the sequence, and play around with what makes sense to you:

  • Ground down through your heel, top of the thighbones press down towards your heels.

  • Inner thighs lifted, as you hug your outer hips to the midline, press into your big toe mound to keep your knees tracking over your ankles.

  • Draw your navel in towards your spine and feel into the strength of your lower back.

  • Lengthen up through your side body and reach from your tailbone to the tip of your crown.

  • Broaden through the collarbones, feel into your shoulder blades spin out and hug against your back ribs, soften any tension from your shoulders.

To save the images for personal use click and hold down the image until the ‘save image’ option appears; on Mac hold down ‘control’ and click the image to get the option box; on PC right click on the image to get the option box. Scroll down in the ‘option box’ and click ‘save image’.

Ruth Delahunty Yogaru